It’s all fun and games until someone looses an AI

What follows is a story about my journey into AI driven network automation, and here’s what I hope you’ll get out of it:

  • How to use AI well in the context of network automation
  • When traditional network automation is a better fit
  • Why AI isn’t going to replace you as a domain expert
  • What you can do to start your own journey
  • Who can help you along the way

If you want to jump straight to what I did, check out these two GitHub repos:

1. System Acceptance Tests for AOS-CX switches, using Robot Framework against the AOS-CX REST API:

github.com/crispyfi/robotframework-aos-cx

2. A complete demo that you can try yourself using GitHub CodeSpaces for free:

github.com/crispyfi/cx-sat-demo

Laziness is the mother of all engineering

I started working on a bunch of projects this year, involving multiple large campus network deployments.

Following a common architecture, most of the design, configuration and testing was repeatable across sites.

Looking at the mountain of repetitive (tedious) work ahead of me – it’s 2026, so you can guess what comes next…

AI can help?

This has been the catch cry of the networking industry at the moment.

In the HPE Networking world, it’s called the Self-Driving Network, and its a great use case for AI, since it involves:

  • Crunching lots of data
  • Finding patterns and connecting the dots
  • Creating actionable insights

Generative AI refresher

It’s important to remember at this point what AI actually does, and what it doesn’t do.

It doesn’t “think” with logic – it’s predicting the best answer based on its training sources. Like predictive text on steroids.

It is also designed to sound confident, but a lot of times it is confidently wrong.

Strengths:

  • Generates text that looks similar to what a human would write
  • Reads lots of text really fast
  • Surprisingly good responses to a wide variety of tasks

Weaknesses

  • It might not always “pay attention” to everything in the prompt
  • It might not consistently give the same answer
  • Everything is a hallucination – but it’s correct surprisingly often

Groundhog Day

If you live in the Professional Services world (like me), most of our time is spent on Day-0 or Day-1 operations.

In this world, everything is about:

  • Consistency
  • Reliability
  • Repeatability
  • Auditability
  • Running in customer environments

All things that AI is not known for being good at.

Try not

I’m faced with a dilemma: I have a lot of repeatable work, but I can’t trust AI to help.

So now I do what any Padawan does – go and talk to a Jedi Master.

Fortunately for me, there is one in the family – my brother.

He’s a real software developer (you know, the beard, socks & sandals kind). He also happens to have a PhD in Machine Learning and runs training on Python, Git and using Generative AI

The solution to this problem is obvious to him, he’s been saying it for 900 years:

“Python, Git, CI/CD. Once you start down the dark path, forever will it dominate your destiny. Consume you, it will”

Mind the gap

That’s right, traditional network automation – the kind that all the cool DevOps kids are using.

So why are so few network engineers doing it?

For me, this XKCD comic pretty much sums it up:

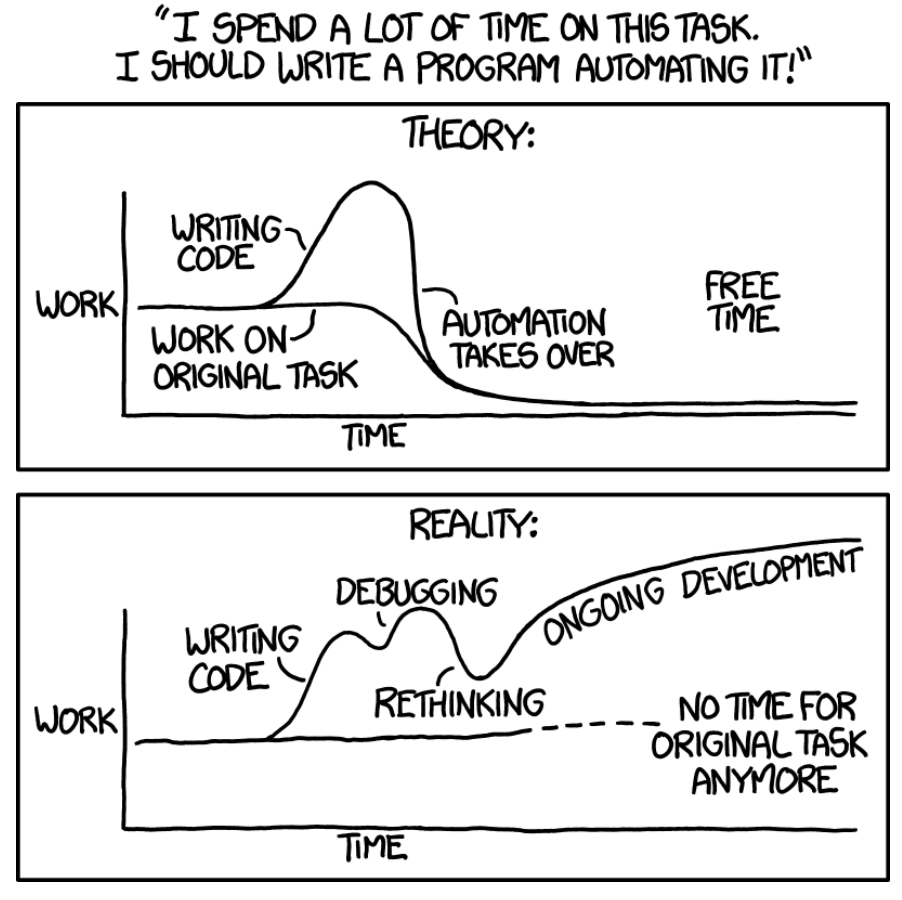
This was my justification for not automating things. I’m sure you can relate.

I’m NOT a software developer and I didn’t study computer science.

I do understand basic programming concepts, for loops, variables, de-coupling, and have written (plagiarised and hacked together) a few scripts over the years.

But this is like having a tourists level understanding of French – enough to have a basic conversation, but no more than that.

Use the force Luke

With the explosion of Generative AI, there is now a ‘force multiplier’ available.

Learning Python is no longer a barrier to automation.

So what did this mean for my projects?

A journey of 1000 miles…

Before starting on my big projects this year, I was inspired by a colleague of mine who was doing API automation for deploying a similar config to multiple sites.

I started playing around in my HPE Networking Central lab to see if I could automate some of the standard configuration I would deploy at a customer, it sort-of worked but it prepared me for what was next.

When I came into the big project environment, I struggled to find standard configs or my teams ‘current’ or ‘best’ way of doing things, so I had to pull all it this together from some existing deployments before deploying my first site.

Fortunately for us, we had a well-defined architecture and set of design guidelines, as well as a clear high-level design.

The first thing I built was a config generator. It was the spiritual successor to an Excel spreadsheet full of VLOOKUP and CONCAT functions, requiring some clever find/replace in NotePad++ before it was finally paste-able in a switch.

I had a free ChatGPT account that I used to write my code, which I’d paste into a text editor, then copy/paste bugs back into the prompt.

Level Up

The free account didn’t cut it for long so I upgraded my plan and started using the VSCode extension, which allowed ChatGPT to read and edit one file at a time. It made a massive difference, and helped me build a few tools:

  • Config generator that takes an Excel workbook as input, and renders config files using Jinja templates
  • HPE Greenlake device inventory tool that can add & assign devices to an MSP tenant, attach a subscription and assign to a Central pre-provisioning group
  • Created Classic Central template groups and uploaded config templates and variables files written by the config generator

The value of these tools was massive, and as a result we got:

  • Consistent config across projects
  • Our ‘best approach’ as code, with a record of all changes in version control
  • Lessons learned are incorporated to eliminate repeating issues
  • Minimised risk of human error
  • Efficiency: we saved tens of hours per project
  • Better job satisfaction – removal of tedious tasks

I also learned A LOT. It was time to go deeper down the rabbit hole.

Je m’appelle Claude

After I saw a demo of Claude Code, everything changed. I immediately signed up for a Pro subscription.

All of the things I had struggled with using ChatGPT were addressed:

  • Less suggestions resulting in ‘feature creep’
  • A dedicated plan mode
  • The ability to work on an entire repo instead of one file at a time
  • Better context and session management

It was almost like it was designed to do exactly what I was doing. I guess the hint is in the name 😛

If you don’t know, Claude Code is, in a nutshell it is an agentic coding tool that you can run inside your terminal or IDE.

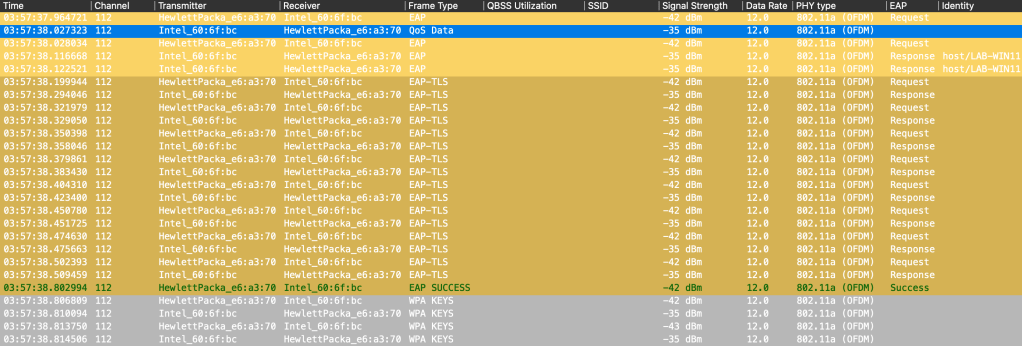
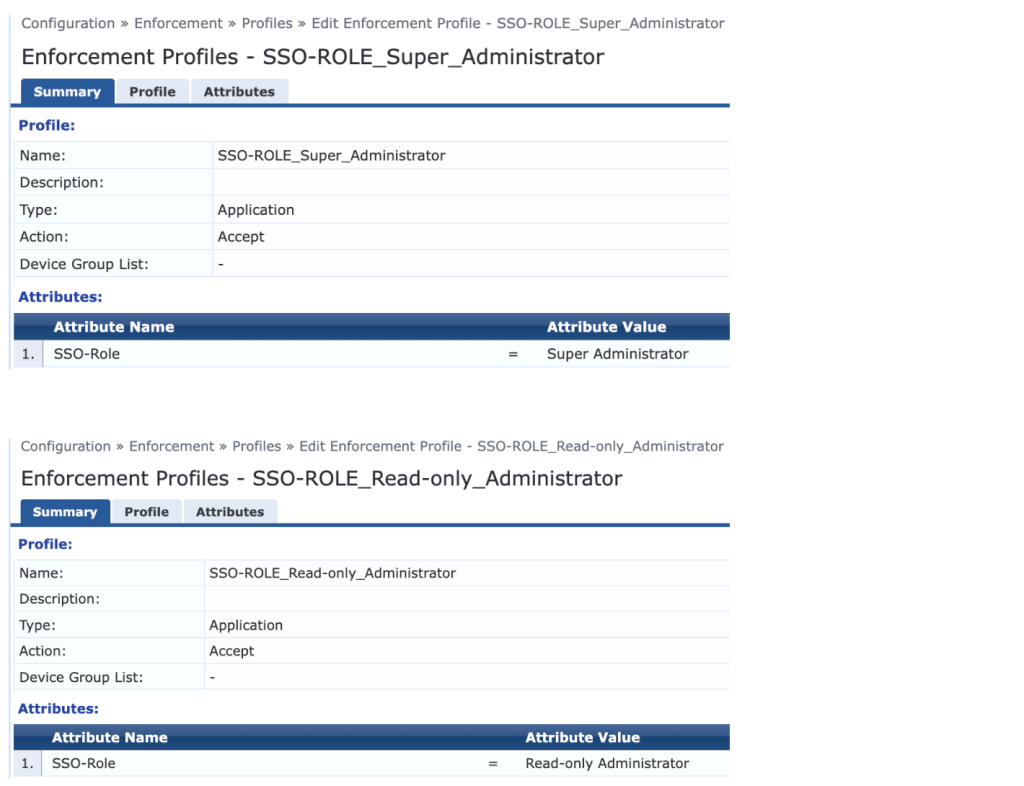
The fat cat SAT on the mat

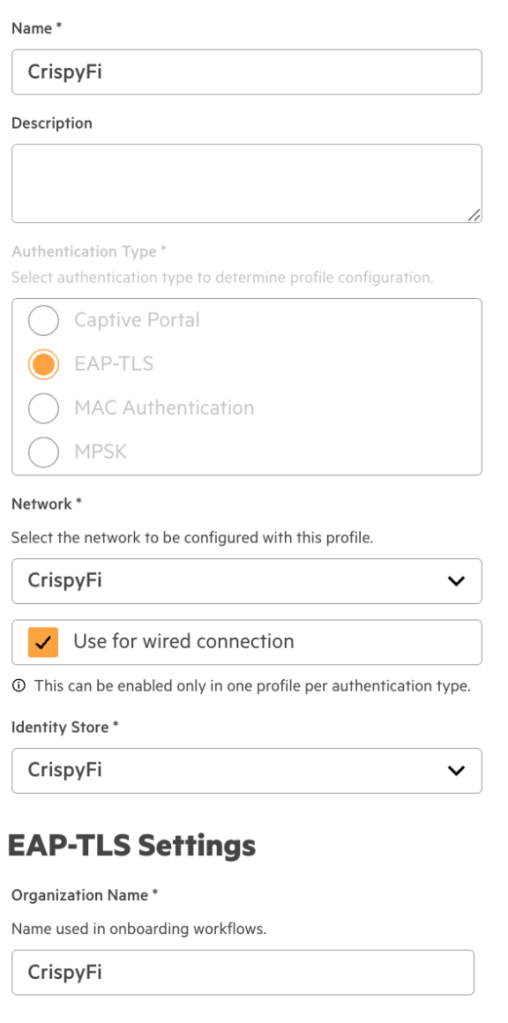
Armed with Claude Code, and after a mind-blowingly fast refactor of my first round of tools, it was time to have a crack at the holy grail – Systems Acceptance Testing.

Systems Acceptance Testing or SAT is what happens at the end of the project before User Acceptance Testing. Its about proving that the network meets all of the requirements, and matches all of the specifics in the design.

The current approach was running multiple ‘show’ commands via SSH, pasting the results into a spreadsheet, and eyeballing the output to see if the test case passed. Almost a hundred test cases for between 20-30 switches in one deployment.

Switching was definitely going to give us the best return on investment for automation, so we started with that.

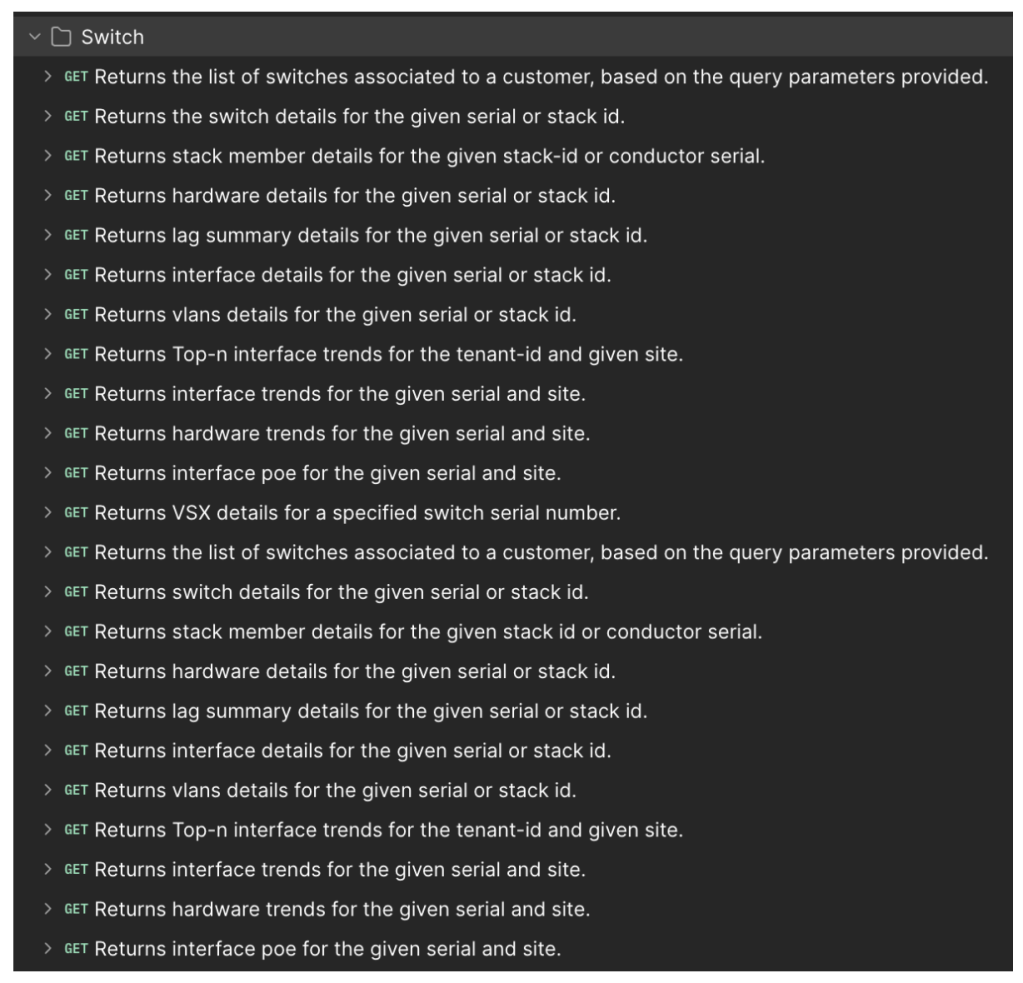
Using the Central API was our first choice, but we quickly discovered it didn’t have anywhere near the coverage we needed for our test cases.

An initial version took a ‘show tech’ output, split it into sections, and put it into a report for human review but we could do better.
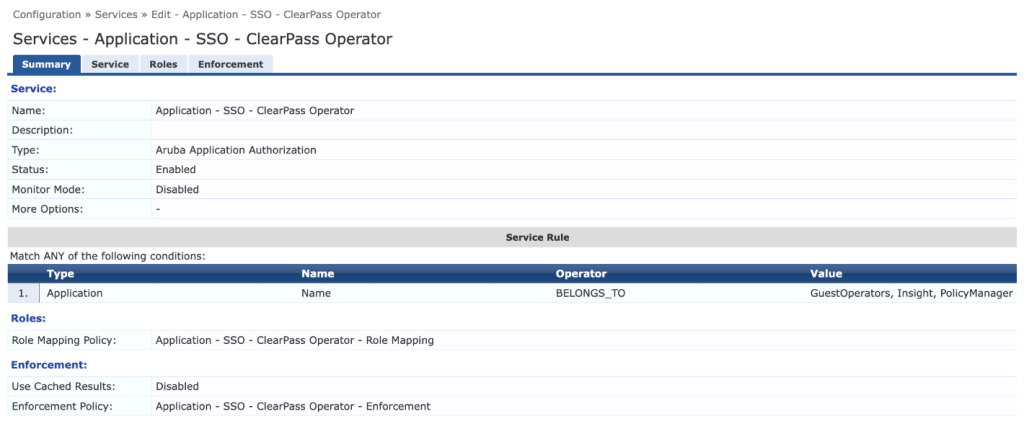
APIs

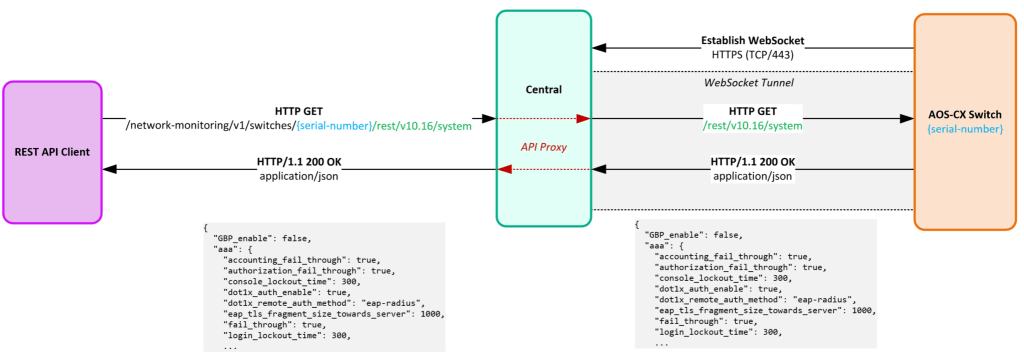
As it turned out, the AOS-CX API had the best API coverage, but it came with the challenge of needing our test runner to be deployed inside the customer environment, which was tightly locked down.

If Central allowed us to query the AOS-CX API for managed devices, it would make our lives a lot easier. See my previous post for a feature request we submitted for this.
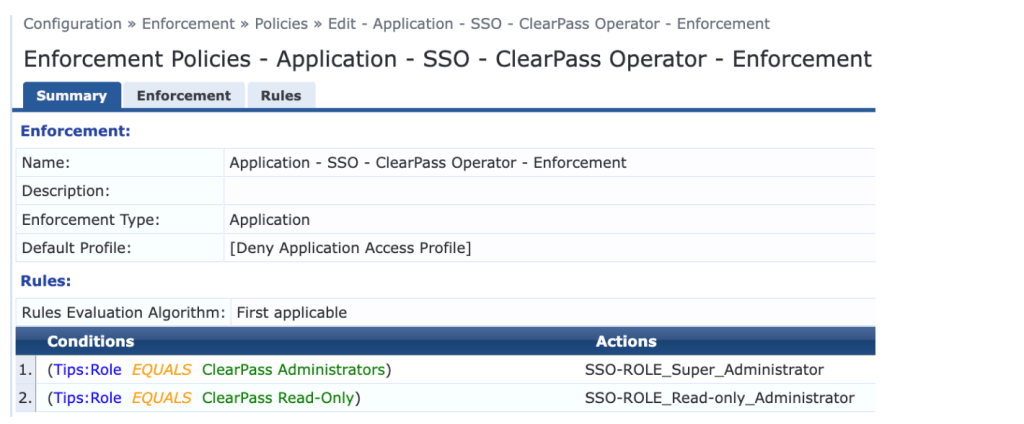
I..AM…A…ROBOT

My Jedi Master (brother) suggested using Robot Framework for running our test cases.

It’s Open source, and uses human-readable test cases, with Python libraries on the backend.

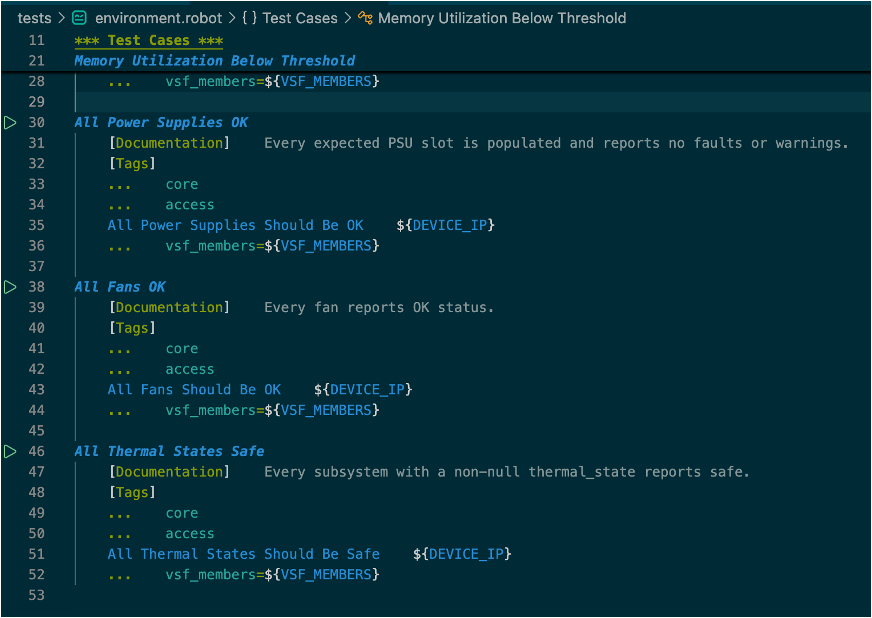
It also had really nice looking HTML-based reporting out of the box.

We would just need to build the test cases and Python code for each test case…anyone know a good Python developer?

AI to the rescue

With Robot Framework (traditional automation) taking care of running the tests in a predictable, auditable way, we figured we could use AI to write the test cases!

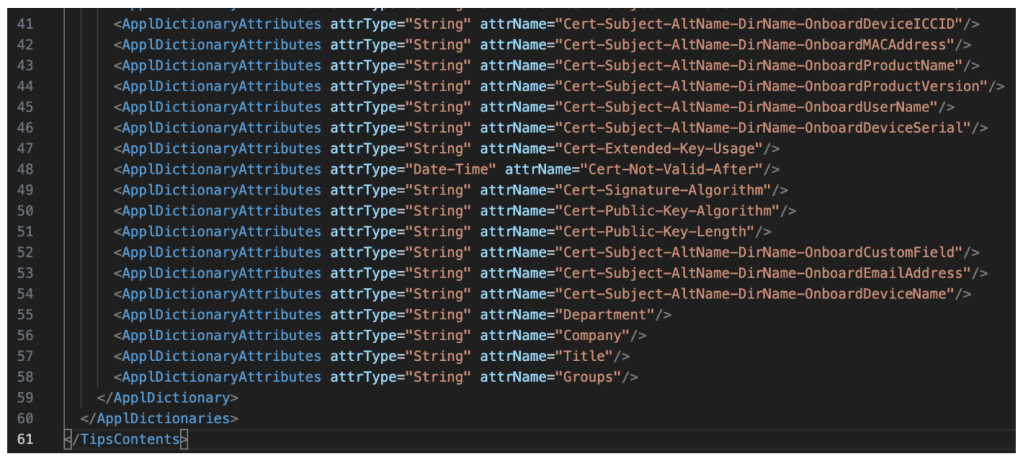
So we took a JSON export of the AOS-CX Postman Collection, de-duplicated it a bit so it would fit inside Claude Code’s context window, and created a skill where it would take a test case described in plain-English, and use a discovery script to query whichever API endpoint looked like the best one.

On paper this sounded great – the perfect way to use AI. I tried it out on a couple of simple examples: Check that the timezone is correct, check that VSX is healthy. It worked brilliantly. So I fed it the whole list of test cases.

That’s when things fell apart. Most of the test cases didn’t work at all.

I even tried querying a bunch of endpoints in advance, sanitising the output to remove customer info, and asking Claude to use that.

All I ended up doing was blowing through my subscription limits at the beginning of the week and my extra usage.

Back to the drawing board

After taking a break for a few days, I took another look at it.

To conserve token limits I put instructions into CLAUDE.md not to read the sample API data, and to split the monolithic Python library into multiple files, to work on one at a time, clearing my session between each.

I took the discovery script I’d given to Claude and started using it myself.

It was actually fun, looking at the output, figuring out exactly which key translated to the item I needed to check in the config. It wasn’t always obvious, but it was a rewarding challenge.

I’m the captain now

And then it dawned on me. I should be doing this part because I’m the domain expert.

AI isn’t as good at figuring this stuff out.

Armed with this new approach I worked through over 100 test cases, then tested them, refined them and re-architected a few times.

The proof is in the pudding

I finally got all of the test cases to pass (at least the ones that should have been passing) and the payoff was immediate, and big.

For an in-flight project, I was quickly able to pickup a number of issues that were able to be resolved before cutover, some requiring reboots. Had I discovered these later, it would have involved planned outages.

Because this was validating design intent vs deployment, it wasn’t something that Central could have alerted on either.

The penny dropped

So now I finally know how CI/CD testing feels, and why Jedi Master Yoda has been drumming on about “Why aren’t you doing this for the networks you build”. The penny dropped.

Here are some other things he said A LOT of times that came in very handy:

Use an AI-friendly IDE

  • Not notepad++
  • VSCode is a solid choice

Use Version Control

  • Setup your own GitHub account
  • Create a private repo for your project
  • Sync to your laptop
  • Commit and push often

Document

  • Keep README.md up to date
  • If you don’t already, start writing in Markdown!
  • Obsidian is a great app for note taking
  • Markdown is portable and can be used in a lot of places, including an LLM

Learn software development principles

Things I learned (the hard way)

Now here are some lessons I learned that hopefully you can avoid. Some of these are obvious, but weren’t immediately obvious to me:

  • Check your spend limits for extra usage!
  • Bigger context windows use more tokens
  • Work on small chunks of a project at a time
  • Start a new chat / session or clear context before moving onto the next task
  • Discuss your requirements, architecture and plan before allowing any code to be written
  • Test often!
  • Use AI in your IDE where it can read and edit multiple files (e.g. Claude Code or Open Code)

Before typing your first prompt, remember:

Don’t trust the output of an AI unless you can verify it #ZeroTrustAI

Treat it like a junior dev who has just has 1000 Red Bulls.

If you don’t understand what the Python code is doing, ask someone who does to look at it for you before running it in a customer environment.

Red Pill or Blue Pill?

“You take the blue pill – the story ends, you wake up in your bed and believe whatever you want to believe.
You take the red pill – you stay in Wonderland and I show you how deep the rabbit-hole goes.”

If you haven’t started your network automation journey, my challenge to you is to take the red pill.

Here are some tips to get started:

  • Get inspired! Check out what other people are doing
  • Start small, pick one problem to solve, something that annoys you or you hate doing
  • Don’t worry if you end up throwing it away at the end, you’ve still learned something
  • Get others in your team onboard, demonstrating value builds momentum
  • Experiment
  • Sign up for a free trial
  • Pay for an LLM subscription for a month
  • Find your own ‘Jedi Master’ who can help you

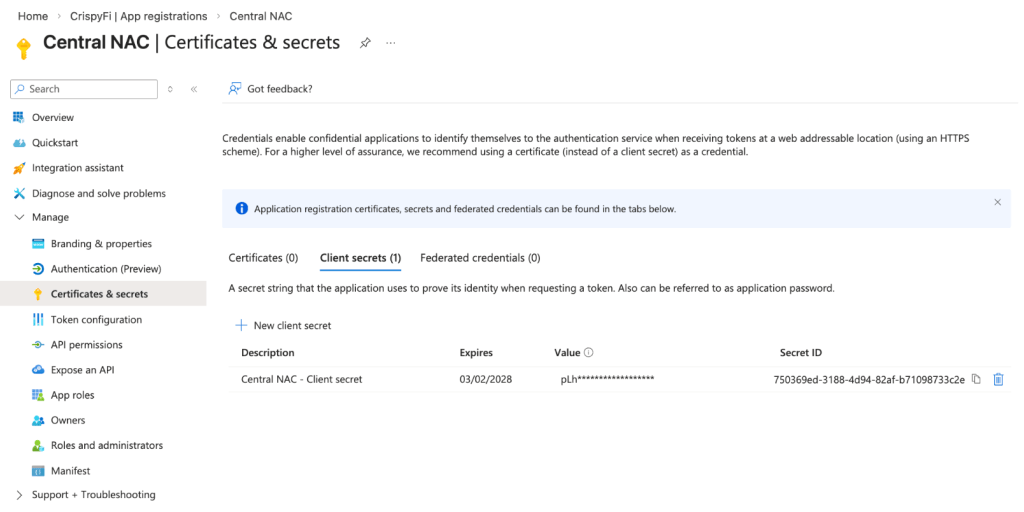
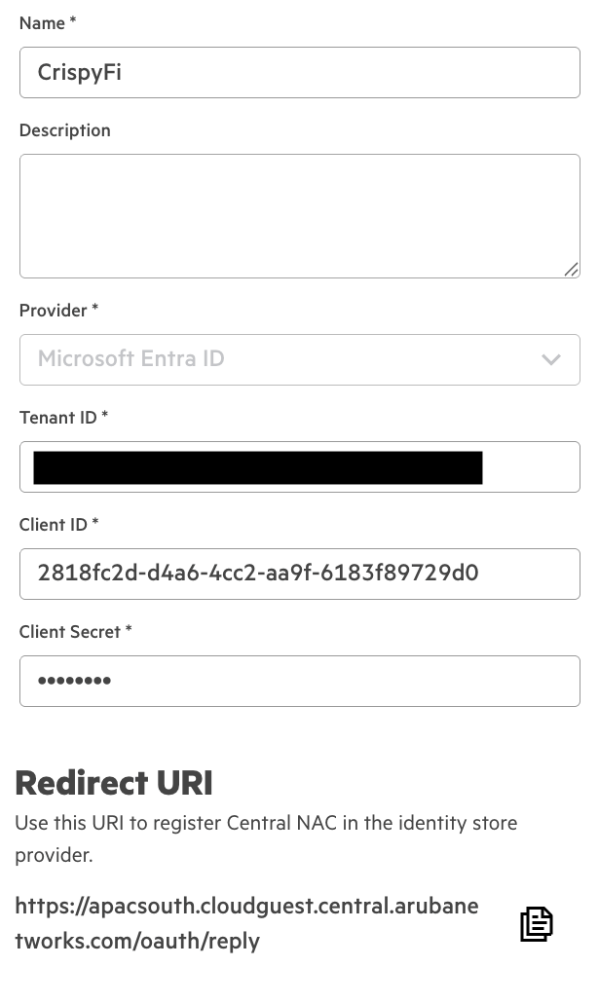
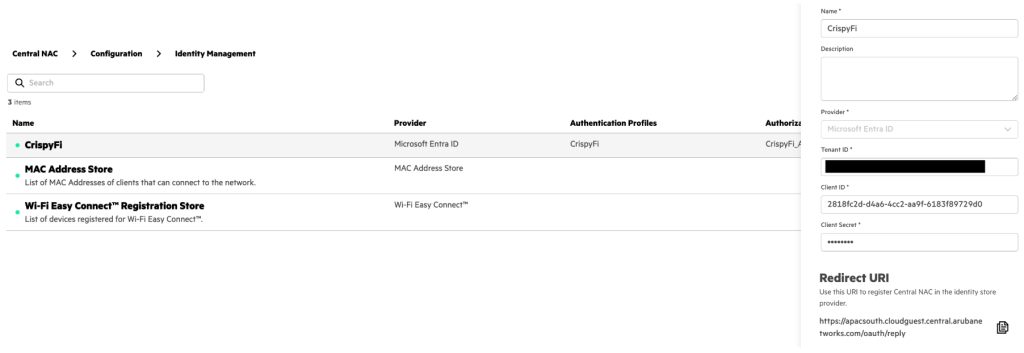
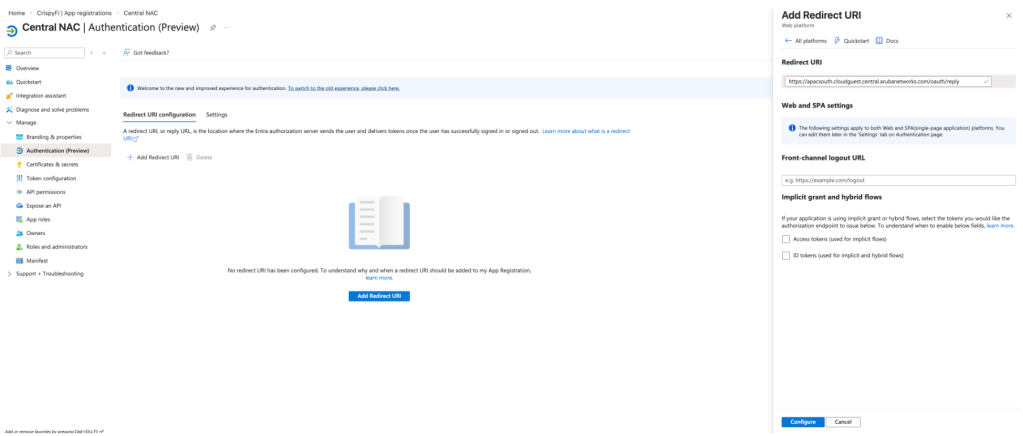
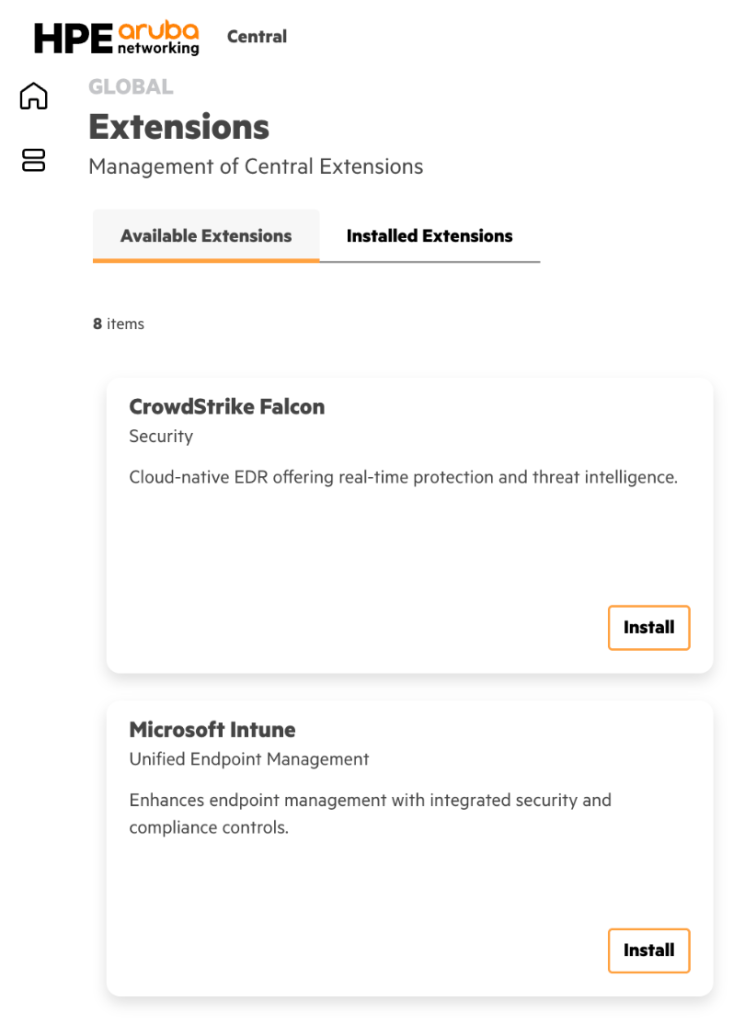
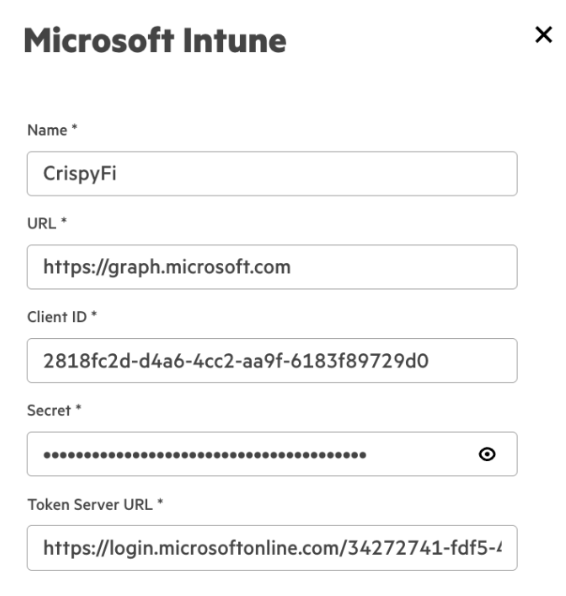
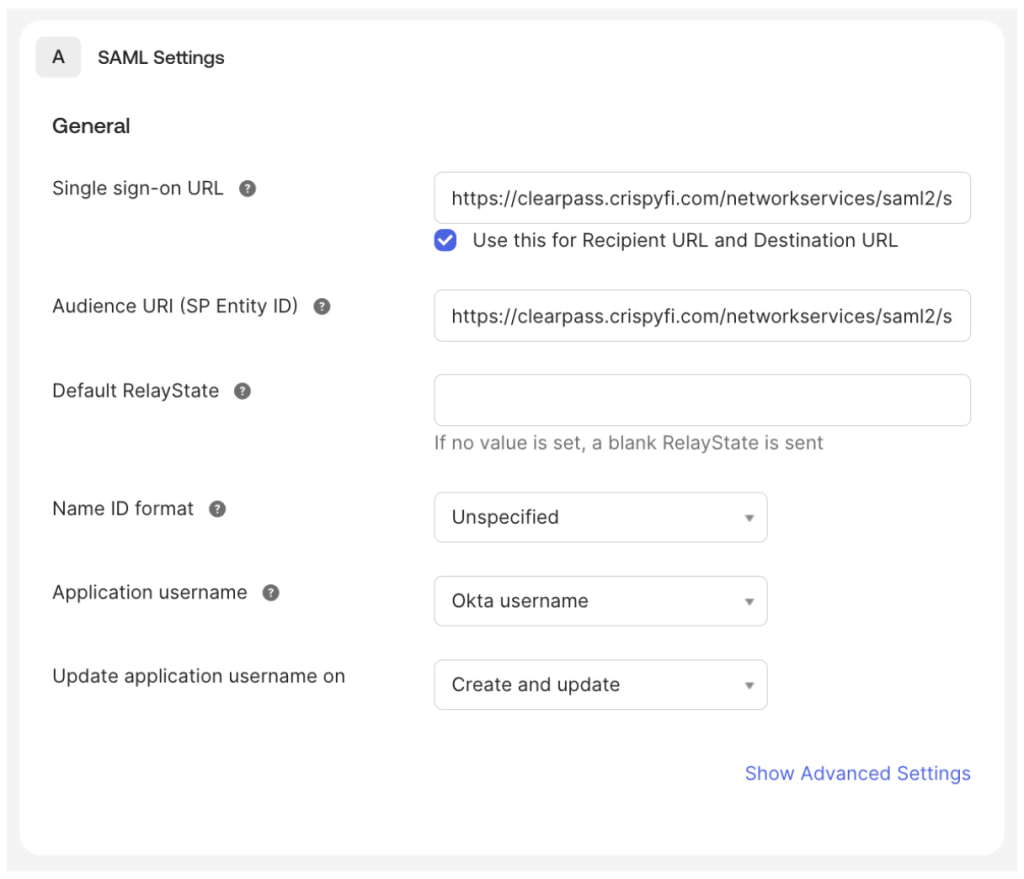
If you want a practical thing you can do right now, go and sign up for a Claude Code Pro Subscription and setup the Central MCP integration in your lab. It will only take you 30 mins.

TechNoon

As I mentioned, my brother has put together some FREE training resources, under the TechNoon initiative which he also runs as ‘lunch and learn’ style training.

Hit up TechNoon if you’d like to engage them to run training in your organisation.

Closing time

AI is powerful but it needs to be applied to your problem in the right way.

Maybe the best thing AI has done for networking is remind us about traditional network automation.

Just scroll LinkedIn and look at the plethora of tools that people are creating.

People have said: “AI won’t take your job, someone who uses AI will” and “AI will only replace entry level jobs”.

My take is this: AI is a superpower in the hands of a domain expert.

Together you can be unstoppable.

Bonus: MCP Server

After writing the post I was thinking about whether any of the code from the test cases could be re-used for an MCP server.

Turns out the answer is a big YES.

So on one of my flights to Tech Jam that happenned to have Wi-Fi, I fired up Claude on my phone.

I asked it to create an MCP server for AOS-CX switches, re-using what it could from what we’d already built.

It wrote the code in a separate branch and created a Pull Request for me to approve and merge the changes.

Building an MCP server using AI coding from 30,000ft. What a time to be alive!

I started with porting a couple of the tests (VSX and LACP) and adding a new tool which grabs the running config in sections (to conserve tokens), that can be used by an LLM depending on what it is troubleshooting (e.g. VSX).

I had to add a tool that allowed it to read the list of devices in my lab from a YAML file that was also used to drive the tests using Robot Framework.

I also added some next_steps to tell an LLM that if it found issues in the VSX tests that it should record relevant info, check the config and if relevant run another check. Again using the VSX example, if the ISL reports issues it should run the lacp_checks tool to

You can see how powerful this could be for troubleshooting.

Here’s are some screenshots of it in action, but better still – it’s part of the demo repo so you can try it yourself using the lab environment!

github.com/crispyfi/cx-sat-demo

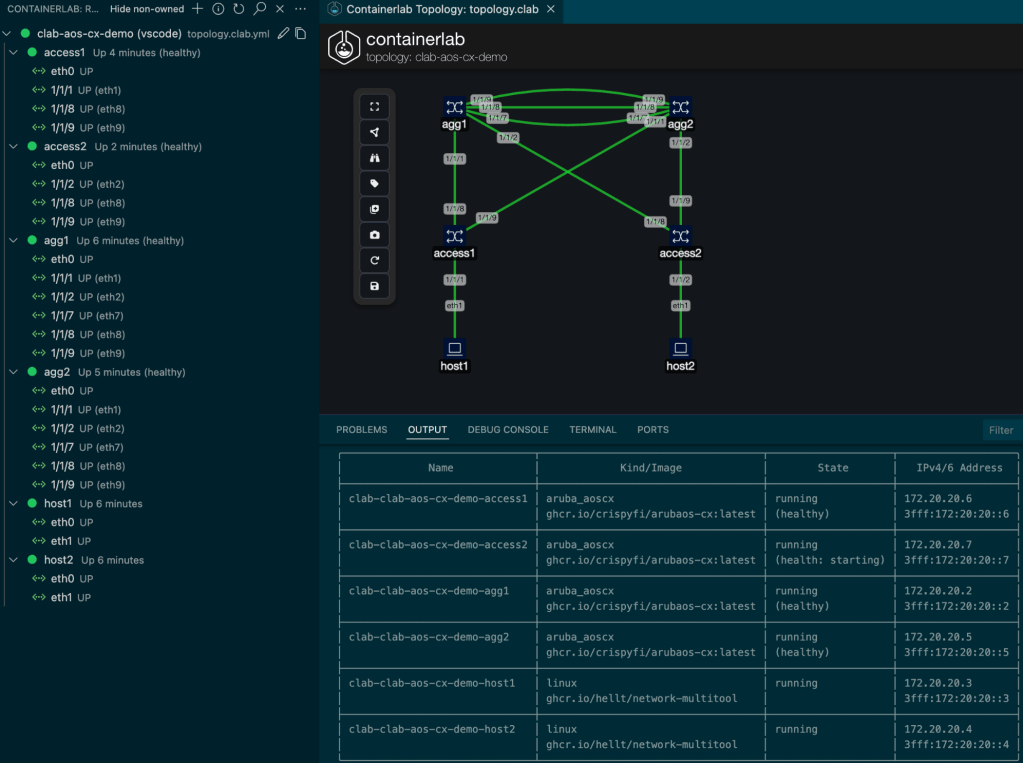
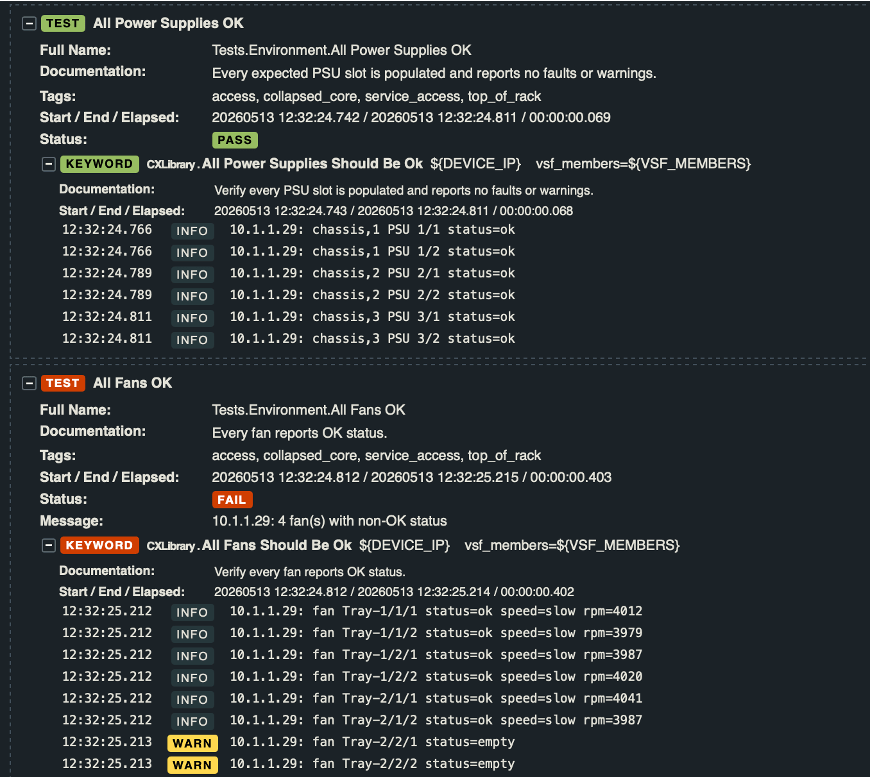
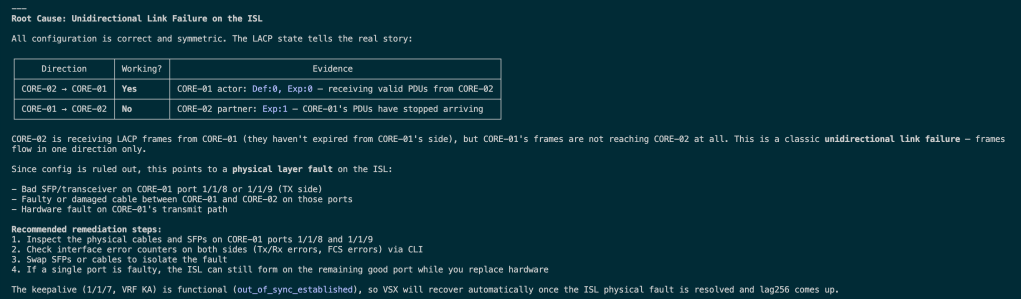
Using Containerlab, I was able to add 100% packet loss to both of the ISL links, check out how Sonnet 4.6 used the MCP server to troubleshoot and diagnose the issue:

First, it uses the device discovery tools and runs the VSX checks (since that’s what we’re troubleshooting):

After identifying that the ISL down, it runs the LACP checks:

Next, it looks at the related config to make sure its not a config issue:

After determining the config looks good, it decides that there is underlying physical issue (for demo purposes, I told Claude not to peek at any of the underlying Containerlab config so it is simulating a real investigation).

Hopefully I can find some time to port the rest of the features!

Bonus 2: The CLI isn’t dead

Here’s some food for thought.

MCP can be quite expensive from a token usage perspective, especially as you add more tools into the mix.

In a lot of cases, an LLM driving a CLI can be more efficient.

Why? Because it can use one shot commands to filter output like grep or tail, and it has been trained on years of data from the Internet showing CLI output from engineers troubleshooting using CLI.

This affects HPE Networking in a slightly different way, since a lot of the examples it would have been trained on would have a heavy Cisco bias.

That’s right. We’ve come full circle back to show commands.

The difference is AI is now running the commands (via API preferably) and dealing with the output. Because that’s what its good at.

On that bombshell, see you in the next post!

A tale of two APIs and a humble (feature) request

I’ve been doing some automation work lately that involves validating specific state information for AOS-CX switches.

Being a good digital citizen, I reached straight for the Central MRT API.

I very quickly discovered that the things I needed to check weren’t covered by the API.

Looking at the Postman Collection, the MRT API can show basic info on hardware, interfaces, VLANs, stacking, PoE, VSX.

But what about STP, OSPF, BGP, NTP, PIM, AAA, QoS? And all the rest of the TLAs?

show me how to live?

As a hack workaround, you can run a fixed list of ‘show’ commands via the API and read the result – but parsing unstructured text is not the way.

Classic Central offers a few different show commands that aren’t on the Central MRT list but we’ve still got the problem of unstructured text, and Classic Central’s days are numbered.

Go straight to the source

The best option for the most complete dataset in one place turns out to be the AOS-CX REST API. It’s a one-stop shop.

Unfortunately it means connecting to each device directly from inside the network. Aren’t these cloud managed switches though?

And here’s the pitch!

What if there was a way to access the full AOS-CX REST API in all its glory from Central?
Then we could get the best of both worlds: A rich API with the convenience of cloud accessibility.

Most of the puzzle pieces already exist:

  • An authenticated WebSocket between Central and the switch
  • A mechanism for Central to send GET requests to the AOS-CX REST API through the WebSocket and process the response (this is in fact where some of the data shown in Central comes from)
  • A northbound API that allows you to query a specific switch based on its serial number

All I want for Christmas is…JSON

Dear HPE,

I promise I’ve been good this year.

Please can you build an API proxy so that we can make GET requests to the AOS-CX REST API via Central?

We’ll even buy Advanced Central Subscriptions.

Crispy

P.S. Enjoy the cookies!

(Seriously, don’t forget to reference the cookie ID for subsequent requests after logging in to the AOS-CX REST API!)

An application diagram is worth 1000 words

Here is an example of what this feature could look like if implemented:

Sharing is caring

If you think this would be useful, please share this with your local SE team!

OpenRoaming with Central NAC

This will be a day long remembered

In only a few minutes you can setup HPE Aruba Networking Central NAC to allow anyone with an OpenRoaming profile to connect to your Wi-Fi network.

Central NAC will perform the Access Network Provider (ANP) role in the OpenRoaming ecosystem, functioning as a RadSec proxy for authentication to the user’s home Identity Provider (IDP).

This will be a short post because it literally took me five mins to setup and test this after hearing it is now possible.

When in Roam

I already had the Purple OpenRoaming profile installed on my phone, but any OpenRoaming profile will do.

See my previous blog post for more info: Purple offers OpenRoaming for free (as in beer!)).

If you’re an iOS user you can download the OpenRoaming App from the app store, or for Android you can connect with a native Google account profile straight from your device.

There is also OpenRoaming Connect that you can use to try out OpenRoaming.

Hold my beer

1. Create a WLAN Profile, the SSID can be called anything you like (literally that, if you want).

Pick WPA3-Enterprise (because friends don’t let friends configure WPA2-Enterprise), select Central NAC and check Air Pass.

2. Like the small ‘i’ says, head over to Air Pass in Central NAC and create an Air Pass Profile.

Select the built-in OpenRoaming (All) provider, select your Network and Site from the drop-down menu, enter your domain name, select site type and click Create.

You can also create a custom Air Pass Provider with

You can also create a new Air Pass Provider with a custom RCOI and Realm list if you’d prefer.

3. And you’re done. I’ll have my beer back now thanks.

PCAPs or it didn’t happen

A good post wouldn’t be complete without a packet capture using the famous MetaGeek Colouring Profile.

Here you can see my device authenticating using EAP-TTLS with an anonymous outer identity courtesy of Purple.

The green EAP Success pretty much sums it up.

Wi-Fi, Wi-Fi, Wi-Fi the Explorer

Here is another screenshot from Wi-Fi Explorer Pro for good measure:

Closing Time

For more information, head to HPE Aruba Networking Central Online Help.

EAP-TLS with Entra ID + Intune + Central NAC w/ PKI


Overview

This deployment guide describes how to configure HPE Aruba Networking Central NAC with Microsoft Entra ID and Intune to:

  • Authenticate Windows 11 users and devices using EAP-TLS
  • Assign access roles based on Entra ID group membership
  • Enforce Intune compliance
  • Perform client certificate enrolment against Central NAC PKI
  • Deploy all required client configuration using Intune

It is possible to configure all of the above using the core feature set of Central NAC which does not require any additional licensing beyond Foundation AP licenses.

The following components must be configured:

Microsoft Entra ID

  • App Registration

Central AP Config

  • Roles
  • WLAN Profile

Central NAC

  • Identity Store
  • Intune Extension
  • Authentication Profile
  • Authorization Policy

Microsoft Intune Configuration Profiles

  • Trusted certificate profile
  • SCEP certificate profile – Device
  • SCEP certificate profile – User
  • Wi-Fi profile

It is assumed that an existing Microsoft Entra ID tenant with Intune licensing is available with a Windows 11 device already enrolled.

A special thanks to Nicolas CULETTO for creating the Technote that helped with the UEM component.


Microsoft Entra ID – App Registration

1. Navigate to Entra ID > App Registrations and click New registration

ParameterValue
NameCentral NAC
Supported account typesAccounts in this organisational directory only

2. Record Application (client) ID

3. Record Directory (tenant) ID

4. Navigate to Manage > API permissions

5. Grant API Permissions:

Intune – Application permissions
scep_challenge_provider
get_device_compliance
Microsoft Graph – Application permissions
Application.Read.All
DeviceManagementManagedDevices.Read.All
Directory.Read.All
Group.Read.All
User.Read.All

6. Grant admin consent for App Registration

7. Navigate to Certificates & secrets > Client secret > New client secret

BEFORE LEAVING SCREEN: Record client Secret Id and Value


Central AP Config – Roles and Policies

IMPORTANT: Roles and WLANs must be created at the Library level to be visible by Central NAC.

1. Create two roles in the Configuration Library, and assign the Device Function and Scope as follows:

2. Create a role-based policy in the Configuration Library, create rules for the newly created roles above and assign the Device Function and Scope as follows:

Central AP Config – WLAN Profile

1. Create a WLAN profile in the Configuration Library with the following configuration, and assign the Device Function and Scope as follows:

ParameterValue
Name<WLAN Profile Name>
ESSID NameEAP-TLS
Security LevelEnterprise
Key ManagementWPA3-Enterprise(CCM-128)
Server GroupCentral NAC
Organization Name<Your Organization Name>
Client IsolationEnabled
Enforce DHCPEnabled
802.11rEnabled

Central NAC – Identity Store

1. Navigate to Central NAC > Configuration > Identity Management and click Create Identity Store

2. Add the following configuration and click Create

ParameterValue
Name<Identity Store Name>
ProviderMicrosoft Entra ID
Tenant ID<Tenant ID from App Registration>
Client ID<Client ID from App Registration>
Client Secret<Client Secret Value from App Registration>

3. Copy and record the Redirect URI

4. Under the Entra ID App Registration, navigate to Manage > Authentication and click Add Redirect URI

5. Select Web platform, paste the Redirect URI from the Identity Store and click Configure


Central NAC – Intune Extension

1. Navigate to Extensions > Available Extensions and click Install next to Microsoft Intune

2. Add the following configuration and click Create

ParameterValue
Name<Extension Name>
URLhttps://graph.microsoft.com
Client ID<Client ID from App Registration>
Secret<Client Secret Value from App Registration>
Token Server URLhttps://login.microsoftonline.com/<Tenantid>/oauth2/v2.0/token

NOTE: Replace <TenantID> in the Token Server URL with your Entra ID Tenant ID.


Central NAC – Authentication Profile

1. Navigate to Central NAC > Configuration > Authentication Profiles and click Create Profile

2. Add the following configuration

ParameterValue
Name<Authentication Profile Name>
Authentication TypeEAP-TLS
Network<Your WLAN Name>
Use for wired connectionEnabled
Identity Store<Your Identity Store>
Organization Name<Your Organization Name>

3. Click the + icon next to UEM Onboarding

4. Configure a name and select Microsoft Intune and the name of your Intune Extension from the drop-down menu

5. Click Create

6. Edit the newly created profile, scroll down to UEM Onboarding and click the profile name

7. Copy and record the SCEP URL and click Download Certificate

These will be used when creating the Intune Configuration Profiles.


Central NAC – Authorization Policy

1. Navigate to Central NAC > Configuration > Authorization Policy and click **Create Policy

2. Add the following configuration and click Create

ParameterValue
Name<Authorization Policy Name>
Policy TypeCustom*
Identity Store<Identity Store Name>
Pre-conditionsAuthentication Type is equal to EAP-TLS

*NOTE: You can use a Policy Type of User if you don’t have a Premium Central NAC license.

3. Click the ellipses next to the newly created policy and click Add Rule

4. Create a rule with the following configuration

ParameterValue
NameUser + Intune Compliant
ConditionsUser Group(<Identity Store Name>) contains User Group Name

And

Client Tags contains any Intune: Compliant
Identity Store<Identity Store Name>
ActionsAllow Access
RoleUSER

5. Create another rule with the following configuration

ParameterValue
NameIntune Compliant
ConditionsClient Tags contains any Intune: Compliant
Identity Store<Identity Store Name>
ActionsAllow Access
RoleMACHINE-ONLY

6. Review the configuration

The first rule will allow user authentication, requiring:

  • Certificate issued by Central NAC CA
  • Member of specific user group
  • Connecting from a compliant Intune managed device

The second rule will allow machine authentication, requiring:

  • Certificate issued by Central NAC CA
  • Connecting from a compliant Intune managed device

This will allow role-based VLAN access for users in different groups, and more restricted access for a Windows 11 device before a user logs in.


Microsoft Intune – Trusted certificate profile

Navigate to Microsoft Intune admin center > Home > Devices | Configuration profiles and Create a New Policy as follows:

ParameterValue
PlatformWindows 10 and later
Profile typeTemplates
Template nameTrusted certificate
NameWindows Central NAC CA

Configuration Settings

ParameterValue
Certificate file<Certificate downloaded from UEM Onboarding Config>
Destination storeComputer certificate store – Root

Assignments

Groups
<Intune Device Group>
<Intune User Group>

Microsoft Intune – SCEP certificate profile – Device

Navigate to Microsoft Intune admin center > Home > Devices | Configuration profiles and Create a New Policy as follows:

ParameterValue
PlatformWindows 10 and later
Profile typeTemplates
Template nameSCEP certificate
NameWindows SCEP Device Certificate

Configuration Settings

ParameterValue
Certificate typeDevice
Subject name formatCN={{DeviceName}}}
Subject alternative nameURI cnac+intune:///?DeviceId={{DeviceId}}
Key storage provider (KSP)Enroll to Trusted Platform Module (TPM) KSP, otherwise Software KSP
Key usageDigital signature, Key encipherment
Key size (bits)2048
Hash algorithmSHA-2
Root Certificate<Trusted CA Certificate Profile>
Extended key usageClient Authentication (1.3.6.1.5.5.7.3.2) under Predefined values
SCEP Server URLs<SCEP URL from UEM Onboarding Config>

Assignments

Groups
<Intune Device Group>

Microsoft Intune – SCEP certificate profile – User

Navigate to Microsoft Intune admin center > Home > Devices | Configuration profiles and Create a New Policy as follows:

ParameterValue
PlatformWindows 10 and later
Profile typeTemplates
Template nameSCEP certificate
NameWindows SCEP User Certificate

Configuration Settings

ParameterValue
Certificate typeUser
Subject name formatCN={{UserPrincipalName}}}
Subject alternative nameURI cnac+intune:///?DeviceId={{DeviceId}}
Key storage provider (KSP)Enroll to Trusted Platform Module (TPM) KSP, otherwise Software KSP
Key usageDigital signature, Key encipherment
Key size (bits)2048
Hash algorithmSHA-2
Root Certificate<Trusted CA Certificate Profile>
Extended key usageClient Authentication (1.3.6.1.5.5.7.3.2) under Predefined values
SCEP Server URLs<SCEP URL from UEM Onboarding Config>

Assignments

Groups
<Intune User Group>

Microsoft Intune – Wi-Fi profile

Navigate to Microsoft Intune admin center > Home > Devices | Configuration profiles and Create a New Policy as follows:

ParameterValue
PlatformWindows 10 and later
Profile typeTemplates
Template nameWi-Fi
NameWindows Central NAC Wi-Fi

Configuration Settings

ParameterValue
Wi-Fi type
Wi-Fi name (SSID)<SSID name>
Connection name<Connection name>
Connect automatically when in rangeYes
Authentication ModeUser or machine
EAP typeEAP-TLS
Certificate server names<SSID name>
Root certificates for server validation<Trusted CA Certificate Profile>
Authentication methodSCEP certificate
Client certificate for client authentication (Identity certificate)<SCEP Device Certificate Profile>

Assignments

Groups
<Intune Device Group>

Deployed Windows 11 Configuration

Although Windows is configured with WPA2-Enterprise, it will happily connect to a WPA3-Enterprise network.

The only differences between WPA2 and WPA3 Enterprise(CCM-128) are the use of a SHA-256 AKM (instead of SHA-1) and requiring Management Frame Protection (which can be used in a WPA2-Enterprise network anyway.

See below showing the 802.1X (SHA-256) (AKM 5) and FT-802.1X (AKM 3) for 802.11r capable clients.

Refer to the WPA3-Enterprise TechDoc for more information:

https://arubanetworking.hpe.com/techdocs/aos/wifi-design-deploy/security/modes/wpa3-enterprise/


Verification

Navigate to Central NAC > Clients to view connections logs, with examples below.

Logs show up almost immediately, you just need to refresh the brower with Ctrl+r.

Computer authentication


Computer automatically connected at logon screen:

Certificate used for computer authentication:

Packet capture of computer authenticaiton:

Central NAC is using TLS 1.3, which means the certificate exchange is encrypted:

User authentication

User automatically connected:

Certificate used for user authentication:

Private Root CA, created per Central tenant:

ClearPass Okta SSO Integration

ClearPass can be configured to use Okta for Single Sign-on using SAML for administration, Guest or Onboard provisioning.

This post will be focused on using Okta for administrative login.

Okta Application Configuration

An Application must be created in Okta to support this, with a appropriate management user group(s) assigned.

1. Navigate to Admin Console > Applications > Applications and click Create App Integration

2. Select SAML 2.0

3. Enter a name for the App, check Do not display application icon to users and click Next

4. Populate the Single sign-on URL and Audience URI (SP Entity ID) fields based on the values below:

Single sign-on URL

https://<Publisher FQDN>/networkservices/saml2/sp/acs

Audience URI (SP Entity ID)

https://<Publisher FQDN>/networkservices/saml2/sp

5. Click Show Advanced Settings, and click + Add Another under Other Requestable SSO URLs

6. Enter a unique SSO URL for each Subscriber based on the value below, starting with Index 0

https://<Subscriber FQDN>/networkservices/saml2/sp/acs

7. Click Next then Finish

8. Navigate to the Assignments tab, then click Assign, Assign to Groups

9. Click Assign next to the group(s) appropriate to your environment and click Done

9. Navigate to the Sign On tab, scroll down to Attribute statements and expand Show legacy configuration and click Edit

10. Add the following configuration under Group attribute statements and click Save

NameName formatFilterExpression
GroupsUnspecifiedMatches regex.*

This statement will return a list of all Okta groups that a given user is a member of in a SAML Attribute called ‘Groups’.

This list will be used by ClearPass to assign the appropriate role.

Alternatively, the following statement can be used to only return groups that begin with the string ‘ClearPass’:

NameName formatFilterExpression
GroupsUnspecifiedStarts withClearPass

11. Scroll up to the top of the Sign on tab and click View SAML setup instructions

12. Record the Identity Provider Single Sign-On URL and click Download certificate

ClearPass Configuration

1. Navigate to Administration > Certificates > Trust List and click Add to upload the previously downloaded certificate with the SAML Usage

2. Under Configuration > Identity > Single Sign-On (SSO), edit the following:

Identity Provider (IdP) URL
<Identity Provider Single Sign-On URL recorded from Okta>

Enable SSO for

  • PolicyManager
  • GuestOperators
  • Insight

Identity Provider (IdP) Signing Certificate
emailAddress=info@okta.com,CN=...

NOTE: It is recommended to enable SSO for only one application initially (e.g. GuestOperators) until SSO has been tested successfully.

Enabling SSO for an application will prevent logins to the WebUI using local administrator accounts.
In order to recover access, login to the CLI of the virtual appliance and execute the command below, which will reset all Single Sign-On (SSO) configuration.

system sso-reset

3. Under Administration > Dictionaries > Applications, select the SSO dictionary, click Export, select No then Export

4. Add the following line to ApplicationDictionary.xml:

<ApplDictionaryAttributes attrType="String" attrName="Groups"/>

5. Click Import, select ApplicationDictionary.xml and click Import

6. Select the SSO Application Dictionary and scroll down to confirm that the Groups attribute has been added

7. Create roles corresponding to your Okta group names, and create a Role Mapping policy according to the screenshot below:

8. Create enforcement profiles which assign the desired SSO roles

9. Create an enforcement policy according to the screenshot below:

10. Create an Aruba Application Authorization service and select the previously created Role Mapping and Enforcement Policies

Verification

1. In a private browser tab, connect to ClearPas and select the SSO enabled Application

2. Sign in using Okta

3. Confirm username and role assignment is visible under the Menu in the top-right corner of the screen

4. Confirm successful authentication in Access Tracker

5. Observe returned Okta Groups under Input tab

6. For further troubleshooting, a browser extension such as SAML Tracer can be used to confirm that Okta is including the correct Groups list as SAML attributes. Here is a snippet of output from a successful authentication:

</saml2:AuthnStatement>
<saml2:AttributeStatement xmlns:saml2="urn:oasis:names:tc:SAML:2.0:assertion">
<saml2:Attribute Name="Groups" NameFormat="urn:oasis:names:tc:SAML:2.0:attrname-format:unspecified">
<saml2:AttributeValue xmlns:xs="http://www.w3.org/2001/XMLSchema" xmlns:xsi="http://www.w3.org/2001/XMLSchema-instance" xsi:type="xs:string">Everyone</saml2:AttributeValue>
<saml2:AttributeValue xmlns:xs="http://www.w3.org/2001/XMLSchema" xmlns:xsi="http://www.w3.org/2001/XMLSchema-instance" xsi:type="xs:string">ClearPass Administrators</saml2:AttributeValue>
</saml2:Attribute>
</saml2:AttributeStatement>

Hamina Clip – First Impressions

Look Mum, no cables!

Do you remember the first time you used AirPods? The freedom from being tangled up or tied to your device was a game changer.
I experienced that all over again when I tried out Hamina’s new survey device – the Clip.

Christmas came quickly this year, since I was fortunate enough to receive a prototype version of the Clip to test, in a very shiny (sorry not shipping with the production version!) case.

Walk the Line

Surveying with the Clip is an absolute dream. It’s super light, so you quickly forget you’re wearing it, and thanks to Bluetooth data transfer to the Hamina Onsite App, there won’t be any cables in your way.

You might need to use a cable in very busy environments, but Onsite will let you know if data transfer over Bluetooth isn’t working so well. There is also a pretty slick data buffering mechanism when using Bluetooth.

My preferred survey approach is using an iPad + Apple pencil, rotating the device when I turn to keep the map facing the same way as I’m walking. Needless to say, having to periodically stop and untangle a cable is no longer required.

No more handbag?

The Clip isn’t designed to replace the Oscium Nomad, but in true Hamina style offer a more accessible alternative for those who don’t need every single feature.

The full specs for both the Nomad and the Clip are below, but in a nutshell here are the main reasons you might choose to pack a Nomad:

  • When spectrum analysis is required
  • In very busy environments, e.g. large public venues and you’d prefer to walk a bit faster than you’d otherwise need to
  • When you need to run a multi-radio packet capture
  • You prefer the old school look and love it when people ask you ‘what’s with the handbag?’

Otherwise it is safe to say that the Clip could permanently live in your everyday bag.

Radio Gaga

It’s worth pointing out that although the Clip has half the number of radios and antennas, it is by no means half as good.
The product itself was born out of the fact that if you perform scanning efficiently, you don’t need more than two radios most of the time.

The Clip will also certified to perform transmit functions for things like Orb testing.

These are a few of my favourite things

To wrap up, here are the things I love the most about the Clip:

  • Cable-less surveys
  • Form factor
  • Packet captures without disturbing your device’s Wi-Fi connection with AirTool

Purple offers OpenRoaming for free (as in beer!)

How to Watch Jeremiah Johnson and Pretend You Knew Robert Redford Was the Nodding  Guy the Whole Time

Roam if you want to

If you operate a network that offers free public access, please consider enable OpenRoaming as another way to connect. You can learn more about OpenRoaming itself here. It is hands-down the BEST way to offer fast, frictionless, free and secure Wi-Fi for users.

In an effort to accelerate global adoption of OpenRoaming, Purple is has recently started offering it as part of their free subscription tier for any business to use.

https://www.globenewswire.com/news-release/2025/11/21/3192859/0/en/Purple-s-free-initiative-to-accelerate-OpenRoaming-adoption-for-businesses.html

You can use this in one of two ways:

  1. Advertise an OpenRoaming capable SSID, using Purple’s authentication servers (Purple is performing the ANP function).
  2. Provision your device with an credential profile allowing it to connect to OpenRoaming networks all over the world (Purple is performing the IDP function).

Access Network Provider (ANP) setup

If you want to support OpenRoaming, here’s what you need to do:

  1. Sign up for a Purple Connect account here
  2. Setup a new Location
  3. Add your AP MAC Addresses and model

4. View the manual and follow the instructions for ‘PurpleConnex’ (the Purple app which supports OpenRoaming)

To summarise, you need to configure:

  • An SSID that supports WPA2/3 Enterprise authentication
  • Hotspot 2.0 / Passpoint configuration with Purple’s NAI Realm and EAP configuration
  • Purple authentication servers using RadSec
  • Enable RADIUS Accounting
  • Include the AP’s MAC Address as Called Station ID
  • Purple’s RadSec Server Root CA certificate (this wasn’t in the HPE Aruba instructions, but necessary)

Once configured, any OpenRoaming device that is configured to use either of the below RCOIs will be able to connect!

Here is what my test SSID looks like:

Using Purple credentials to connect to an existing OpenRoaming network

If you want to provision your device using Purple as an IDP to connect to an existing OpenRoaming network, here’s what you need to do:

  1. Download the PurpleConneX app on your device
  2. Create and login with a free account
  3. Accept the prompt to add a new network profile to your device

Your device will then automatically connect to any SSID that advertises the WBA RCOI (5A03BA).

Here is a packet capture showing a PurpleConneX provisioned device connecting to an SSID using the WBA OpenRoaming RADIUS test server.

Challenge to networking vendors

Purple have made the first move by offerring OpenRoaming for free.

I believe all cloud managed networking vendors should offer a drop-down option to enable OpenRoaming on an SSID with a hosted RadSec Proxy / ANP for no additional licensing cost.

Also Apple and Microsoft, please include device native OpenRoaming functionality as an option to use the account that is signed into the device. This is already possible with a Google account on Android.

Only when OpenRoaming is free for users, simple for administrators to deploy, and simple to use will we see the uptake of this awesome technology.

AAA = Access Assurance Awesomeness?

In case you were wondering, this is a post about HPE Juniper Networking’s Cloud NAC offering – Access Assurance. Great, now that’s cleared up, on with the post!

The way things were

For most of the ClearPass deployments I’ve been involved with in the last few years, the requirements for wireless have been pretty simple:

  • Authenticate managed devices and/or users (mostly Intune + Entra ID)

In order to meet this requirement, I’d typically configure:

  • TEAP with chained EAP-TLS to authenticate Windows devices and users, and plain EAP-TLS for other OSs.
  • Entra ID and Intune API integration for authorization.
  • Intune configuration payloads including where to enrol for a certificate from a suitable CA, whether it be ClearPass Onboard, SCEPman, SecureW2, NDES, or ADCS with a certificate connector.

Anyone for a SNAC?

With the trend towards SaaS for everything else, what about NAC? (SaaS NAC = SNAC?) you heard it here first folks, Gartner eat your heart out 😛

HPE Networking have Aruba and Juniper Mist flavoured ‘SNAC’s which are rapidly growing in functionality, and are respectively:

  • Central NAC
  • Access Assurance

There were two features in particular which compelled me to spin up a demo of Access Assurance:

  • PKI with SCEP integration
  • TEAP

To the lab!

Any good lab work should start with a hypothesis (or so primary school science taught me).

Mine was this: A SaaS NAC should be able to replace an on-prem NAC for most customer’s wireless needs.

(By the way, this blog post isn’t intended to be a deployment guide, but rather to highlight key functionality that might help you decide whether or not to deploy Access Assurance, based on my experience).

Here are the key features of Access Assurance:

  • OAuth IdP integration for group based authorization
  • MDM integration for compliance checking
  • PKI which can be integrated with Intune or Jamf Pro for issuing certificates to managed devices
  • Support for TEAP (basic for now)
  • Support for non-Mist devices with use of a Mist Edge (RADIUS Proxy – licensed separately)
  • IdP SSO integrated portal to provision unmanaged devices with a certificate
  • Supports ‘BYO’ Client Root CA and Server Certificates if you want to use it with an existing PKI
  • Competitive license pricing, counted on concurrently connected users (not seats)

Keep it Simple

The first thing I noticed is how simple everything is. A lot of the nuts and bolts have been hidden under a layer of goldilocks-level abstraction.

Everything that you need to configure for the NAC itself is done from this humble menu.

In no particular order, here is a quick tour:

Identity Providers

Setup your IDP using OAuth after first creating an Entra ID App Registration with the appropriate permissions and Client Secret. This will allow you to perform group lookups for authorization.

Next, link your MDM of choice for compliance checking.

If you’re signed into your Azure Portal account with the correct permissions, linking your Intune account is as simple as approving access to a pre-canned service.

Other MDM options are available too:

Client Onboarding

If you have unmanaged devices that you want to deploy a certificate and Wi-Fi configuration profile to, you can create a NAC Onboarding Portal, complete with SSO using SAML against your IdP of choice.

There is even a pre-built Entra ID Enterprise App for the SSO bit:)

You need to install the Marvis App on your OS of choice for this to work.

Certificates

On the Internal tab you can view all of your issued certificates.

You can upload your own CA certificate, in case you issue client certificates to your devices from another CA.
You can also upload your own RADIUS Server certificate as well if you’d prefer to use your own PKI entirely.

If you’re sticking with the Mist CA, you can download the CA certificate that sits above the RADIUS Server Certificate in the chain of trust, for deploying to your devices via Intune.

Enabling the CA couldn’t be simpler, you just choose ‘Active’ from the drop-down menu accessible from the gear icon.

You can also view the SCEP URL for integration with Intune or Jamf Pro, and download the Onboard CA Certificate, for deploying to your devices.

Auth Policy Labels

Auth Policy Labels are the building blocks for your policies.

They can be used either as match criteria (e.g. Entra ID Group) for a particular rule, or as an action to take after authentication (e.g. Assign a particular VLAN ID).

Auth Policies

This is about as simple as it gets.

My list of policies is as follows:
1) EAP-TLS User authentication with Entra ID Group and Intune Compliance authorization
2) EAP-TLS Device authentication with Intune Compliance authorization (i.e. Windows logon screen)
3) EAP-TLS User authentication with Entra ID Group authorization (for a Marvis Client enrolled device)

NAC Events

Logging is pretty simple but perfect for troubleshooting policy or client configuration issues.

Intune Configuration Profiles

Worth mentioning of course are the various configuration profiles that need to be created in Intune for a complete solution.

Mist opportunity?

Since I only (currently) have Aruba APs in my lab, I thought there would be no way to test Access Assurance with getting hold of a Mist AP first.


I was wrong. Under the hood, Access Assurance only accepts RadSec (RADIUS over TLS) connections from Mist devices, but this also includes Mist Edge virtual appliances.


Although licensed separately, you can quite easily spin up a Mist Edge VM to accept regular RADIUS traffic and proxy it to Access Assurance using RadSec.

A little bit of Azure lab credit later, I was well on my way.

All I had to do in HPE Aruba Networking Central was add the IP address of the Mist Edge appliance as a RADIUS Server in my SSID config.

TEAP

As I mentioned, my go-to for Intune managed Windows device authentication is TEAP with EAP-TLS.

I tried to setup a basic set of policies which treated a user + computer authentication differently to a computer only authentication (e.g. Windows device at logon screen).

For now, computer only authentication only is not supported. So we’ll have to use regular EAP-TLS.

Closing Thoughts

So what about my hypothesis? Can a SaaS NAC replace an on-prem NAC for most customer’s wireless needs? The answer is almost.

For what I personally configure, once TEAP support is feature complete and if TEAP & SCEP cross-pollenate over to Central NAC 😉 that will cover most wireless deployments.

Wired is a different story – I’m yet to put Central NAC or Access Assurance through its paces for a ‘Colourless Port’ deployment with profiling, although with the recent enhancements to the AI based client profiling (had to get the buzzword in at least once) I can’t imagine a robust solution will be far off, if not already here.

In the meantime, if you’d like to try Access Assurance yourself, reach out to your local SE and check out the Access Assurance Guide.

Aruba CX lab with Containerlab and GitHub Codespaces

There’s no such thing as a free lab?

I was working on a project where I wanted to prototype a VXLAN deployment, and was about to revive a GCP VM mentioned in my previous blog post.

This time, I also wanted to see if I could use the VS Code Extension on my local machine to interact with the lab.

Familiarising myself with the documentation again, I noticed a comment from the Containerlab team mentioning Codespaces:

Intrigued, I explored Containerlab’s documentation on Codespaces and looked at the official GitHub Codespaces page.

Codespaces are cloud-hosted development environments that can be quickly deployed using Docker Development containers.

On GitHub’s free tier, you have access 120 CPU core-hours on one of their 4 vCPU machines, which is 30 hours of free lab time – perfect for occasional use.

The Containerlab team have published a Development container image that includes almost everything you need to spin up a lab in Codespaces…

I can hardly contain myself!

If you want to run the HPE Aruba Networking CX Switch Simulator in Containerlab, you need to bring your own Docker image.
This requires downloading the OVA file from HPE Networking Support, and using vrnetlab to package it inside a Docker container.

Accessing the image from Codespaces also requires the image to be hosted in a Container Registry.

Since I run an ARM-based mac, I can’t make x86 Docker images on my machine, so I would have to do this from a VM hosted somewhere else.

This is where ljarasius suggested I use a GitHub Action to download the OVA, make the Docker container image, and publish to a private GitHub Container Registry.

Now everything could be done from in CodeSpaces (once obtaining the download link of course).

All systems go

  • GitHub account – check
  • New repo – check
  • Dev container image – check
  • AOS-CX container image – check
  • VS Code extension – check

After creating a simple topology.yml file in the GitHub, I was able to get a fully functional lab working from VS Code running on my MacBook – and this is what it looked like.

I created a GitHub repository with a full set of instructions that you can fork and use to get your own lab up and running quickly.
https://github.com/crispyfi/clab-aos-cx-demo


[stderr] 03:31:42 INFO Containerlab started version=0.68.0
[stderr] 03:31:42 INFO Parsing & checking topology file=topology.clab.yml
[stderr] 03:31:42 INFO Creating docker network name=clab IPv4 subnet=172.20.20.0/24 IPv6 subnet=3fff:172:20:20::/64 MTU=1500
[stderr] 03:31:42 WARN iptables check error: exit status 111. Output:
[stderr] 03:31:42 WARN iptables check error: exit status 111. Output:
[stderr] 03:31:42 WARN iptables check error: exit status 111. Output:
[stderr] 03:31:42 WARN iptables check error: exit status 111. Output:
[stderr] 03:31:42 INFO Pulling ghcr.io/crispyfi/arubaos-cx:latest Docker image
[stderr] 03:32:31 INFO Done pulling ghcr.io/crispyfi/arubaos-cx:latest
[stderr] 03:32:31 INFO Pulling ghcr.io/hellt/network-multitool:latest Docker image
[stderr] 03:32:42 INFO Done pulling ghcr.io/hellt/network-multitool:latest
[stderr] 03:32:42 INFO Creating lab directory path=/workspaces/clab-aos-cx/clab-clab-aos-cx-demo
[stderr] 03:32:42 INFO Creating container name=agg1
[stderr] 03:32:42 INFO Creating container name=host1
[stderr] 03:32:42 INFO Creating container name=host2
[stderr] 03:34:13 INFO node "agg1" turned healthy, continuing
[stderr] 03:34:13 INFO Creating container name=agg2
[stderr] 03:34:13 INFO Created link: agg1:eth9 (1/1/9) ▪┄┄▪ agg2:eth9 (1/1/9)
[stderr] 03:34:13 INFO Created link: agg1:eth8 (1/1/8) ▪┄┄▪ agg2:eth8 (1/1/8)
[stderr] 03:34:13 INFO Created link: agg1:eth7 (1/1/7) ▪┄┄▪ agg2:eth7 (1/1/7)
[stderr] 03:36:45 INFO node "agg2" turned healthy, continuing
[stderr] 03:36:45 INFO Creating container name=access1
[stderr] 03:36:45 INFO Created link: agg1:eth1 (1/1/1) ▪┄┄▪ access1:eth8 (1/1/8)
[stderr] 03:36:45 INFO Created link: agg2:eth1 (1/1/1) ▪┄┄▪ access1:eth9 (1/1/9)
[stderr] 03:36:45 INFO Created link: access1:eth1 (1/1/1) ▪┄┄▪ host1:eth1
[stderr] 03:41:17 INFO node "access1" turned healthy, continuing
[stderr] 03:41:17 INFO Creating container name=access2
[stderr] 03:41:18 INFO Created link: agg1:eth2 (1/1/2) ▪┄┄▪ access2:eth8 (1/1/8)
[stderr] 03:41:18 INFO Created link: agg2:eth2 (1/1/2) ▪┄┄▪ access2:eth9 (1/1/9)
[stderr] 03:41:18 INFO Created link: access2:eth2 (1/1/2) ▪┄┄▪ host2:eth1
[stderr] 03:41:18 ERRO Failed to execute command command="bash /host2.sh" node=host2 rc=127 stdout=""
[stderr] stderr=
[stderr] │ bash: /host2.sh: No such file or directory
[stderr] 03:41:18 ERRO Failed to execute command command="bash /host1.sh" node=host1 rc=2 stdout=""
[stderr] stderr=
[stderr] │ RTNETLINK answers: File exists
[stderr] 03:41:18 INFO Adding host entries path=/etc/hosts
[stderr] 03:41:18 INFO Adding SSH config for nodes path=/etc/ssh/ssh_config.d/clab-clab-aos-cx-demo.conf
╭───────────────────────────────┬────────────────────────────────────┬────────────────────┬───────────────────╮
│              Name             │             Kind/Image             │        State       │   IPv4/6 Address  │
├───────────────────────────────┼────────────────────────────────────┼────────────────────┼───────────────────┤
│ clab-clab-aos-cx-demo-access1 │ aruba_aoscx                        │ running            │ 172.20.20.6       │
│                               │ ghcr.io/crispyfi/arubaos-cx:latest │ (healthy)          │ 3fff:172:20:20::6 │
├───────────────────────────────┼────────────────────────────────────┼────────────────────┼───────────────────┤
│ clab-clab-aos-cx-demo-access2 │ aruba_aoscx                        │ running            │ 172.20.20.7       │
│                               │ ghcr.io/crispyfi/arubaos-cx:latest │ (health: starting) │ 3fff:172:20:20::7 │
├───────────────────────────────┼────────────────────────────────────┼────────────────────┼───────────────────┤
│ clab-clab-aos-cx-demo-agg1    │ aruba_aoscx                        │ running            │ 172.20.20.3       │
│                               │ ghcr.io/crispyfi/arubaos-cx:latest │ (healthy)          │ 3fff:172:20:20::3 │
├───────────────────────────────┼────────────────────────────────────┼────────────────────┼───────────────────┤
│ clab-clab-aos-cx-demo-agg2    │ aruba_aoscx                        │ running            │ 172.20.20.5       │
│                               │ ghcr.io/crispyfi/arubaos-cx:latest │ (healthy)          │ 3fff:172:20:20::5 │
├───────────────────────────────┼────────────────────────────────────┼────────────────────┼───────────────────┤
│ clab-clab-aos-cx-demo-host1   │ linux                              │ running            │ 172.20.20.4       │
│                               │ ghcr.io/hellt/network-multitool    │                    │ 3fff:172:20:20::4 │
├───────────────────────────────┼────────────────────────────────────┼────────────────────┼───────────────────┤
│ clab-clab-aos-cx-demo-host2   │ linux                              │ running            │ 172.20.20.2       │
│                               │ ghcr.io/hellt/network-multitool    │                    │ 3fff:172:20:20::2 │
╰───────────────────────────────┴────────────────────────────────────┴────────────────────┴───────────────────╯

Four AOS-CX containers can get a little sluggish, so you can always run them on a bigger machine, or upgrade to a GitHub Pro account for more Codespaces core-hours.

Git with the program

Not only is this a simple, quick and cost-effective way to spin up a lab, it forces you to learn version control with Git and how to use Git with VS Code.

Once you’re comfortable with how everything hangs together, you can do everything straight from VS Code – no browser required.

What’s next

Shortly after getting my lab up and running in Codespaces, I came across Antimony which I can’t wait to try!

Aruba CX Infrastructure as Code Lab with Containerlab in Google Cloud Platform

To the lab!

I was recently working on a project where I needed to configure and check the output of a few commands on some Aruba CX switches.

In the past I ran EVE-NG on an Intel NUC on with ESXi free (RIP), which I no longer have.

My EVE-NG Pro license had an also expired.

Running the Aruba CX Switch Simulator on EVE-NG helped me a lot when studying for my ACSP certification and was invaluable for developing complex multi-VRF BGP configurations for a data centre migration project.

All the cool kids use Infrastructure-as-code

A good friend of mine told me I should check out Containerlab, which allows you to define a lab topology in a YAML file and run network device images as Docker containers for a true infrastructure as code experience.

The performance with Docker is much better, since you’re not running a full-blown hypervisor (i.e. KVM with EVE-NG).

Another tool called Vrnetlab takes the VMDK file from the Aruba CX switch simulator and builds a Docker image from it.

Home Data Centre?

Without having any decent compute at home (and intentionally trying to keep it that way 😉 my first idea was to try and run Containerlab on my M3 MacBook Pro with Rosetta 2 handling the x86 translation.

Docker for desktop allows running x86 containers and Parallels Pro allows you to do a one click install of an Ubuntu x86 VM.

Unfortunately neither of these supported the nested virtualisation (vmx CPU flag).

Azure?

Having little success with Containerlab at this point I tried to install EVE-NG Pro on an Azure VM, however the install failed. Although there are blog articles from 2023 reporting it works, it is not officially supported, and I came across some information online that lead me to believe Azure would also not support non-Microsoft nested virtualisation.

Google it

Google Cloud Platform is the only cloud provider that EVE-NG is officially supported on, so perhaps it would support Containerlab since they both rely on nested virtualisation?

Conviniently, GCP gives new users $300 USD to use in 90 days – what did I have to lose?

Would it work? Only one way to find out!

A couple of cups of coffee and a few typos later, I had two virtual CX switches pinging each other in the cloud 🙂

Do it yourself mate

To save you some pain, here are the key steps to get you up and running.

This assumes you have an existing Google Cloud Platform Account and some credit (credits will do fine).

All of the steps below are using default parameters, including the default VPC so be sure to customise to suit your environment.

Prepare a custom Ubuntu boot disk template

From Google Cloud Console, open Google Cloud Shell and paste the following command to create a custom Ubuntu 22.04 image that supports nested virtualisation.

gcloud compute images create nested-ubuntu-jammy --source-image-family=ubuntu-2204-lts --source-image-project=ubuntu-os-cloud --licenses https://www.googleapis.com/compute/v1/projects/vm-options/global/licenses/enable-vmx

Deploy VM

Specify your region and the other settings below.

  • Machine type: n2-standard-8
  • Boot disk: Custom Images > nested-ubuntu-jammy


Any of the N2 images should work, pick your size based on how many devices you are going to be running.

For reference, each CX switch simulator image requires 4GB of memory according to the documentation.

Generate and Upload SSH Key

Commands below are for macOS, create a new SSH key pair and upload the public key to GCP.

ssh-keygen -o -a 100 -t ed25519
cat /Users/chris/.ssh/id_ed25519.pub

Under Settings > Metadata > SSH Keys, upload SSH Key.

Update firewall rules

Navigate to the VPC containing VM (the default VPC if you don’t specify a different one).
Update inbound firewall rules to allow SSH from your public IP address only.

Connect to VM via SSH

You can then connect to your VM by simply typing:

ssh <public IP of your VM>

Update OS, install dependencies

Install the latest OS updates.

Make is required by Vrnetlab to build the Docker image, vim is because I don’t like nano 😉

sudo apt update
sudo apt upgrade

sudo apt install make vim

Install Docker

Install docker – the steps are from the official Docker documentation referenced below.

sudo apt-get install ca-certificates curl
install -m 0755 -d /etc/apt/keyrings
curl -fsSL https://download.docker.com/linux/ubuntu/gpg -o /etc/apt/keyrings/docker.asc
chmod a+r /etc/apt/keyrings/docker.asc
echo   "deb [arch=$(dpkg --print-architecture) signed-by=/etc/apt/keyrings/docker.asc] https://download.docker.com/linux/ubuntu \
$(. /etc/os-release && echo "$VERSION_CODENAME") stable" |   sudo tee /etc/apt/sources.list.d/docker.list > /dev/null
apt update
apt install docker-ce docker-ce-cli containerd.io docker-buildx-plugin docker-compose-plugin

sudo service docker start

sudo systemctl enable docker.service
sudo systemctl enable containerd.service

Reference: https://docs.docker.com/engine/install/ubuntu/

Install Containerlab

Add the required repo and install Containerlab.

echo "deb [trusted=yes] https://apt.fury.io/netdevops/ /" | sudo tee -a /etc/apt/sources.list.d/netdevops.list
sudo apt update && sudo apt install containerlab

Reference: https://containerlab.dev/install/

Install Vrnetlab

Create a new working directory (e.g. in your home directory) and use git to clone the Vrnetlab project.

Check out the latest version (at the time of writing this was v0.16.0).

mkdir containerlab
cd containerlab/

git clone https://github.com/hellt/vrnetlab && cd vrnetlab
git checkout v0.16.0

cd aoscx

Reference:
https://containerlab.dev/manual/vrnetlab/

Upload AOS-CX Image

Download the CX switch simulator image for the version you want to use from https://networkingsupport.hpe.com

Copy only the OVA file to your GCP VM using SCP from your local machine. (Again, I’m using macOS for this example).

scp Aruba_AOS-CX_Switch_Simulator_10_13_1000_ova/ArubaOS-CX_10_13_1000.ova <public IP of your VM>:/home/chris/containerlab/vrnet/aoscx

Make Docker Image

From the aoscx directory, extract the VMDK file from the OVA and run make to create the Docker image.

There is a readme file in this directory with more information if needed.

You can then make sure the docker is in the image list, and find which tag was used (created based on the timestamp from the VMDK file).

cd containerlab/vrnet/aoscx
tar xvf 
ArubaOS-CX_10_13_1000.ova

sudo make docker-image

docker image ls

REPOSITORY          TAG              IMAGE ID       CREATED       SIZE
vrnetlab/vr-aoscx   20240129204649   9043b910e18a   9 hours ago   1.24GB

Deploy from YAML file

Create a YAML file in the Containerlab working directory.

cd /home/chris/containerlab

vi lab.yml

Paste your lab topology from one you have created in a local text editor, or from the example below.

This simple topology deploys two switches and connects interfaces 1/1/1 and 1/1/2 between each.

The image is the docker image created in the previous step, including the tag.

You can specify a config file to be loaded from the same directory as the topology YAML file.

name: lab
topology:
  nodes:
    sw1:
      kind: aruba_aoscx
      image: vrnetlab/vr-aoscx:20240129204649
      startup-config: myconfig.txt
    sw2:
      kind: aruba_aoscx
      image: vrnetlab/vr-aoscx:20240129204649
      startup-config: myconfig.txt
  links:
  - endpoints: ["sw1:eth1", "sw2:eth1"]
  - endpoints: ["sw1:eth2", "sw2:eth2"]

containerlab deploy --topo lab.yml
INFO[0000] Containerlab v0.54.2 started
INFO[0000] Parsing & checking topology file: lab.yml
INFO[0000] Creating docker network: Name="clab", IPv4Subnet="172.20.20.0/24", IPv6Subnet="2001:172:20:20::/64", MTU=1500
INFO[0000] Creating lab directory: /home/chris/containerlab/clab-lab
INFO[0000] Creating container: "sw2"
INFO[0000] Creating container: "sw1"
INFO[0000] Created link: sw1:eth1 <--> sw2:eth1
INFO[0000] Created link: sw1:eth2 <--> sw2:eth2
INFO[0000] Adding containerlab host entries to /etc/hosts file
INFO[0000] Adding ssh config for containerlab nodes
+---+--------------+--------------+----------------------------------+-------------+---------+----------------+----------------------+
| # |     Name     | Container ID |              Image               |    Kind     |  State  |  IPv4 Address  |     IPv6 Address     |
+---+--------------+--------------+----------------------------------+-------------+---------+----------------+----------------------+
| 1 | clab-lab-sw1 | 113beef33555 | vrnetlab/vr-aoscx:20240129204649 | aruba_aoscx | running | 172.20.20.2/24 | 2001:172:20:20::2/64 |
| 2 | clab-lab-sw2 | fe73007cb0b6 | vrnetlab/vr-aoscx:20240129204649 | aruba_aoscx | running | 172.20.20.3/24 | 2001:172:20:20::3/64 |
+---+--------------+--------------+----------------------------------+-------------+---------+----------------+----------------------+

You can now SSH from the VM to each switch using the IP address in the table above, with credentials ‘admin’, ‘admin’.

Note that eth0 on each deployed container maps to the mgmt interface on each switch.

Destroy lab

Once you’ve finished with the lab, you can kill the containers with the command below.

containerlab destroy --topo lab.yml

Remember, this is infrastructure as code, so the idea is to spin up the containers and topology with a predefined config each time you want to run the lab.

Closing thoughts

This is an incredibly simple example which should hopefully get you started running CX switches using Containerlab.

The sky is the limit in terms of the topologies you can create the other powerful features of Containerlab.