
To the lab!
I was recently working on a project where I needed to configure and check the output of a few commands on some Aruba CX switches.
In the past I ran EVE-NG on an Intel NUC on with ESXi free (RIP), which I no longer have.
My EVE-NG Pro license had an also expired.
Running the Aruba CX Switch Simulator on EVE-NG helped me a lot when studying for my ACSP certification and was invaluable for developing complex multi-VRF BGP configurations for a data centre migration project.
All the cool kids use Infrastructure-as-code
A good friend of mine told me I should check out Containerlab, which allows you to define a lab topology in a YAML file and run network device images as Docker containers for a true infrastructure as code experience.
The performance with Docker is much better, since you’re not running a full-blown hypervisor (i.e. KVM with EVE-NG).
Another tool called Vrnetlab takes the VMDK file from the Aruba CX switch simulator and builds a Docker image from it.
Home Data Centre?
Without having any decent compute at home (and intentionally trying to keep it that way 😉 my first idea was to try and run Containerlab on my M3 MacBook Pro with Rosetta 2 handling the x86 translation.
Docker for desktop allows running x86 containers and Parallels Pro allows you to do a one click install of an Ubuntu x86 VM.
Unfortunately neither of these supported the nested virtualisation (vmx CPU flag).
Azure?
Having little success with Containerlab at this point I tried to install EVE-NG Pro on an Azure VM, however the install failed. Although there are blog articles from 2023 reporting it works, it is not officially supported, and I came across some information online that lead me to believe Azure would also not support non-Microsoft nested virtualisation.
Google it
Google Cloud Platform is the only cloud provider that EVE-NG is officially supported on, so perhaps it would support Containerlab since they both rely on nested virtualisation?
Conviniently, GCP gives new users $300 USD to use in 90 days – what did I have to lose?
Would it work? Only one way to find out!
A couple of cups of coffee and a few typos later, I had two virtual CX switches pinging each other in the cloud 🙂
Do it yourself mate
To save you some pain, here are the key steps to get you up and running.
This assumes you have an existing Google Cloud Platform Account and some credit (credits will do fine).
All of the steps below are using default parameters, including the default VPC so be sure to customise to suit your environment.
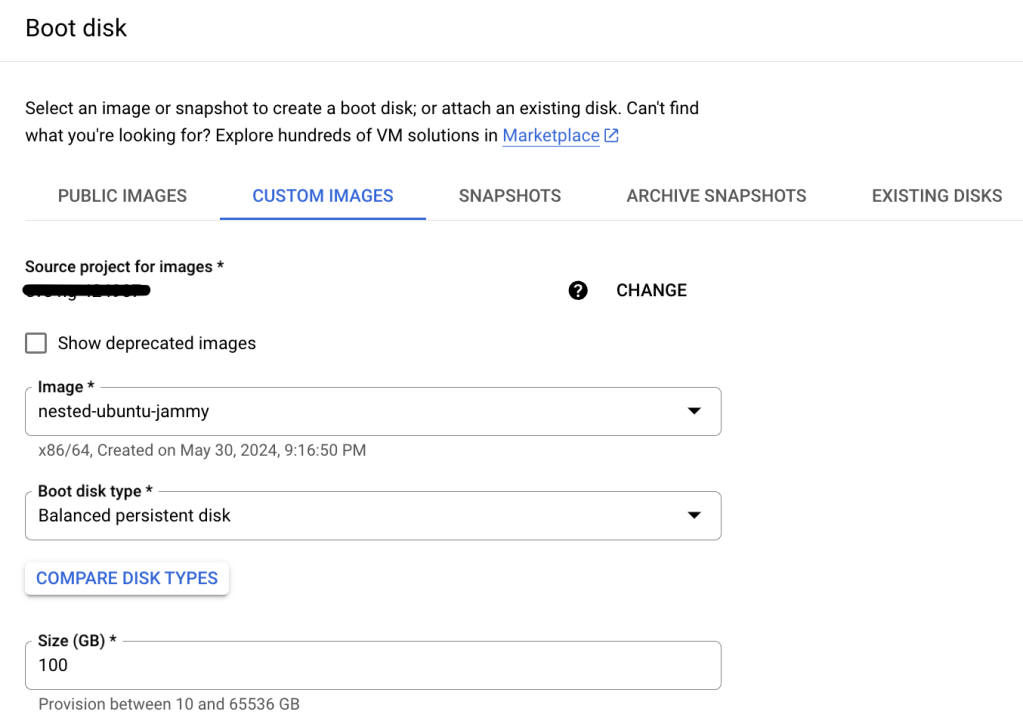
Prepare a custom Ubuntu boot disk template
From Google Cloud Console, open Google Cloud Shell and paste the following command to create a custom Ubuntu 22.04 image that supports nested virtualisation.
gcloud compute images create nested-ubuntu-jammy --source-image-family=ubuntu-2204-lts --source-image-project=ubuntu-os-cloud --licenses https://www.googleapis.com/compute/v1/projects/vm-options/global/licenses/enable-vmxDeploy VM
Specify your region and the other settings below.
- Machine type: n2-standard-8
- Boot disk: Custom Images > nested-ubuntu-jammy
Any of the N2 images should work, pick your size based on how many devices you are going to be running.
For reference, each CX switch simulator image requires 4GB of memory according to the documentation.

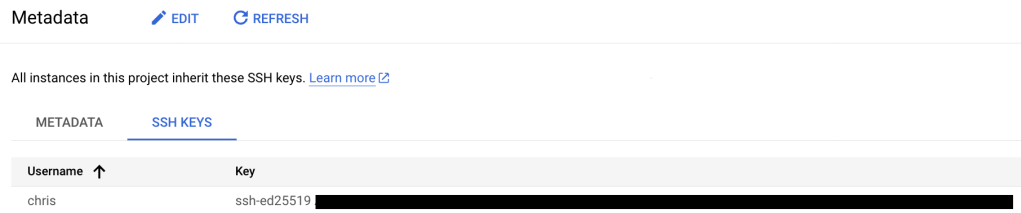
Generate and Upload SSH Key
Commands below are for macOS, create a new SSH key pair and upload the public key to GCP.
ssh-keygen -o -a 100 -t ed25519
cat /Users/chris/.ssh/id_ed25519.pub
Under Settings > Metadata > SSH Keys, upload SSH Key.
Update firewall rules
Navigate to the VPC containing VM (the default VPC if you don’t specify a different one).
Update inbound firewall rules to allow SSH from your public IP address only.
Connect to VM via SSH
You can then connect to your VM by simply typing:
ssh <public IP of your VM>Update OS, install dependencies
Install the latest OS updates.
Make is required by Vrnetlab to build the Docker image, vim is because I don’t like nano 😉
sudo apt update
sudo apt upgrade

sudo apt install make vim
Install Docker
Install docker – the steps are from the official Docker documentation referenced below.
sudo apt-get install ca-certificates curl
install -m 0755 -d /etc/apt/keyrings
curl -fsSL https://download.docker.com/linux/ubuntu/gpg -o /etc/apt/keyrings/docker.asc
chmod a+r /etc/apt/keyrings/docker.asc
echo   "deb [arch=$(dpkg --print-architecture) signed-by=/etc/apt/keyrings/docker.asc] https://download.docker.com/linux/ubuntu \
$(. /etc/os-release && echo "$VERSION_CODENAME") stable" |   sudo tee /etc/apt/sources.list.d/docker.list > /dev/null
apt update
apt install docker-ce docker-ce-cli containerd.io docker-buildx-plugin docker-compose-plugin

sudo service docker start

sudo systemctl enable docker.service
sudo systemctl enable containerd.service
Reference: https://docs.docker.com/engine/install/ubuntu/
Install Containerlab
Add the required repo and install Containerlab.
echo "deb [trusted=yes] https://apt.fury.io/netdevops/ /" | sudo tee -a /etc/apt/sources.list.d/netdevops.list
sudo apt update && sudo apt install containerlab
Reference: https://containerlab.dev/install/
Install Vrnetlab
Create a new working directory (e.g. in your home directory) and use git to clone the Vrnetlab project.
Check out the latest version (at the time of writing this was v0.16.0).
mkdir containerlab
cd containerlab/

git clone https://github.com/hellt/vrnetlab && cd vrnetlab
git checkout v0.16.0

cd aoscx
Reference:
https://containerlab.dev/manual/vrnetlab/
Upload AOS-CX Image
Download the CX switch simulator image for the version you want to use from https://networkingsupport.hpe.com
Copy only the OVA file to your GCP VM using SCP from your local machine. (Again, I’m using macOS for this example).
scp Aruba_AOS-CX_Switch_Simulator_10_13_1000_ova/ArubaOS-CX_10_13_1000.ova <public IP of your VM>:/home/chris/containerlab/vrnet/aoscxMake Docker Image
From the aoscx directory, extract the VMDK file from the OVA and run make to create the Docker image.
There is a readme file in this directory with more information if needed.
You can then make sure the docker is in the image list, and find which tag was used (created based on the timestamp from the VMDK file).
cd containerlab/vrnet/aoscx
tar xvf
ArubaOS-CX_10_13_1000.ova

sudo make docker-image

docker image ls

REPOSITORY          TAG              IMAGE ID       CREATED       SIZE
vrnetlab/vr-aoscx   20240129204649   9043b910e18a   9 hours ago   1.24GB
Deploy from YAML file
Create a YAML file in the Containerlab working directory.
cd /home/chris/containerlab

vi lab.yml
Paste your lab topology from one you have created in a local text editor, or from the example below.
This simple topology deploys two switches and connects interfaces 1/1/1 and 1/1/2 between each.
The image is the docker image created in the previous step, including the tag.
You can specify a config file to be loaded from the same directory as the topology YAML file.
name: lab
topology:
  nodes:
    sw1:
      kind: aruba_aoscx
      image: vrnetlab/vr-aoscx:20240129204649
      startup-config: myconfig.txt
    sw2:
      kind: aruba_aoscx
      image: vrnetlab/vr-aoscx:20240129204649
      startup-config: myconfig.txt
  links:
  - endpoints: ["sw1:eth1", "sw2:eth1"]
  - endpoints: ["sw1:eth2", "sw2:eth2"]
containerlab deploy --topo lab.ymlINFO[0000] Containerlab v0.54.2 started
INFO[0000] Parsing & checking topology file: lab.yml
INFO[0000] Creating docker network: Name="clab", IPv4Subnet="172.20.20.0/24", IPv6Subnet="2001:172:20:20::/64", MTU=1500
INFO[0000] Creating lab directory: /home/chris/containerlab/clab-lab
INFO[0000] Creating container: "sw2"
INFO[0000] Creating container: "sw1"
INFO[0000] Created link: sw1:eth1 <--> sw2:eth1
INFO[0000] Created link: sw1:eth2 <--> sw2:eth2
INFO[0000] Adding containerlab host entries to /etc/hosts file
INFO[0000] Adding ssh config for containerlab nodes
+---+--------------+--------------+----------------------------------+-------------+---------+----------------+----------------------+
| # | Name | Container ID | Image | Kind | State | IPv4 Address | IPv6 Address |
+---+--------------+--------------+----------------------------------+-------------+---------+----------------+----------------------+
| 1 | clab-lab-sw1 | 113beef33555 | vrnetlab/vr-aoscx:20240129204649 | aruba_aoscx | running | 172.20.20.2/24 | 2001:172:20:20::2/64 |
| 2 | clab-lab-sw2 | fe73007cb0b6 | vrnetlab/vr-aoscx:20240129204649 | aruba_aoscx | running | 172.20.20.3/24 | 2001:172:20:20::3/64 |
+---+--------------+--------------+----------------------------------+-------------+---------+----------------+----------------------+You can now SSH from the VM to each switch using the IP address in the table above, with credentials ‘admin’, ‘admin’.
Note that eth0 on each deployed container maps to the mgmt interface on each switch.
Destroy lab
Once you’ve finished with the lab, you can kill the containers with the command below.
containerlab destroy --topo lab.ymlRemember, this is infrastructure as code, so the idea is to spin up the containers and topology with a predefined config each time you want to run the lab.
Closing thoughts
This is an incredibly simple example which should hopefully get you started running CX switches using Containerlab.
The sky is the limit in terms of the topologies you can create the other powerful features of Containerlab.

Nice idea. I’m also looking for alternative to eve ng and this looks very cool. Thanks for sharing.
Do you have an idea how much it would cost to run this in gcp? In azure zoo have to pay for the storage (image of the server) even if the machine is completely down. Or would you recreate the vpc every time as well?
LikeLike
It would be about $0.40 per hour to run, and $23 per month for a 100GB persistent disk (in USD).
I’m sure with some automation it could easily be spun up very quickly when required to save the persistent disk costs.
LikeLike
Thanks, much appreciated. I have only experience with azure but looks like the difference is not that big.
LikeLike
You can also have a look at https://netlab.tools/ 😉
We use containerlab (and vrnetlab) under the hood and – of course – support ArubaCX with multiple configs.
This always save (at least to me) a lot of time when doing testing, since I don’t have to care anymore for basic configs and I can focus on the details.
LikeLike