In only a few minutes you can setup HPE Aruba Networking Central NAC to allow anyone with an OpenRoaming profile to connect to your Wi-Fi network.
Central NAC will perform the Access Network Provider (ANP) role in the OpenRoaming ecosystem, functioning as a RadSec proxy for authentication to the user’s home Identity Provider (IDP).
This will be a short post because it literally took me five mins to setup and test this after hearing it is now possible.
When in Roam
I already had the Purple OpenRoaming profile installed on my phone, but any OpenRoaming profile will do.
If you’re an iOS user you can download the OpenRoaming App from the app store, or for Android you can connect with a native Google account profile straight from your device.
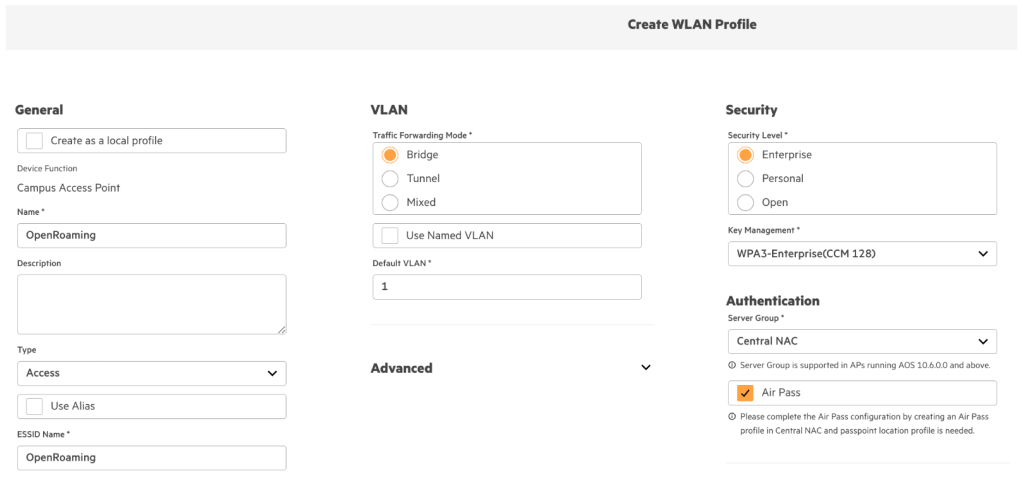
1. Create a WLAN Profile, the SSID can be called anything you like (literally that, if you want).
Pick WPA3-Enterprise (because friends don’t let friends configure WPA2-Enterprise), select Central NAC and check Air Pass.
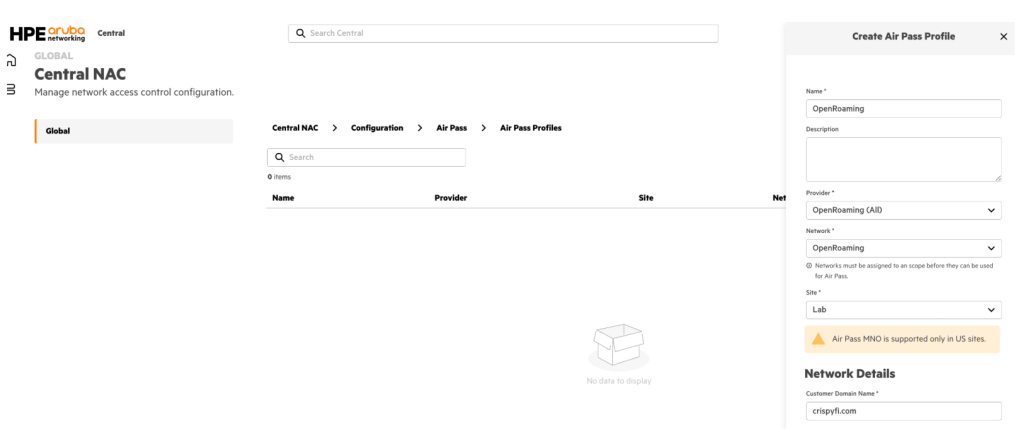
2. Like the small ‘i’ says, head over to Air Pass in Central NAC and create an AirPass Profile.
Select the built-in OpenRoaming (All) provider, select your Network and Site from the drop-down menu, enter your domain name, select site type and click Create.
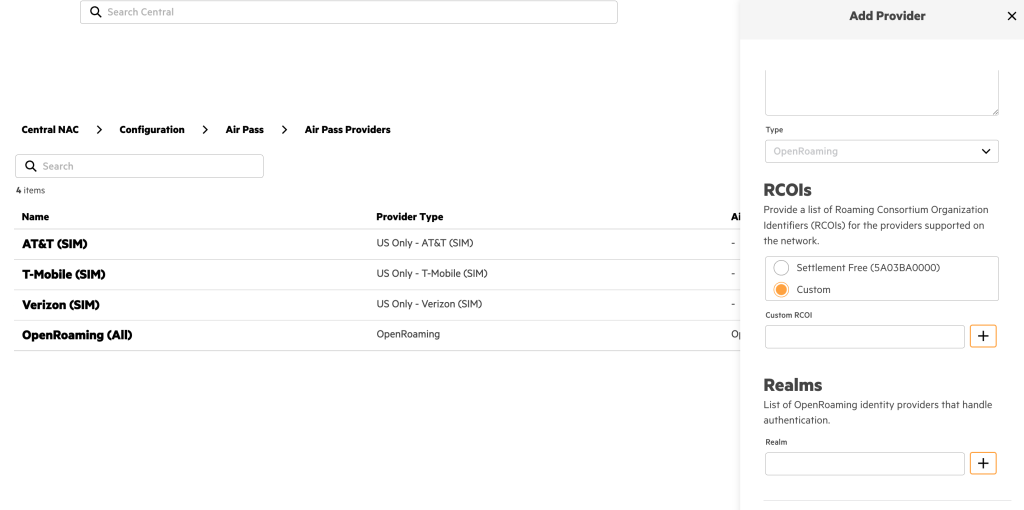
You can also create a custom Air Pass Provider with
You can also create a new Air Pass Provider with a custom RCOI and Realm list if you’d prefer.
3. And you’re done. I’ll have my beer back now thanks.
This deployment guide describes how to configure HPE Aruba Networking Central NAC with Microsoft Entra ID and Intune to:
Authenticate Windows 11 users and devices using EAP-TLS
Assign access roles based on Entra ID group membership
Enforce Intune compliance
Perform client certificate enrolment against Central NAC PKI
Deploy all required client configuration using Intune
It is possible to configure all of the above using the core feature set of Central NAC which does not require any additional licensing beyond Foundation AP licenses.
The following components must be configured:
Microsoft Entra ID
App Registration
Central AP Config
Roles
WLAN Profile
Central NAC
Identity Store
Intune Extension
Authentication Profile
Authorization Policy
Microsoft Intune Configuration Profiles
Trusted certificate profile
SCEP certificate profile – Device
SCEP certificate profile – User
Wi-Fi profile
It is assumed that an existing Microsoft Entra ID tenant with Intune licensing is available with a Windows 11 device already enrolled.
A special thanks to Nicolas CULETTO for creating the Technote that helped with the UEM component.
Microsoft Entra ID – App Registration
1. Navigate to Entra ID > App Registrations and click New registration
Parameter
Value
Name
Central NAC
Supported account types
Accounts in this organisational directory only
2. Record Application (client) ID
3. Record Directory (tenant) ID
4. Navigate to Manage > API permissions
5. Grant API Permissions:
Intune – Application permissions
scep_challenge_provider
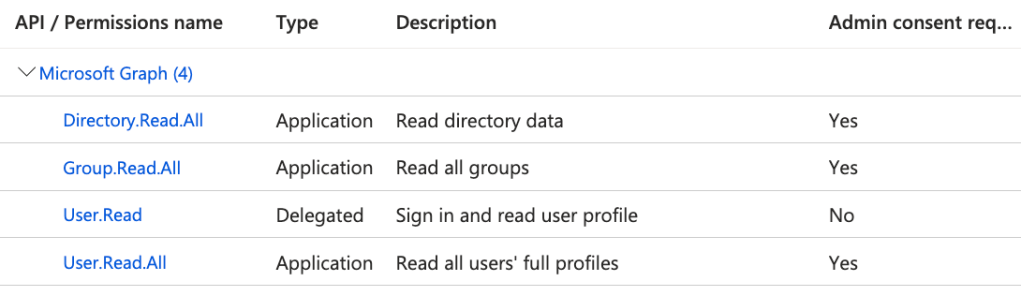
Microsoft Graph – Application permissions
Application.Read.All
DeviceManagementManagedDevices.Read.All
Directory.Read.All
Group.Read.All
User.Read.All
6. Grant admin consent for App Registration
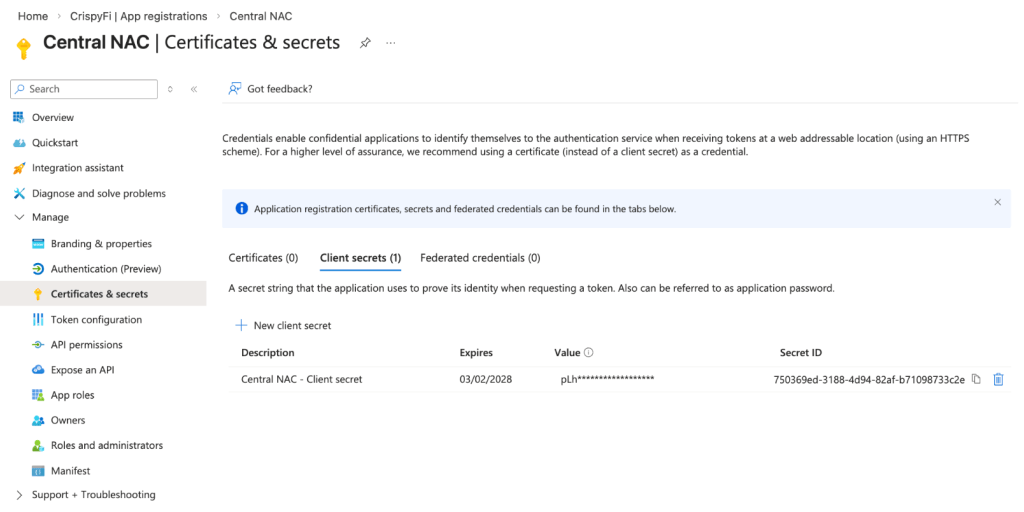
7. Navigate to Certificates & secrets > Client secret > New client secret
BEFORE LEAVING SCREEN: Record client Secret Id and Value
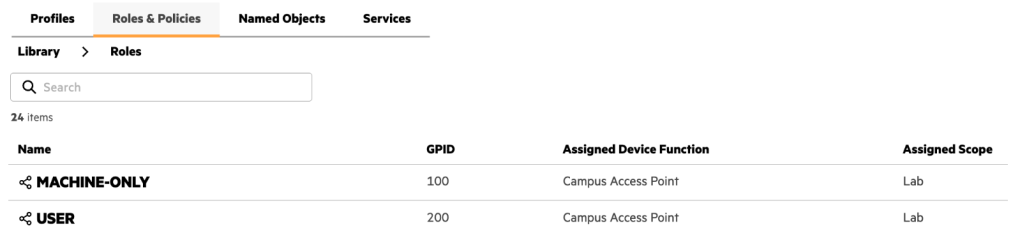
Central AP Config – Roles and Policies
IMPORTANT: Roles and WLANs must be created at the Library level to be visible by Central NAC.
1. Create two roles in the Configuration Library, and assign the Device Function and Scope as follows:
2. Create a role-based policy in the Configuration Library, create rules for the newly created roles above and assign the Device Function and Scope as follows:
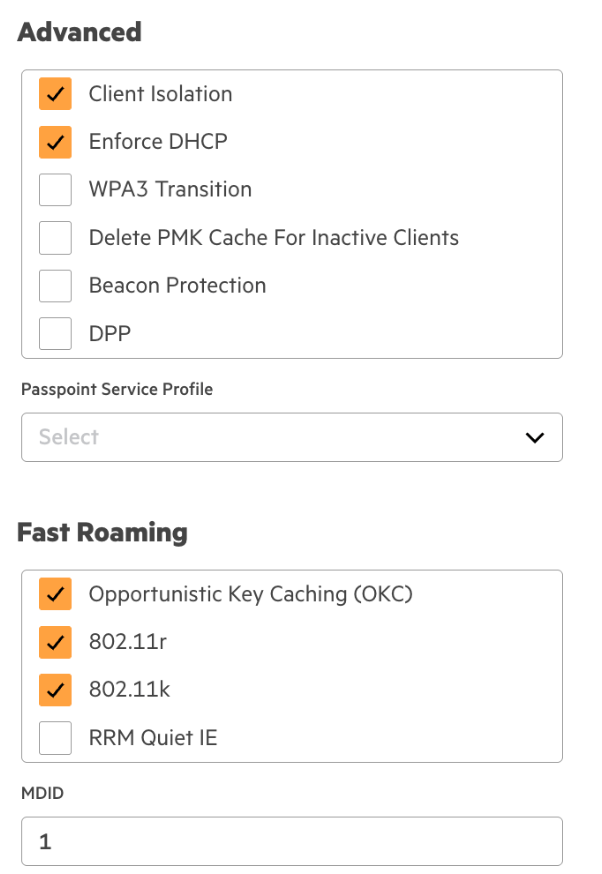
Central AP Config – WLAN Profile
1. Create a WLAN profile in the Configuration Library with the following configuration, and assign the Device Function and Scope as follows:
Parameter
Value
Name
<WLAN Profile Name>
ESSID Name
EAP-TLS
Security Level
Enterprise
Key Management
WPA3-Enterprise(CCM-128)
Server Group
Central NAC
Organization Name
<Your Organization Name>
Client Isolation
Enabled
Enforce DHCP
Enabled
802.11r
Enabled
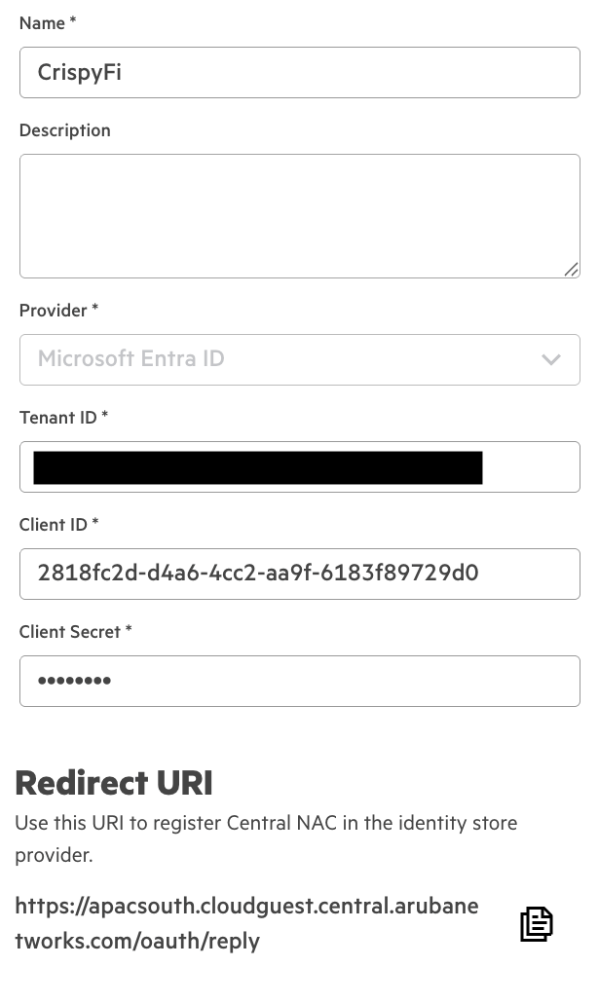
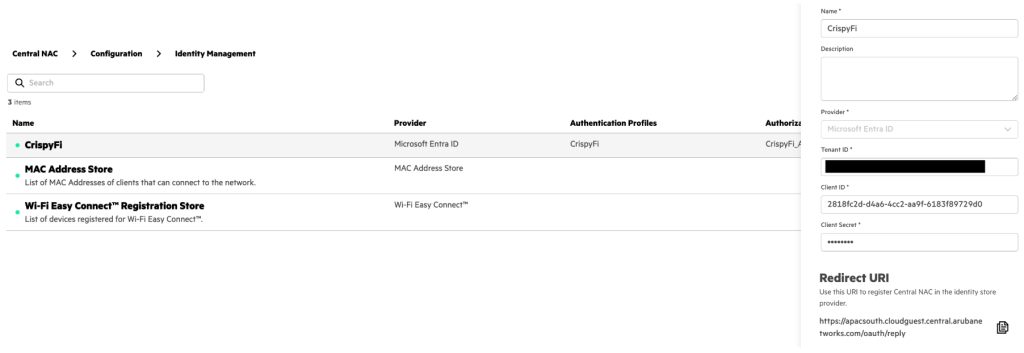
Central NAC – Identity Store
1. Navigate to Central NAC > Configuration > Identity Management and click Create Identity Store
2. Add the following configuration and click Create
Parameter
Value
Name
<Identity Store Name>
Provider
Microsoft Entra ID
Tenant ID
<Tenant ID from App Registration>
Client ID
<Client ID from App Registration>
Client Secret
<Client Secret Value from App Registration>
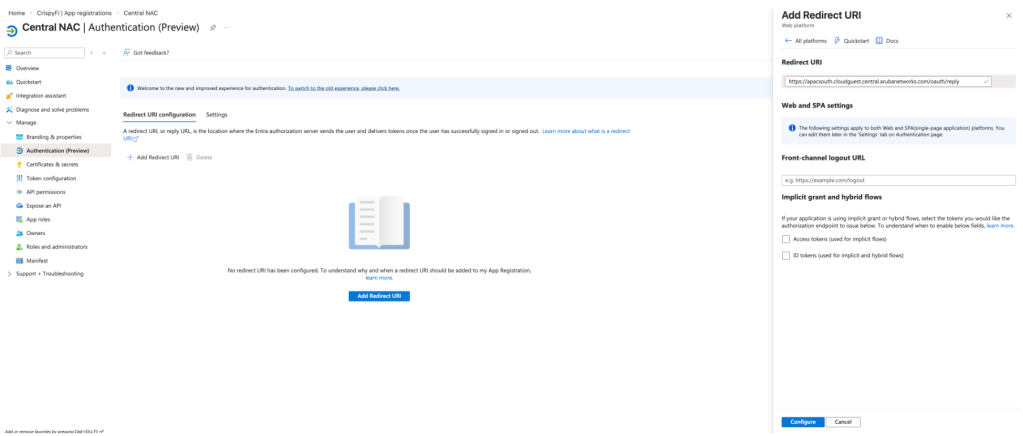
3. Copy and record the Redirect URI
4. Under the Entra ID App Registration, navigate to Manage > Authentication and click Add Redirect URI
5. Select Web platform, paste the Redirect URI from the Identity Store and click Configure
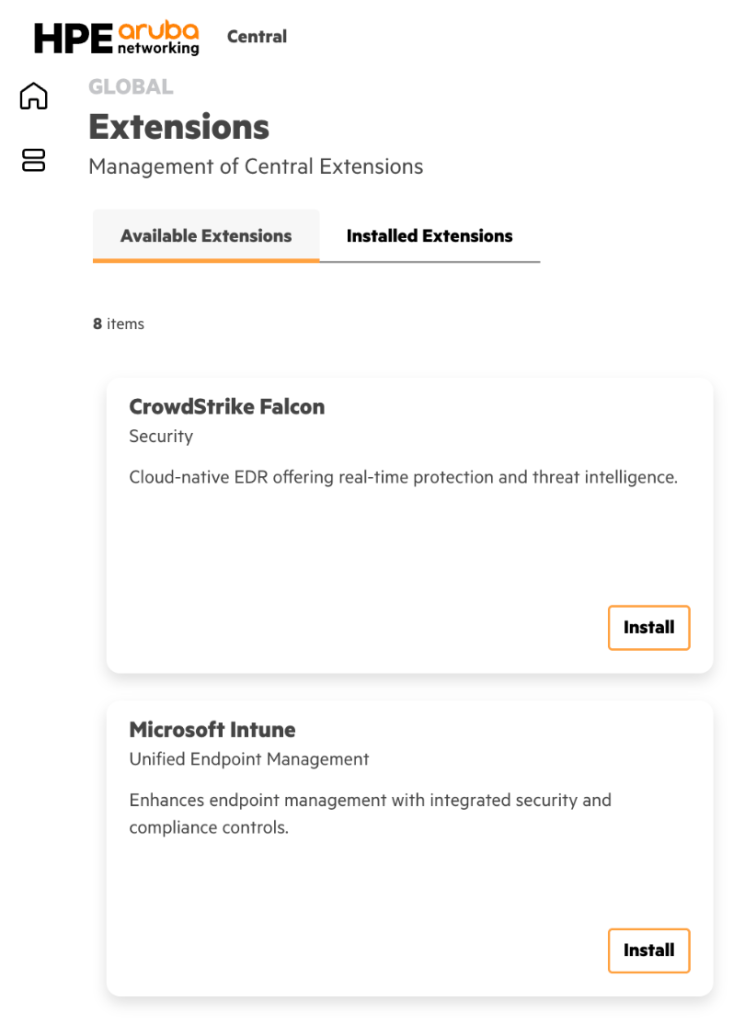
Central NAC – Intune Extension
1. Navigate to Extensions > Available Extensions and click Install next to Microsoft Intune
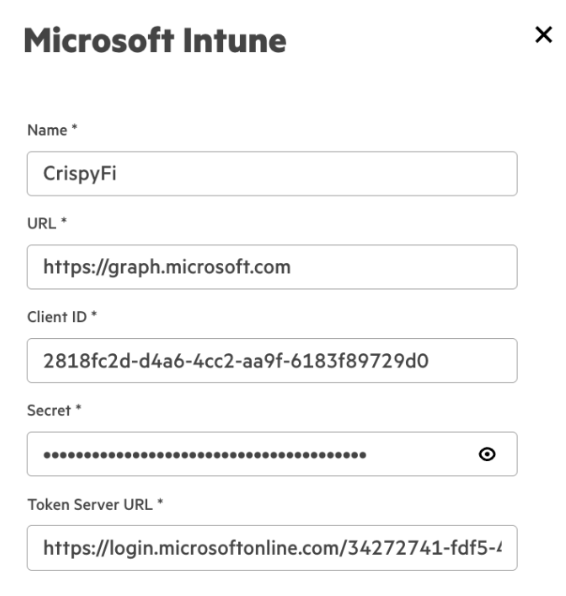
2. Add the following configuration and click Create
NOTE: Replace <TenantID> in the Token Server URL with your Entra ID Tenant ID.
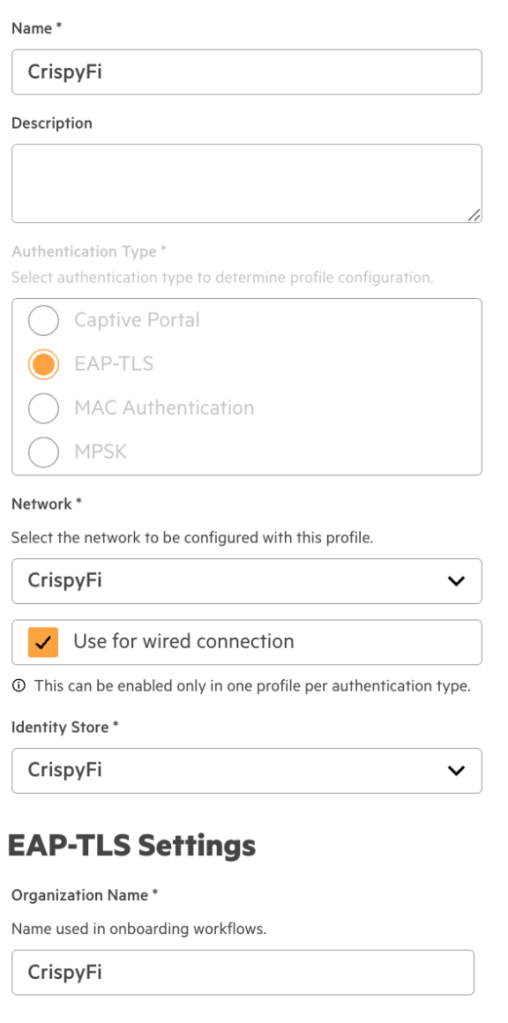
Central NAC – Authentication Profile
1. Navigate to Central NAC > Configuration > Authentication Profiles and click Create Profile
2. Add the following configuration
Parameter
Value
Name
<Authentication Profile Name>
Authentication Type
EAP-TLS
Network
<Your WLAN Name>
Use for wired connection
Enabled
Identity Store
<Your Identity Store>
Organization Name
<Your Organization Name>
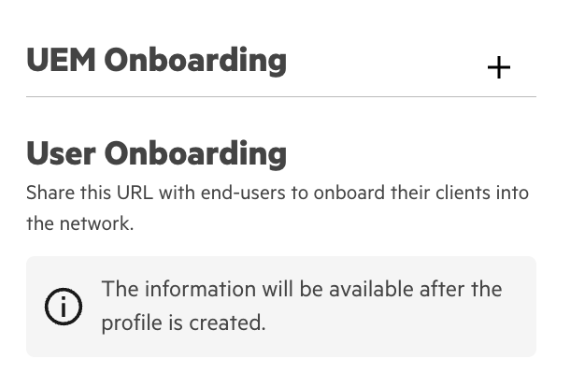
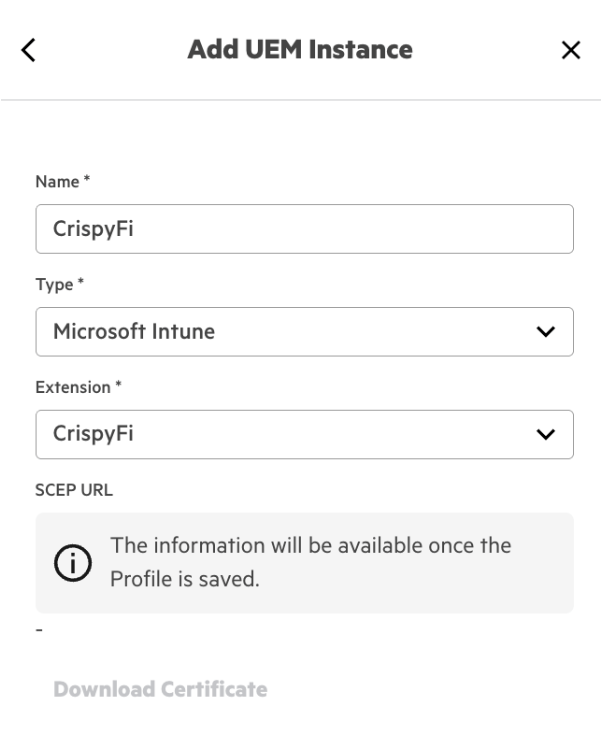
3. Click the + icon next to UEM Onboarding
4. Configure a name and select Microsoft Intune and the name of your Intune Extension from the drop-down menu
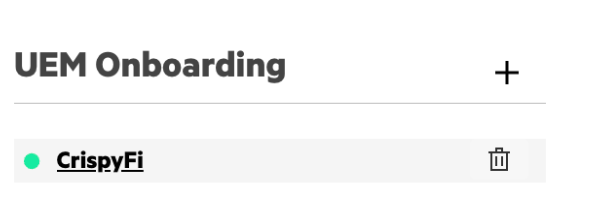
5. Click Create
6. Edit the newly created profile, scroll down to UEM Onboarding and click the profile name
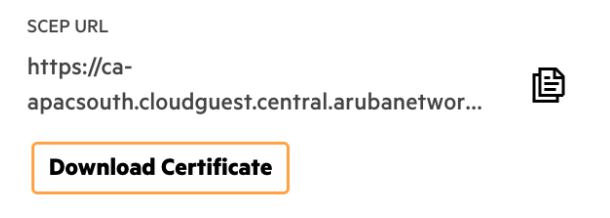
7. Copy and record the SCEP URL and click Download Certificate
These will be used when creating the Intune Configuration Profiles.
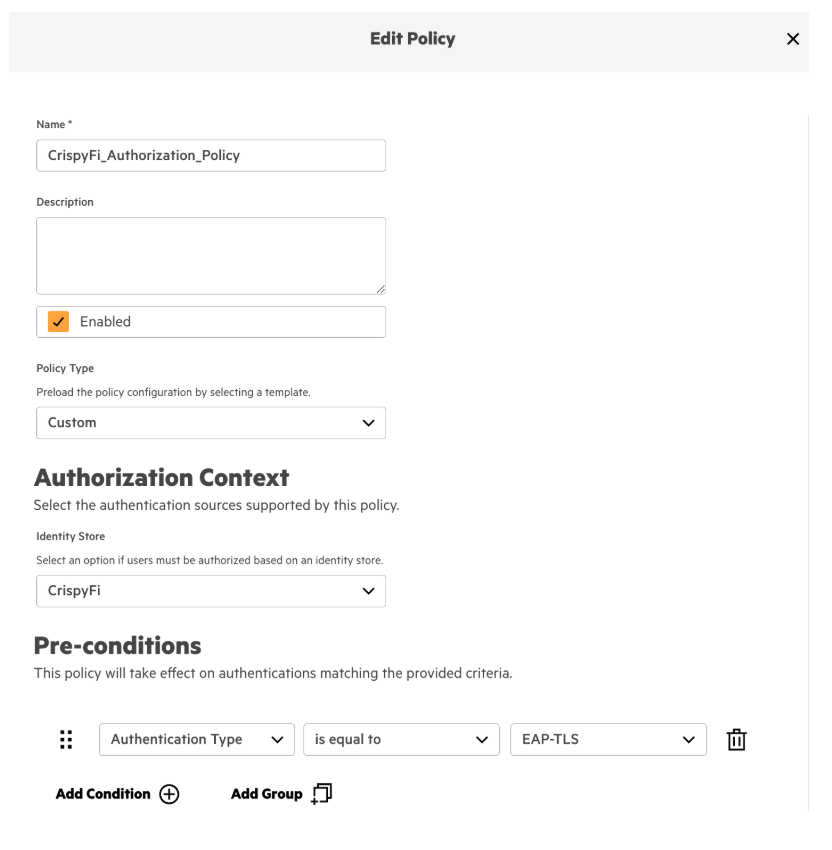
Central NAC – Authorization Policy
1. Navigate to Central NAC > Configuration > Authorization Policy and click **Create Policy
2. Add the following configuration and click Create
Parameter
Value
Name
<Authorization Policy Name>
Policy Type
Custom*
Identity Store
<Identity Store Name>
Pre-conditions
Authentication Type is equal to EAP-TLS
*NOTE: You can use a Policy Type of User if you don’t have a Premium Central NAC license.
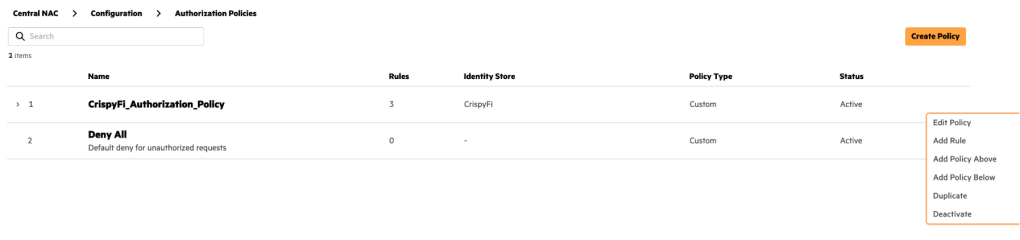
3. Click the ellipses next to the newly created policy and click Add Rule
4. Create a rule with the following configuration
Parameter
Value
Name
User + Intune Compliant
Conditions
User Group(<Identity Store Name>) containsUser Group Name
And
Client Tags contains any Intune: Compliant
Identity Store
<Identity Store Name>
Actions
Allow Access
Role
USER
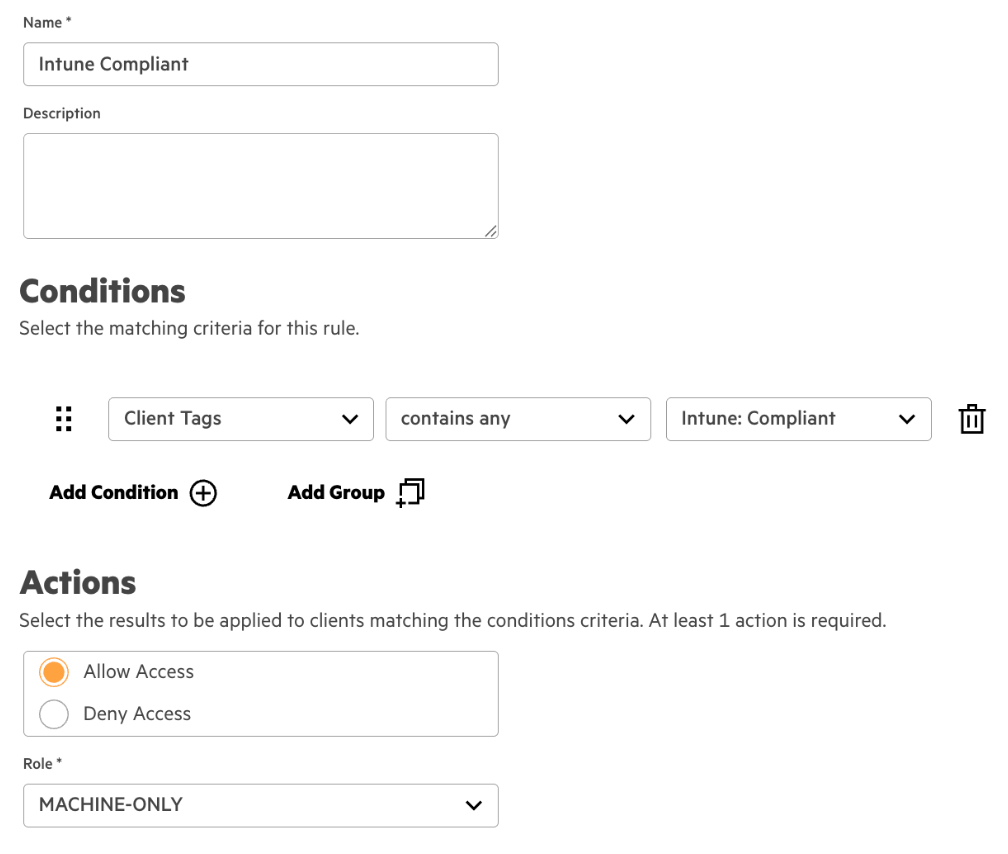
5. Create another rule with the following configuration
Parameter
Value
Name
Intune Compliant
Conditions
Client Tags contains any Intune: Compliant
Identity Store
<Identity Store Name>
Actions
Allow Access
Role
MACHINE-ONLY
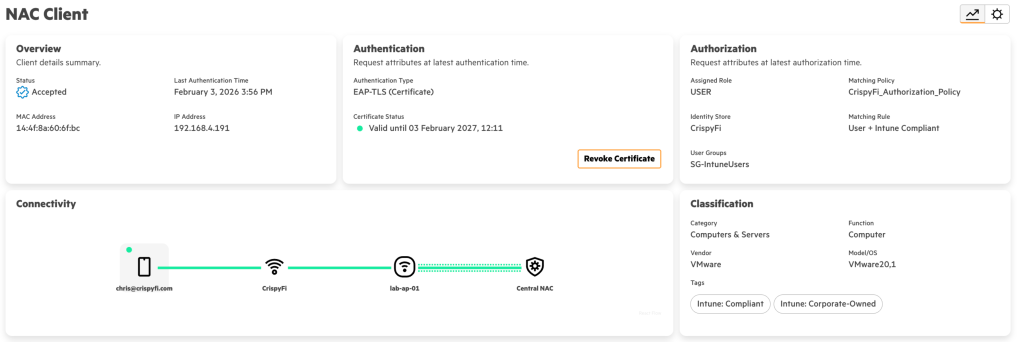
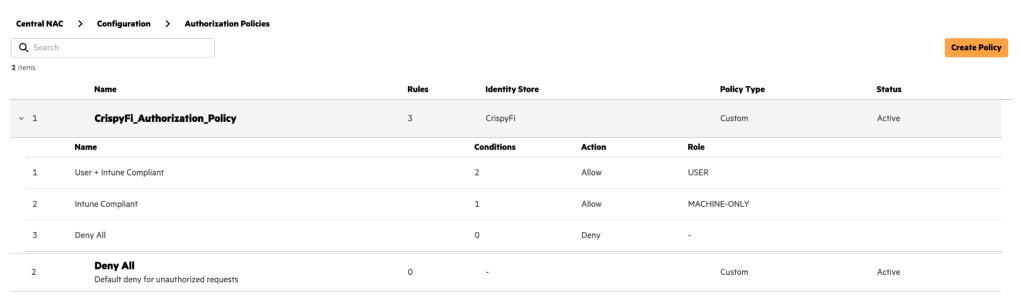
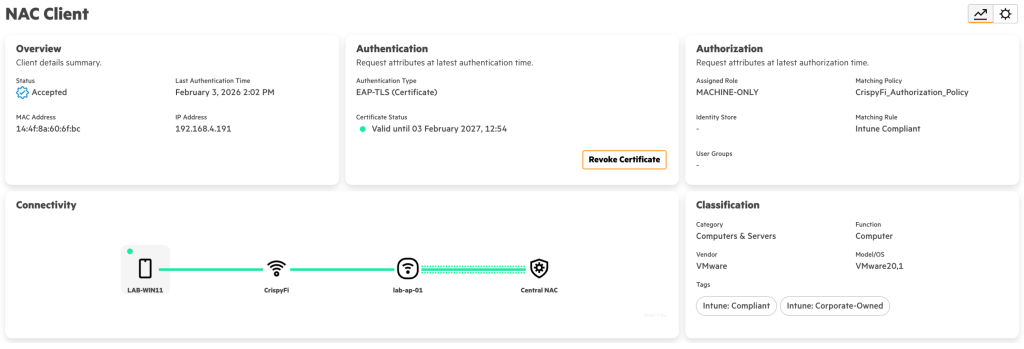
6. Review the configuration
The first rule will allow user authentication, requiring:
Certificate issued by Central NAC CA
Member of specific user group
Connecting from a compliant Intune managed device
The second rule will allow machine authentication, requiring:
Certificate issued by Central NAC CA
Connecting from a compliant Intune managed device
This will allow role-based VLAN access for users in different groups, and more restricted access for a Windows 11 device before a user logs in.
Microsoft Intune – Trusted certificate profile
Navigate to Microsoft Intune admin center> Home > Devices | Configuration profiles and Create a New Policy as follows:
Parameter
Value
Platform
Windows 10 and later
Profile type
Templates
Template name
Trusted certificate
Name
Windows Central NAC CA
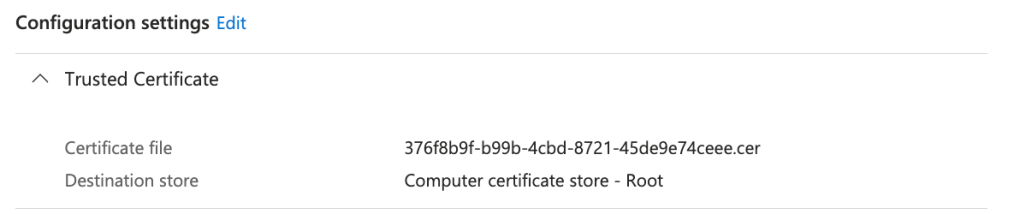
Configuration Settings
Parameter
Value
Certificate file
<Certificate downloaded from UEM Onboarding Config>
Destination store
Computer certificate store – Root
Assignments
Groups
<Intune Device Group>
<Intune User Group>
Microsoft Intune – SCEP certificate profile – Device
Navigate to Microsoft Intune admin center> Home > Devices | Configuration profiles and Create a New Policy as follows:
Parameter
Value
Platform
Windows 10 and later
Profile type
Templates
Template name
SCEP certificate
Name
Windows SCEP Device Certificate
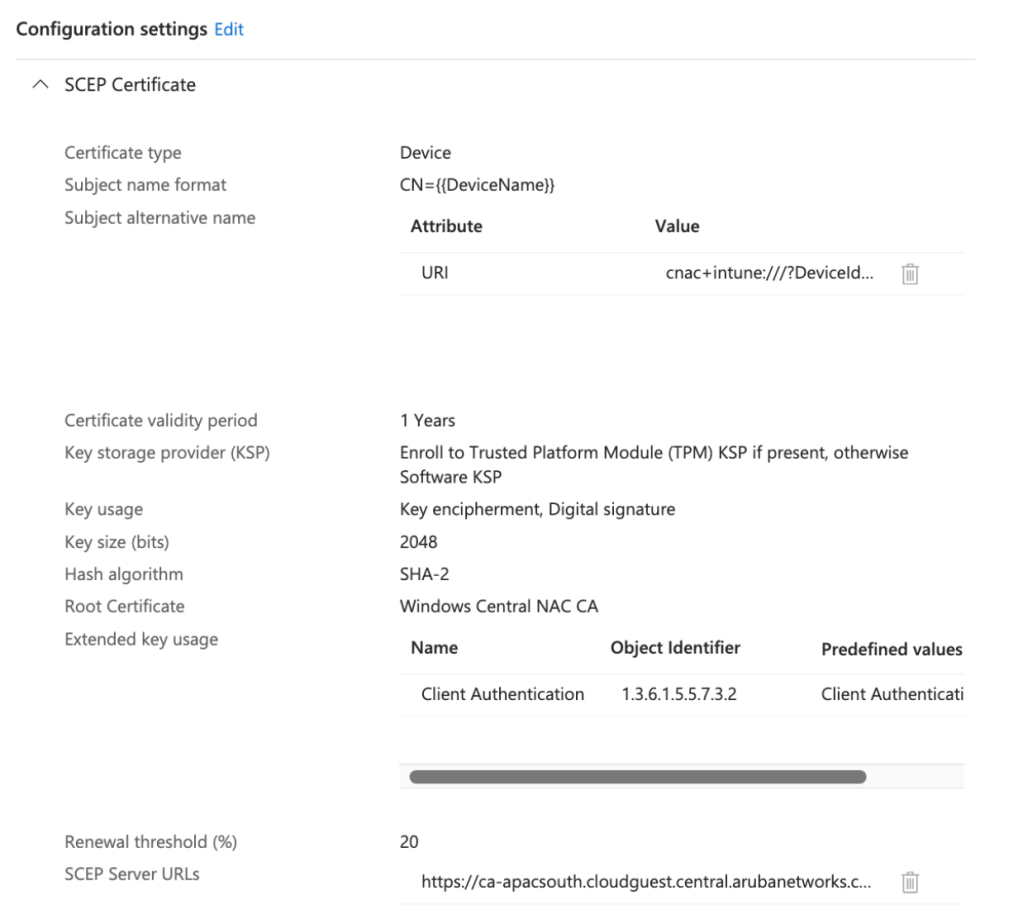
Configuration Settings
Parameter
Value
Certificate type
Device
Subject name format
CN={{DeviceName}}}
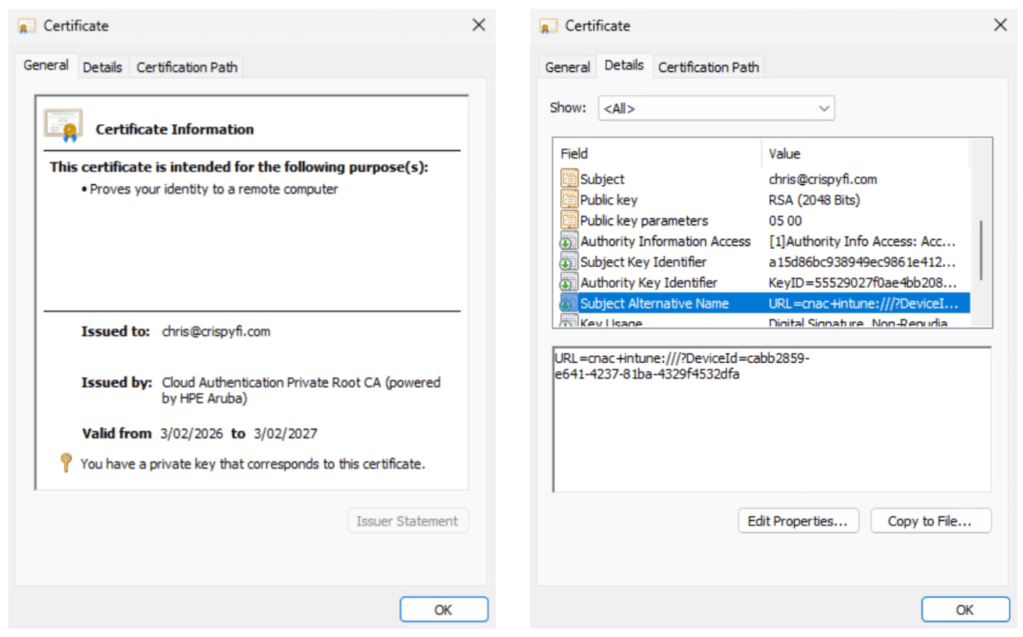
Subject alternative name
URI cnac+intune:///?DeviceId={{DeviceId}}
Key storage provider (KSP)
Enroll to Trusted Platform Module (TPM) KSP, otherwise Software KSP
Key usage
Digital signature, Key encipherment
Key size (bits)
2048
Hash algorithm
SHA-2
Root Certificate
<Trusted CA Certificate Profile>
Extended key usage
Client Authentication (1.3.6.1.5.5.7.3.2) under Predefined values
SCEP Server URLs
<SCEP URL from UEM Onboarding Config>
Assignments
Groups
<Intune Device Group>
Microsoft Intune – SCEP certificate profile – User
Navigate to Microsoft Intune admin center> Home > Devices | Configuration profiles and Create a New Policy as follows:
Parameter
Value
Platform
Windows 10 and later
Profile type
Templates
Template name
SCEP certificate
Name
Windows SCEP User Certificate
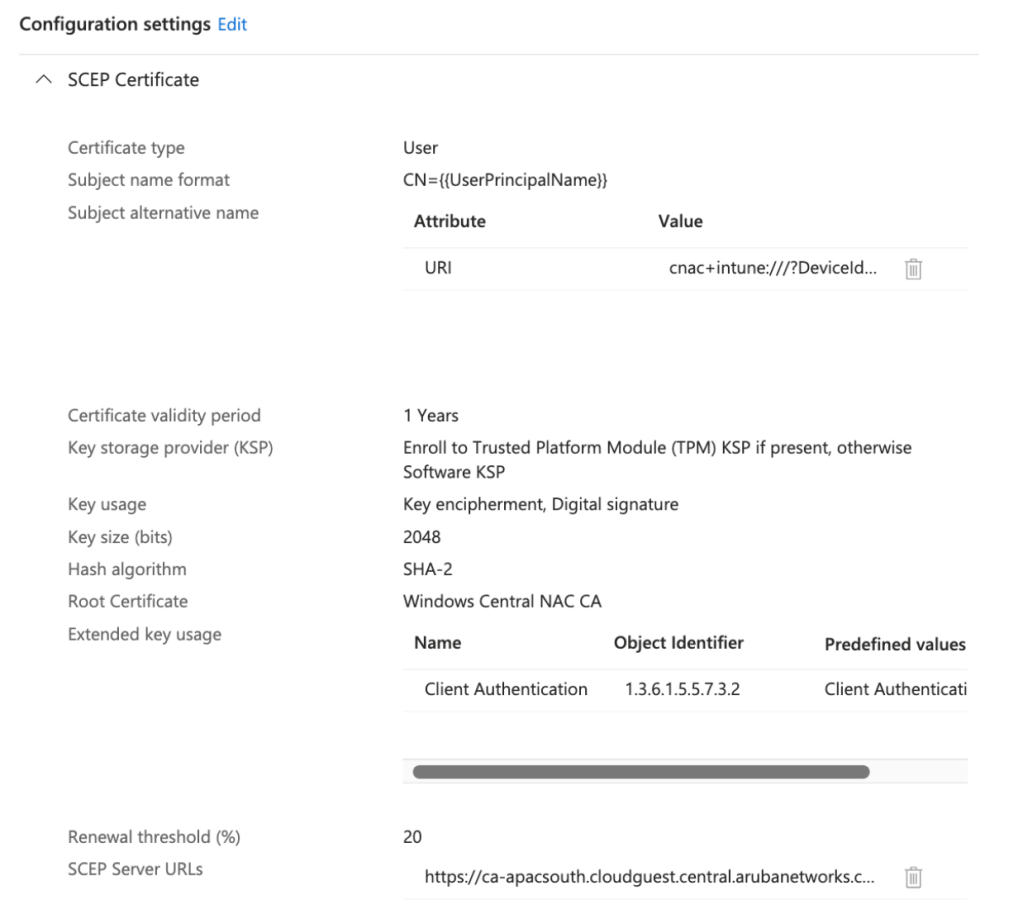
Configuration Settings
Parameter
Value
Certificate type
User
Subject name format
CN={{UserPrincipalName}}}
Subject alternative name
URI cnac+intune:///?DeviceId={{DeviceId}}
Key storage provider (KSP)
Enroll to Trusted Platform Module (TPM) KSP, otherwise Software KSP
Key usage
Digital signature, Key encipherment
Key size (bits)
2048
Hash algorithm
SHA-2
Root Certificate
<Trusted CA Certificate Profile>
Extended key usage
Client Authentication (1.3.6.1.5.5.7.3.2) under Predefined values
SCEP Server URLs
<SCEP URL from UEM Onboarding Config>
Assignments
Groups
<Intune User Group>
Microsoft Intune – Wi-Fi profile
Navigate to Microsoft Intune admin center> Home > Devices | Configuration profiles and Create a New Policy as follows:
Parameter
Value
Platform
Windows 10 and later
Profile type
Templates
Template name
Wi-Fi
Name
Windows Central NAC Wi-Fi
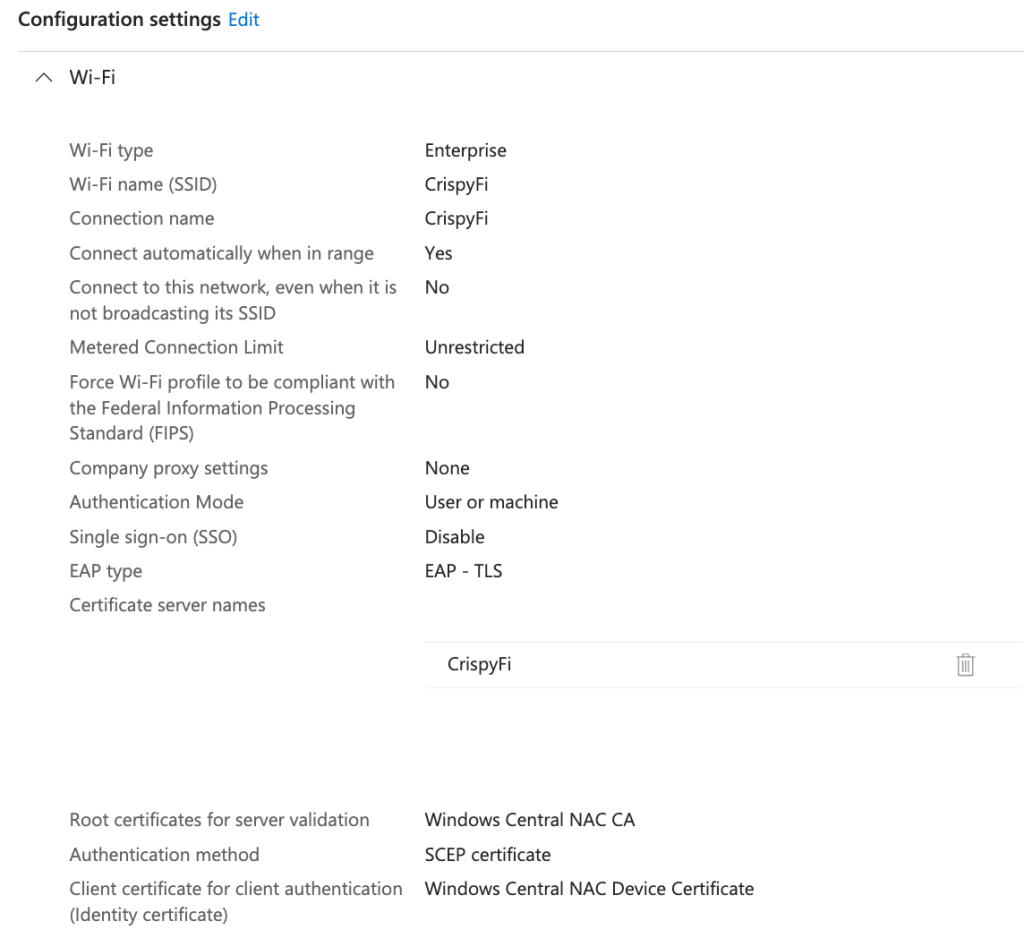
Configuration Settings
Parameter
Value
Wi-Fi type
Wi-Fi name (SSID)
<SSID name>
Connection name
<Connection name>
Connect automatically when in range
Yes
Authentication Mode
User or machine
EAP type
EAP-TLS
Certificate server names
<SSID name>
Root certificates for server validation
<Trusted CA Certificate Profile>
Authentication method
SCEP certificate
Client certificate for client authentication (Identity certificate)
<SCEP Device Certificate Profile>
Assignments
Groups
<Intune Device Group>
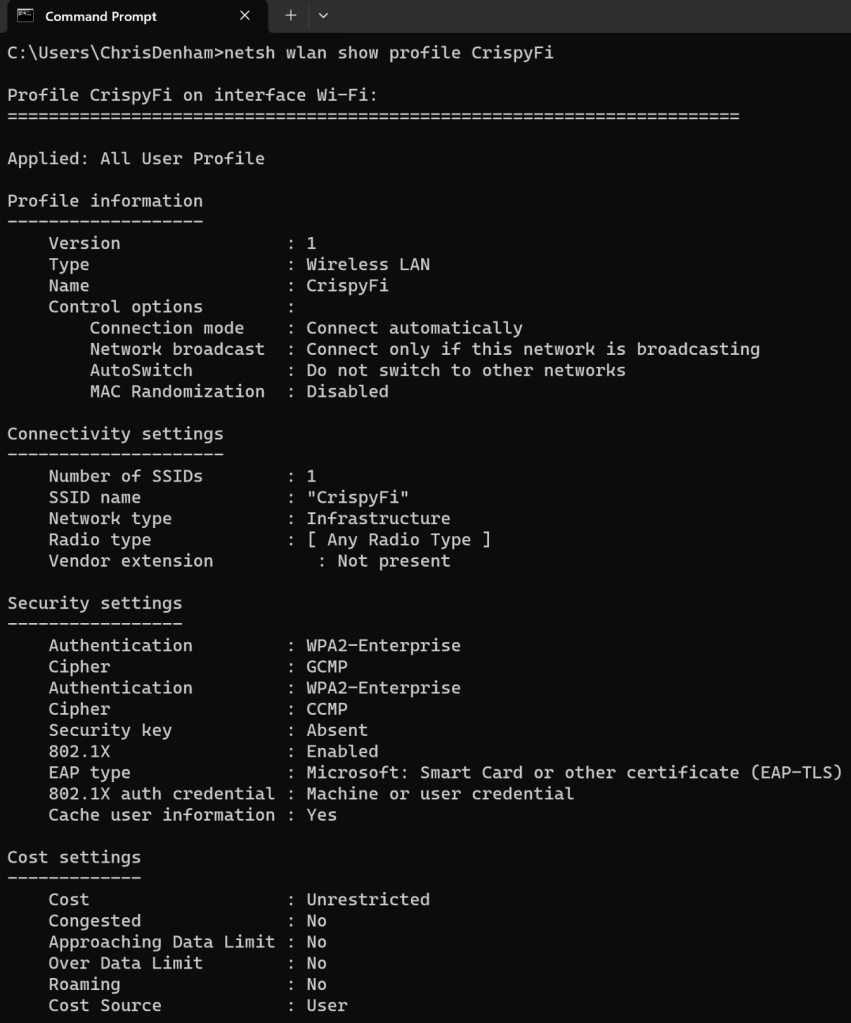
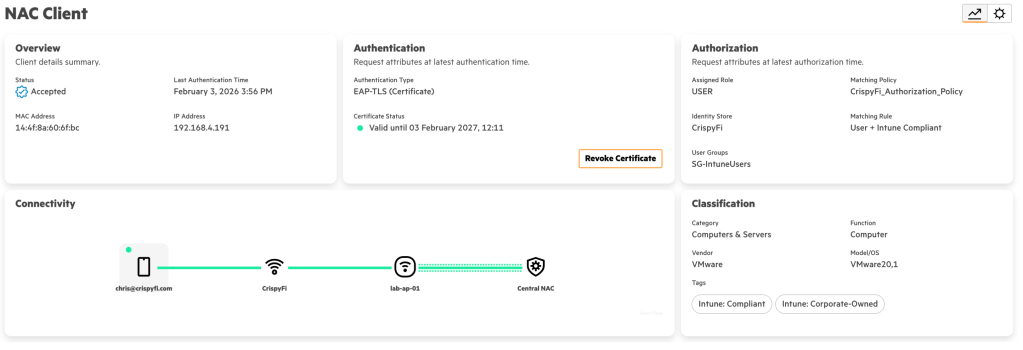
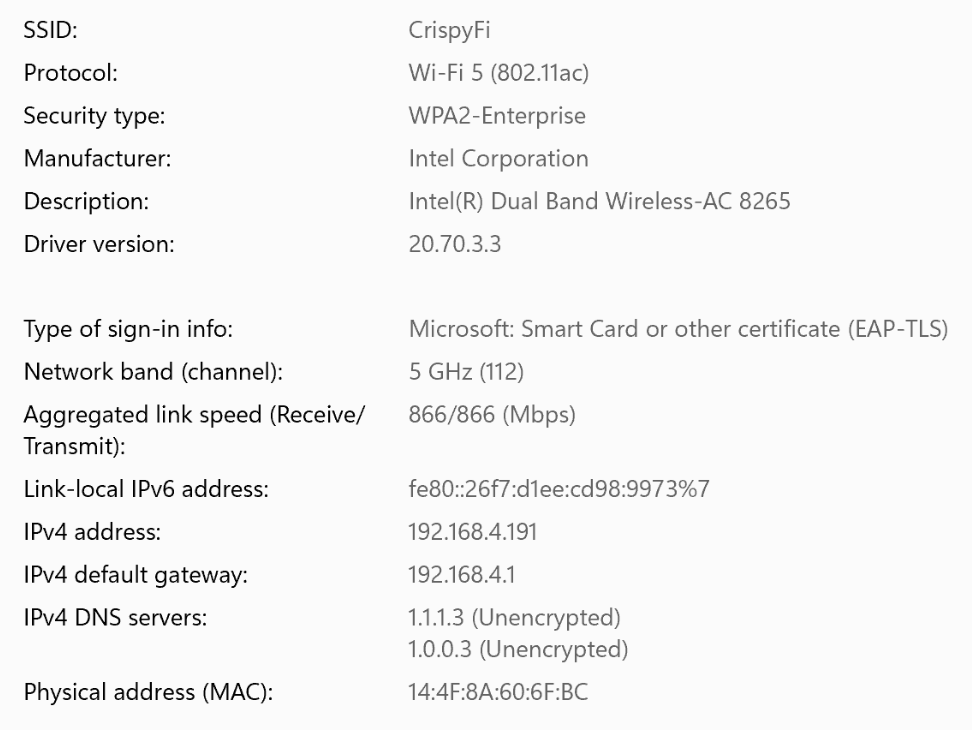
Deployed Windows 11 Configuration
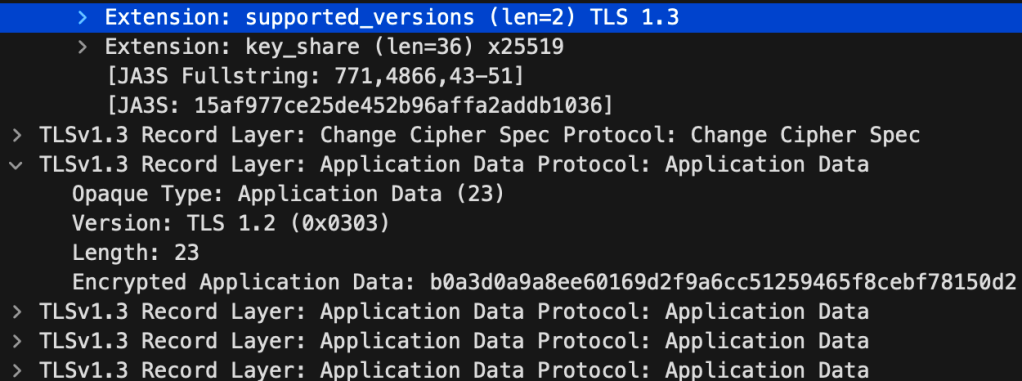
Although Windows is configured with WPA2-Enterprise, it will happily connect to a WPA3-Enterprise network.
The only differences between WPA2 and WPA3 Enterprise(CCM-128) are the use of a SHA-256 AKM (instead of SHA-1) and requiring Management Frame Protection (which can be used in a WPA2-Enterprise network anyway.
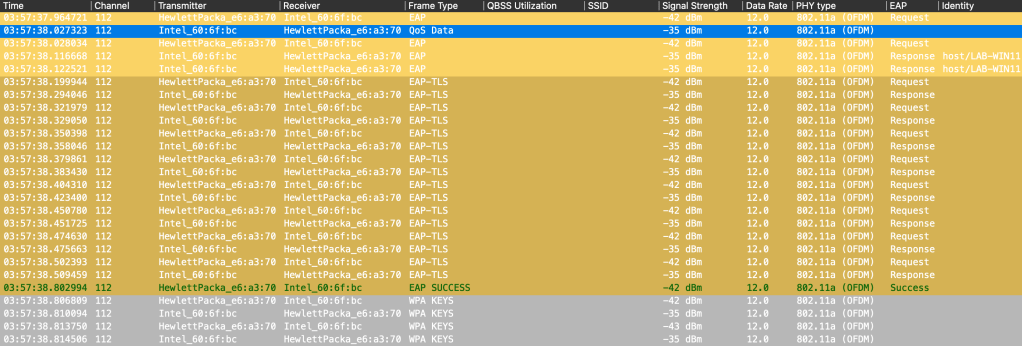
See below showing the 802.1X (SHA-256) (AKM 5) and FT-802.1X (AKM 3) for 802.11r capable clients.
Refer to the WPA3-Enterprise TechDoc for more information:
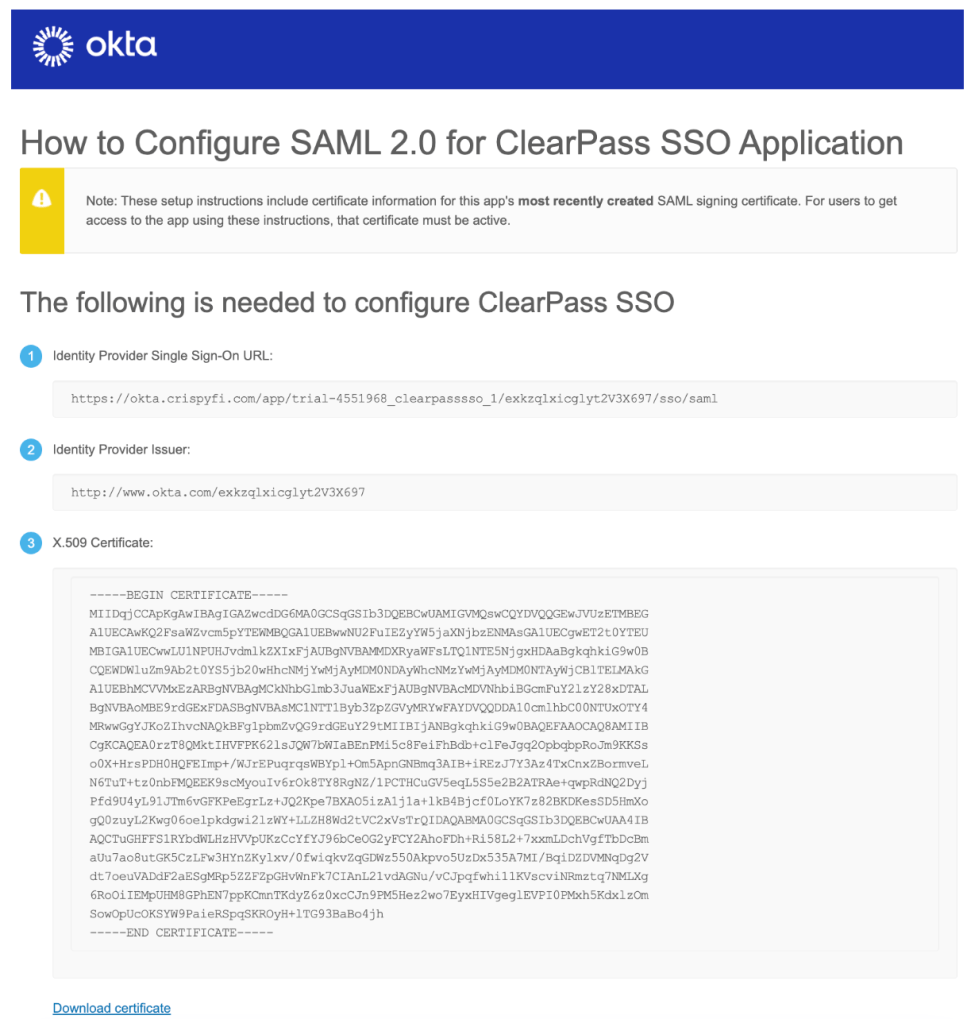
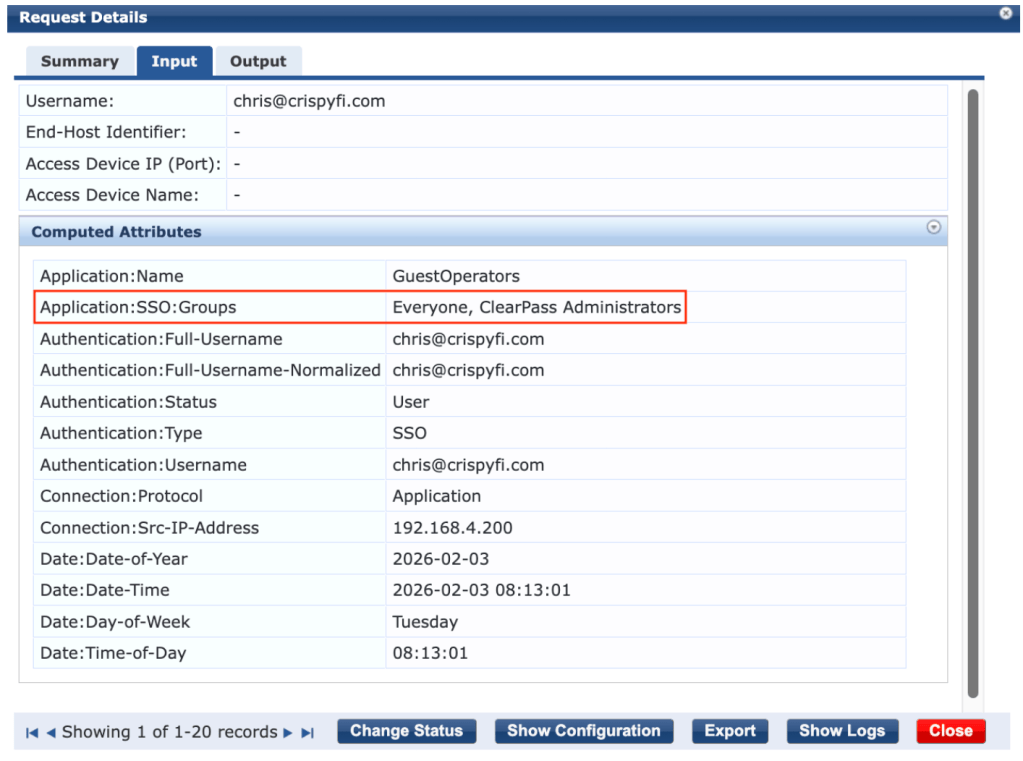
NOTE: It is recommended to enable SSO for only one application initially (e.g. GuestOperators) until SSO has been tested successfully.
Enabling SSO for an application will prevent logins to the WebUI using local administrator accounts. In order to recover access, login to the CLI of the virtual appliance and execute the command below, which will reset all Single Sign-On (SSO) configuration.
system sso-reset
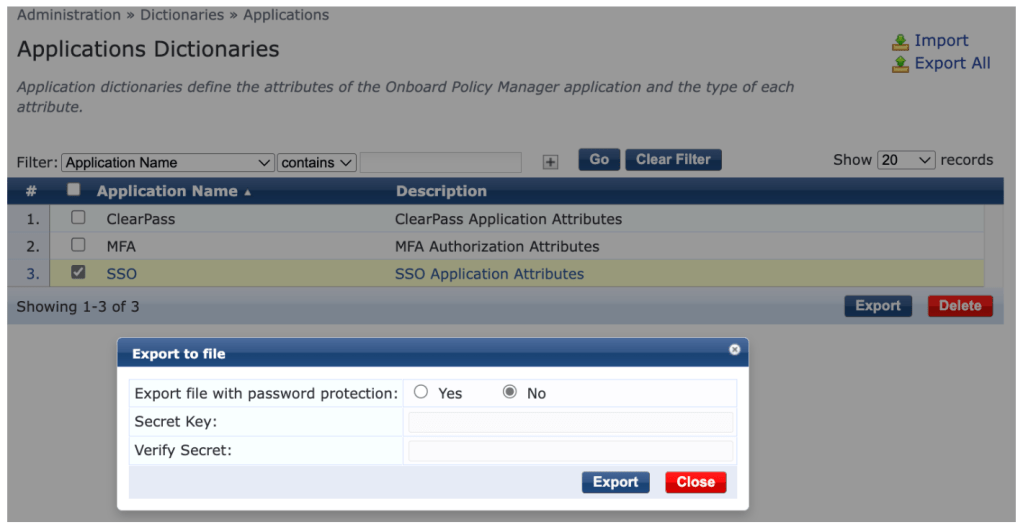
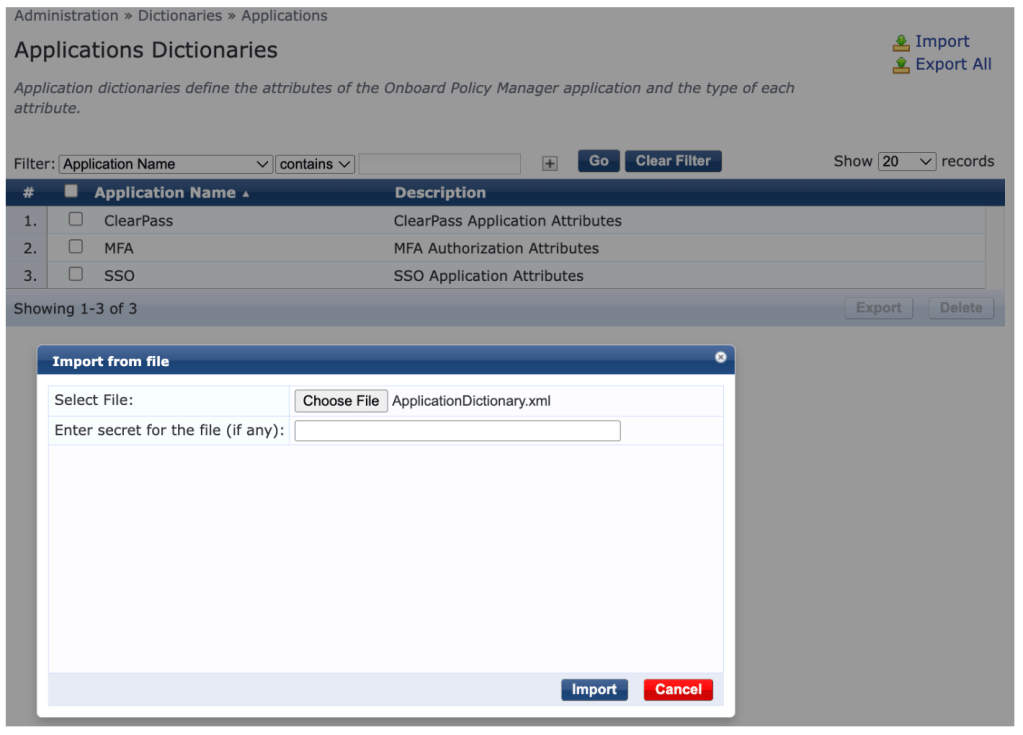
3. Under Administration > Dictionaries > Applications, select the SSO dictionary, click Export, select No then Export
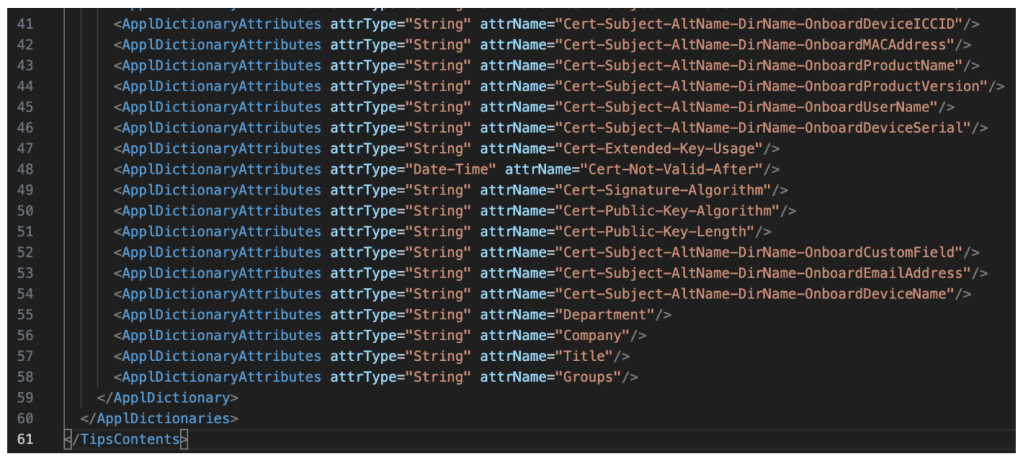
4. Add the following line to ApplicationDictionary.xml:
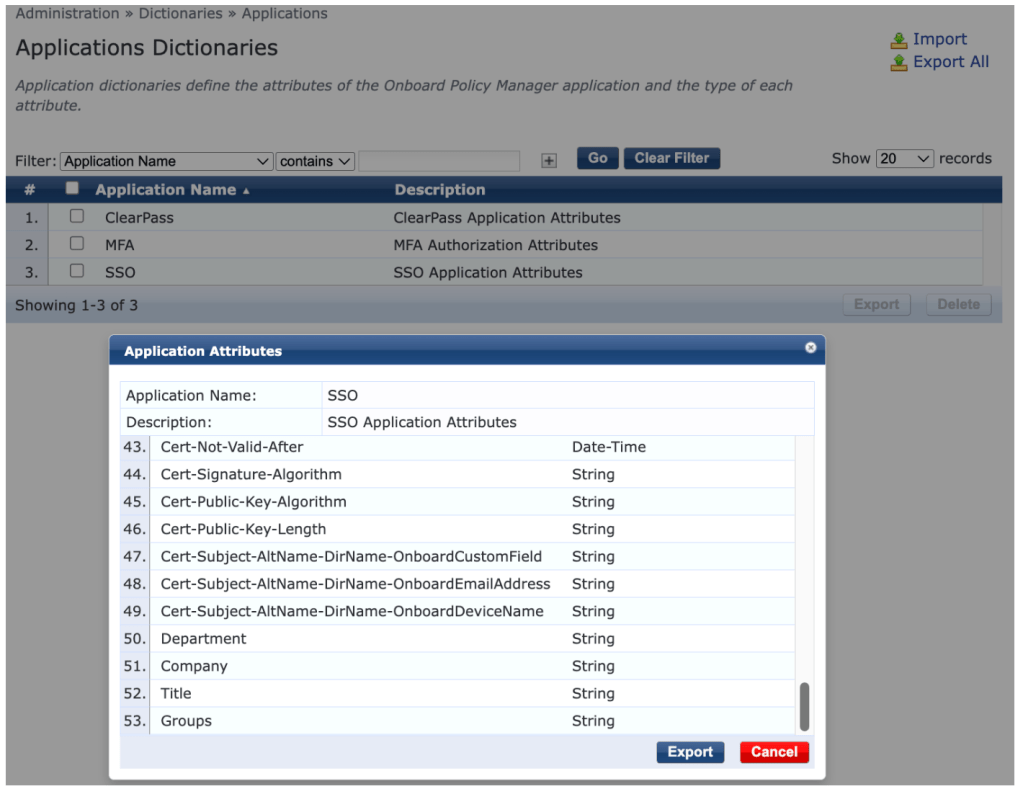
5. Click Import, select ApplicationDictionary.xml and click Import
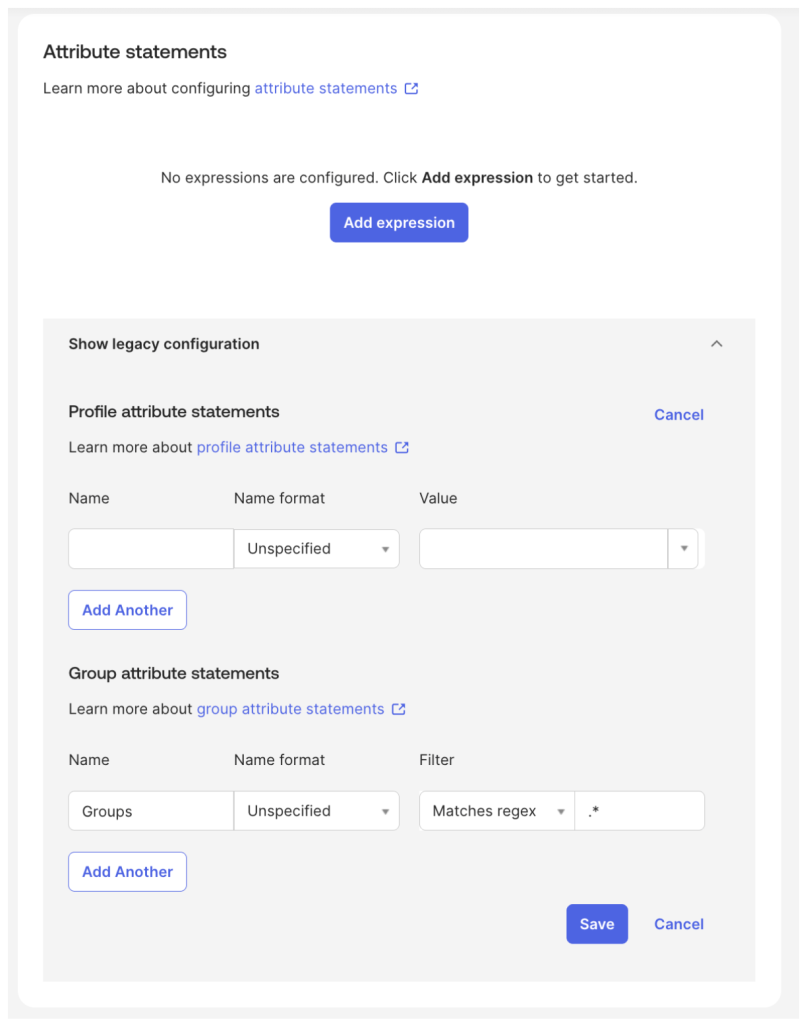
6. Select the SSO Application Dictionary and scroll down to confirm that the Groups attribute has been added
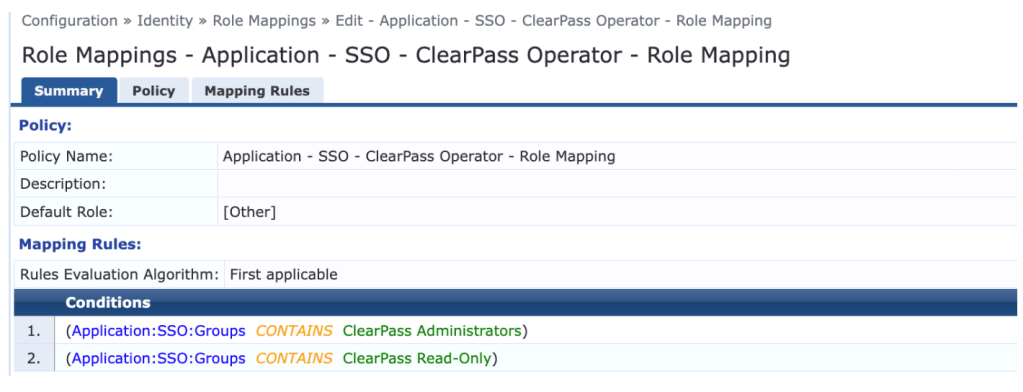
7. Create roles corresponding to your Okta group names, and create a Role Mapping policy according to the screenshot below:
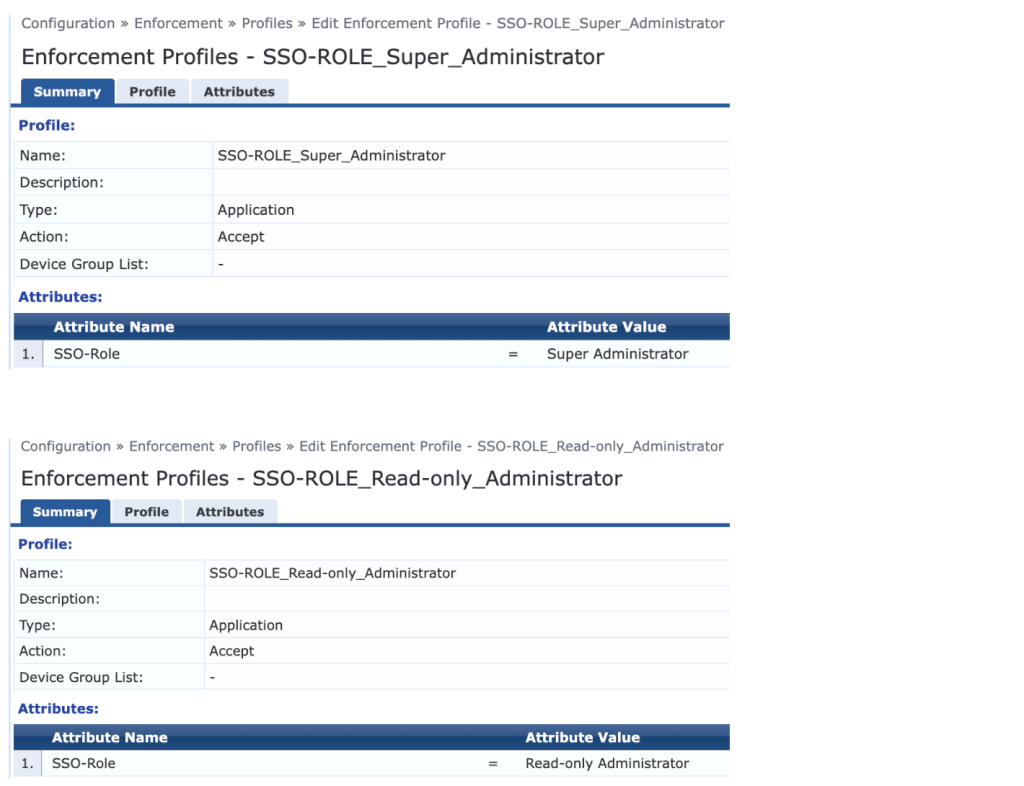
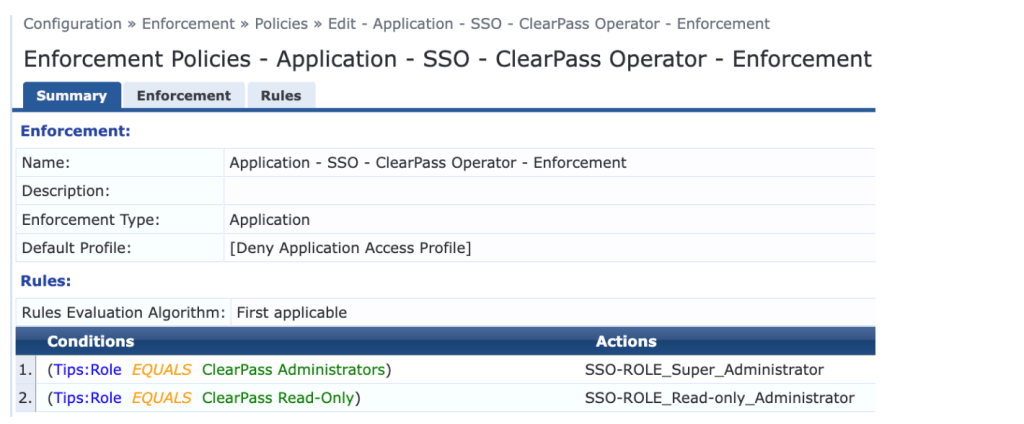
8. Create enforcement profiles which assign the desired SSO roles
9. Create an enforcement policy according to the screenshot below:
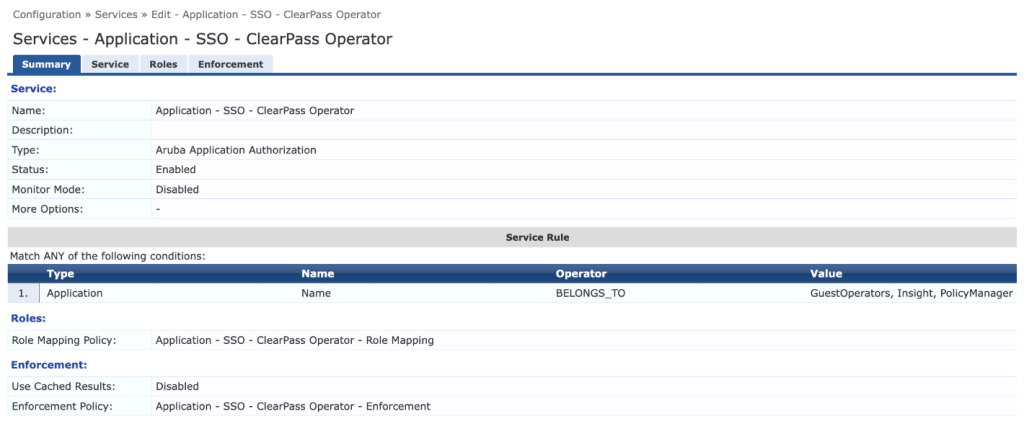
10. Create an Aruba Application Authorization service and select the previously created Role Mapping and Enforcement Policies
Verification
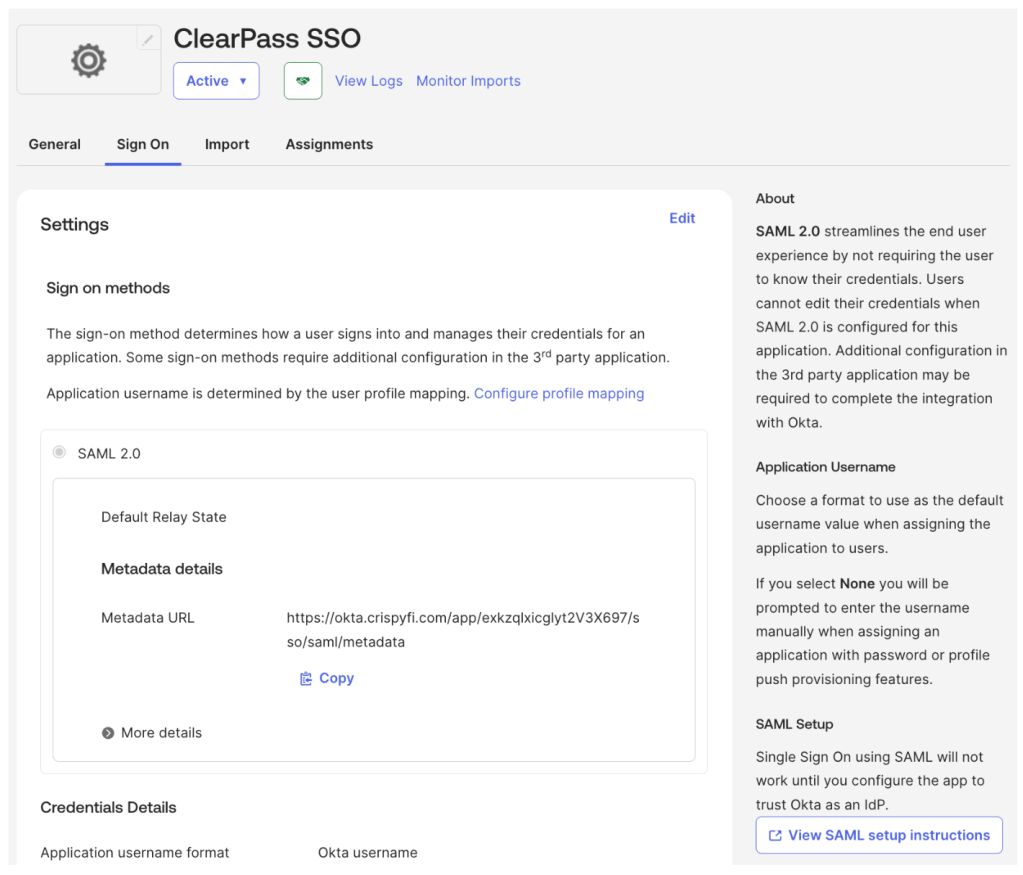
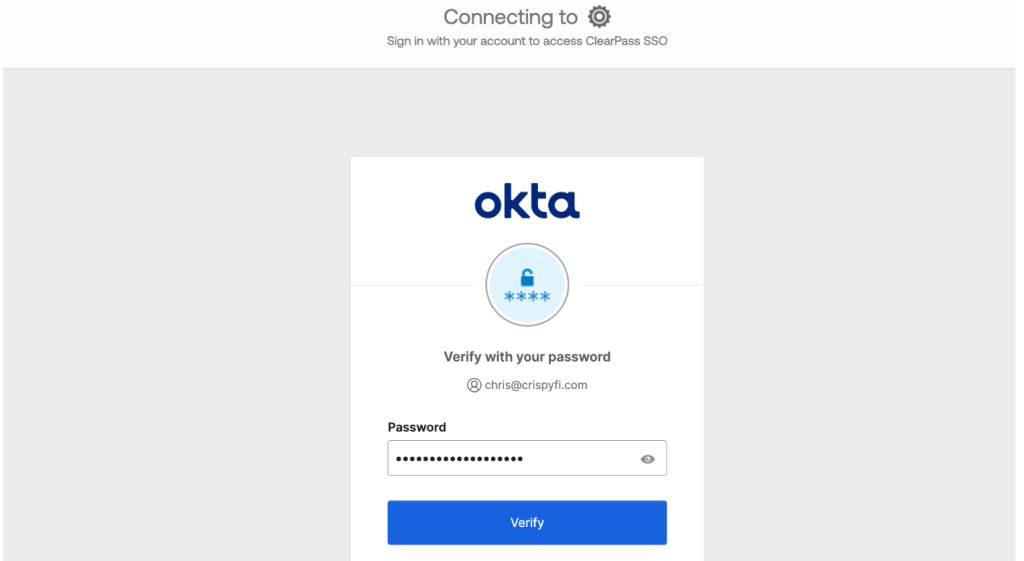
1. In a private browser tab, connect to ClearPas and select the SSO enabled Application
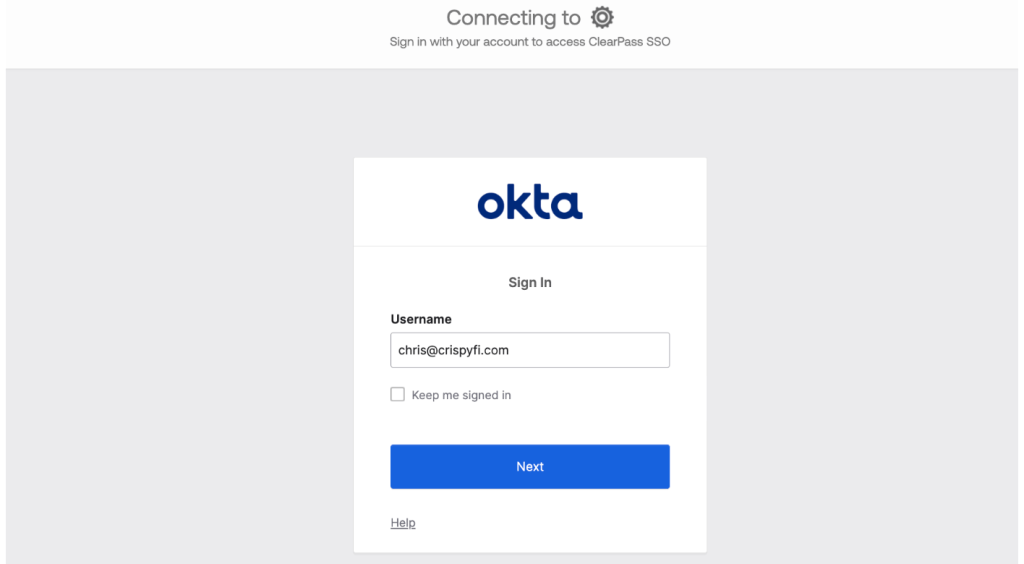
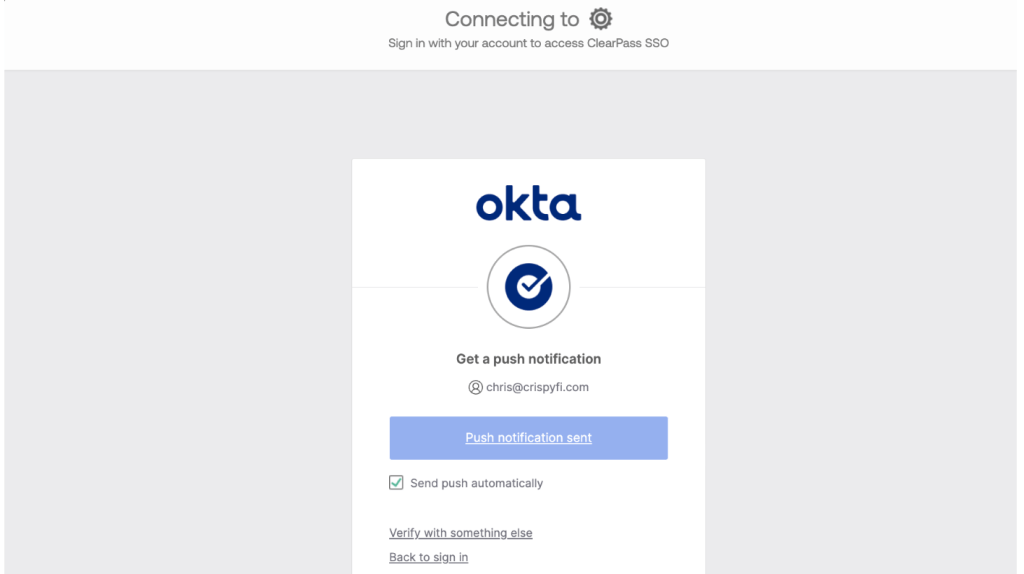
2. Sign in using Okta
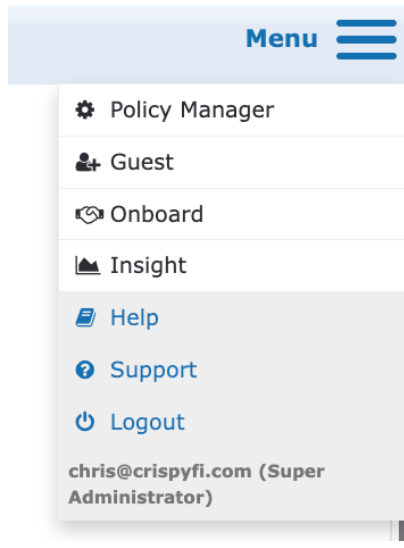
3. Confirm username and role assignment is visible under the Menu in the top-right corner of the screen
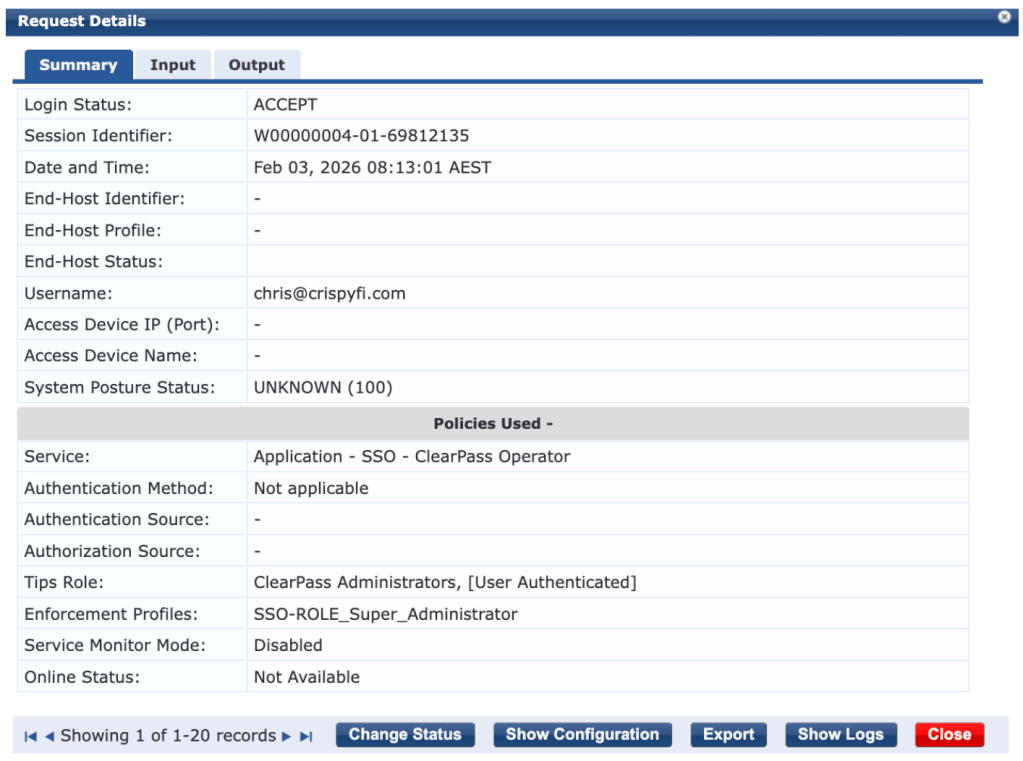
4. Confirm successful authentication in Access Tracker
5. Observe returned Okta Groups under Input tab
6. For further troubleshooting, a browser extension such as SAML Tracer can be used to confirm that Okta is including the correct Groups list as SAML attributes. Here is a snippet of output from a successful authentication:
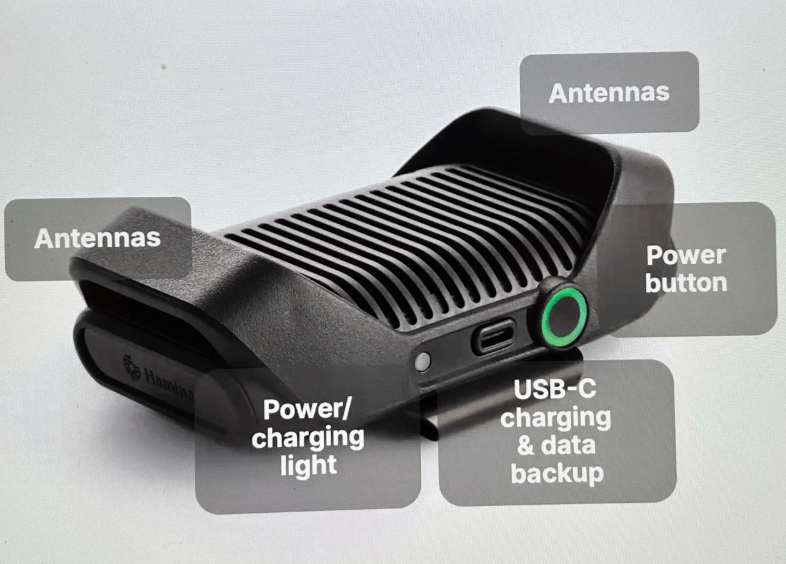
Do you remember the first time you used AirPods? The freedom from being tangled up or tied to your device was a game changer. I experienced that all over again when I tried out Hamina’s new survey device – the Clip.
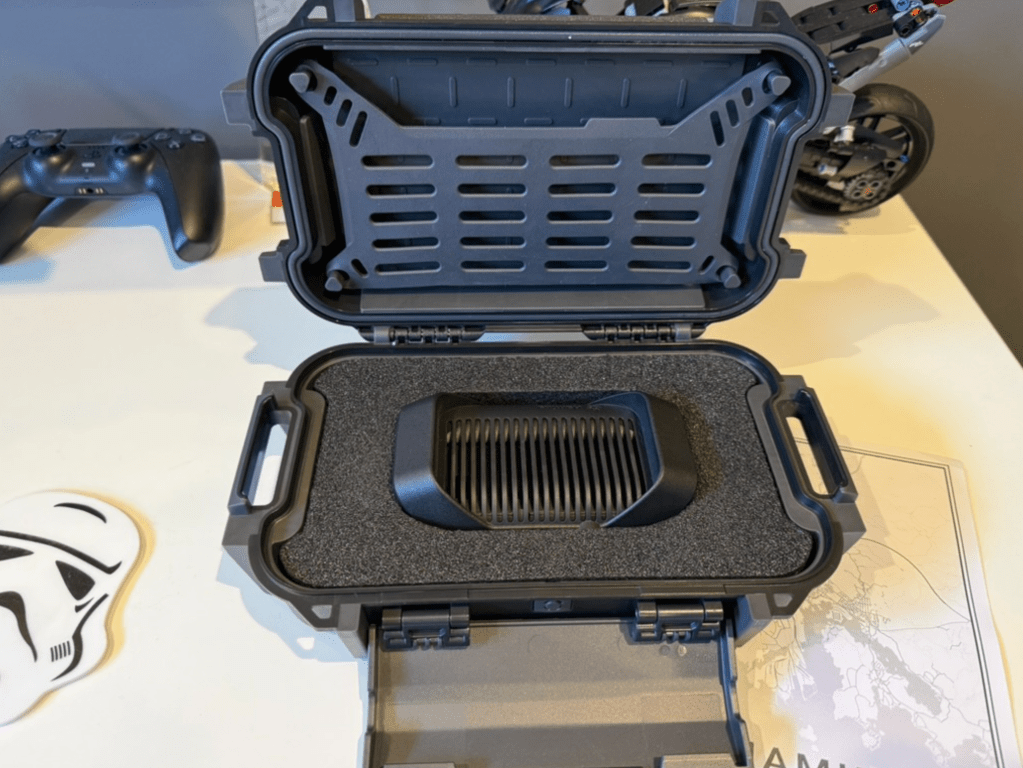
Christmas came quickly this year, since I was fortunate enough to receive a prototype version of the Clip to test, in a very shiny (sorry not shipping with the production version!) case.
Walk the Line
Surveying with the Clip is an absolute dream. It’s super light, so you quickly forget you’re wearing it, and thanks to Bluetooth data transfer to the Hamina Onsite App, there won’t be any cables in your way.
You might need to use a cable in very busy environments, but Onsite will let you know if data transfer over Bluetooth isn’t working so well. There is also a pretty slick data buffering mechanism when using Bluetooth.
My preferred survey approach is using an iPad + Apple pencil, rotating the device when I turn to keep the map facing the same way as I’m walking. Needless to say, having to periodically stop and untangle a cable is no longer required.
No more handbag?
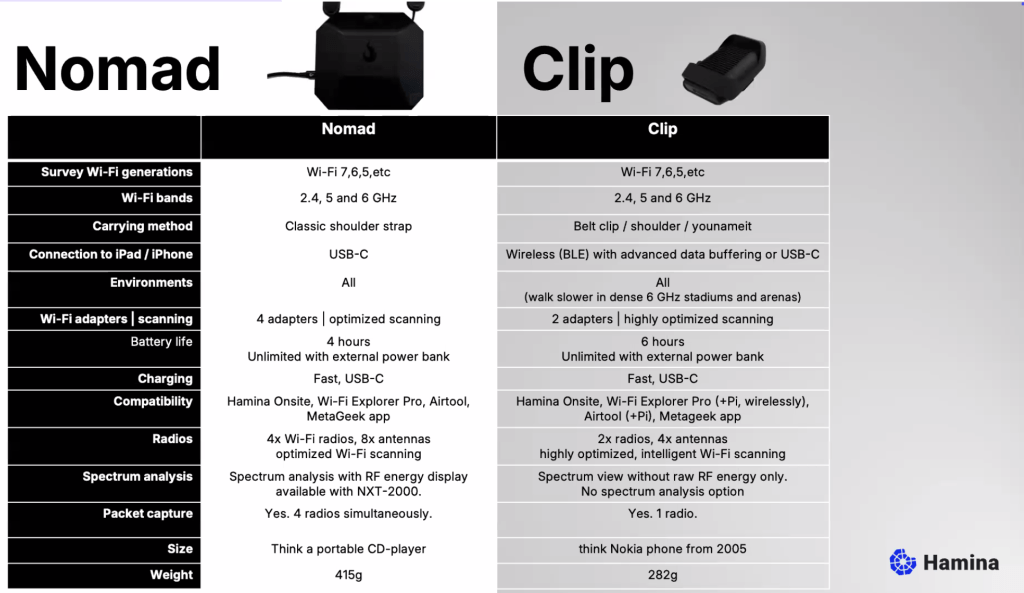
The Clip isn’t designed to replace the Oscium Nomad, but in true Hamina style offer a more accessible alternative for those who don’t need every single feature.
The full specs for both the Nomad and the Clip are below, but in a nutshell here are the main reasons you might choose to pack a Nomad:
When spectrum analysis is required
In very busy environments, e.g. large public venues and you’d prefer to walk a bit faster than you’d otherwise need to
When you need to run a multi-radio packet capture
You prefer the old school look and love it when people ask you ‘what’s with the handbag?’
Otherwise it is safe to say that the Clip could permanently live in your everyday bag.
Radio Gaga
It’s worth pointing out that although the Clip has half the number of radios and antennas, it is by no means half as good. The product itself was born out of the fact that if you perform scanning efficiently, you don’t need more than two radios most of the time.
The Clip will also certified to perform transmit functions for things like Orb testing.
These are a few of my favourite things
To wrap up, here are the things I love the most about the Clip:
Cable-less surveys
Form factor
Packet captures without disturbing your device’s Wi-Fi connection with AirTool
If you operate a network that offers free public access, please consider enable OpenRoaming as another way to connect. You can learn more about OpenRoaming itself here. It is hands-down the BEST way to offer fast, frictionless, free and secure Wi-Fi for users.
In an effort to accelerate global adoption of OpenRoaming, Purple is has recently started offering it as part of their free subscription tier for any business to use.
Advertise an OpenRoaming capable SSID, using Purple’s authentication servers (Purple is performing the ANP function).
Provision your device with an credential profile allowing it to connect to OpenRoaming networks all over the world (Purple is performing the IDP function).
Access Network Provider (ANP) setup
If you want to support OpenRoaming, here’s what you need to do:
4. View the manual and follow the instructions for ‘PurpleConnex’ (the Purple app which supports OpenRoaming)
To summarise, you need to configure:
An SSID that supports WPA2/3 Enterprise authentication
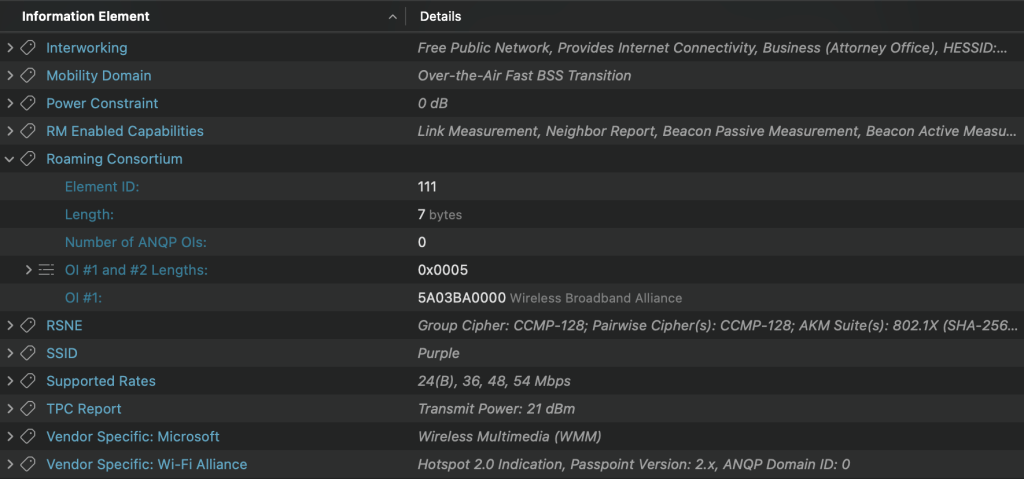
Hotspot 2.0 / Passpoint configuration with Purple’s NAI Realm and EAP configuration
Purple authentication servers using RadSec
Enable RADIUS Accounting
Include the AP’s MAC Address as Called Station ID
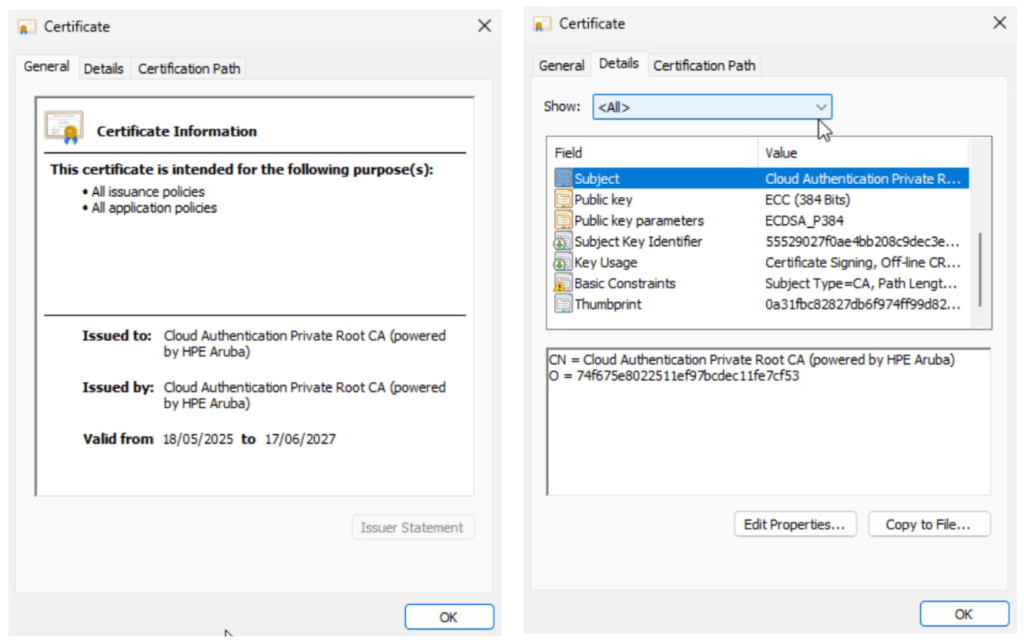
Purple’s RadSec Server Root CA certificate (this wasn’t in the HPE Aruba instructions, but necessary)
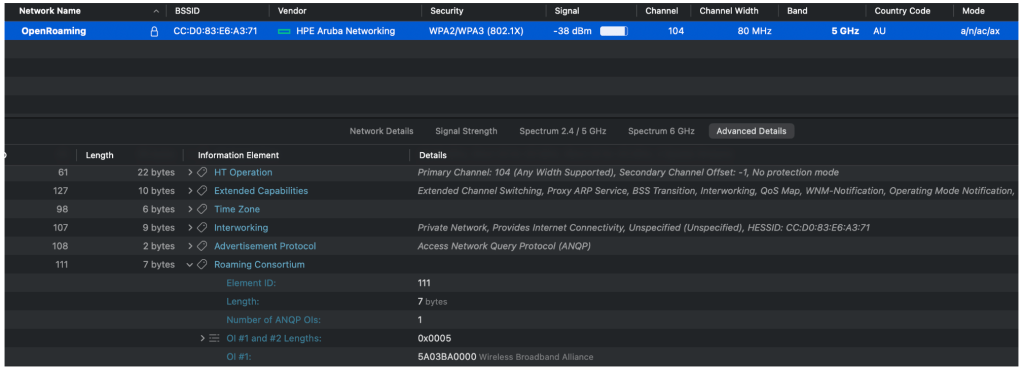
Once configured, any OpenRoaming device that is configured to use either of the below RCOIs will be able to connect!
Here is what my test SSID looks like:
Using Purple credentials to connect to an existing OpenRoaming network
If you want to provision your device using Purple as an IDP to connect to an existing OpenRoaming network, here’s what you need to do:
Download the PurpleConneX app on your device
Create and login with a free account
Accept the prompt to add a new network profile to your device
Your device will then automatically connect to any SSID that advertises the WBA RCOI (5A03BA).
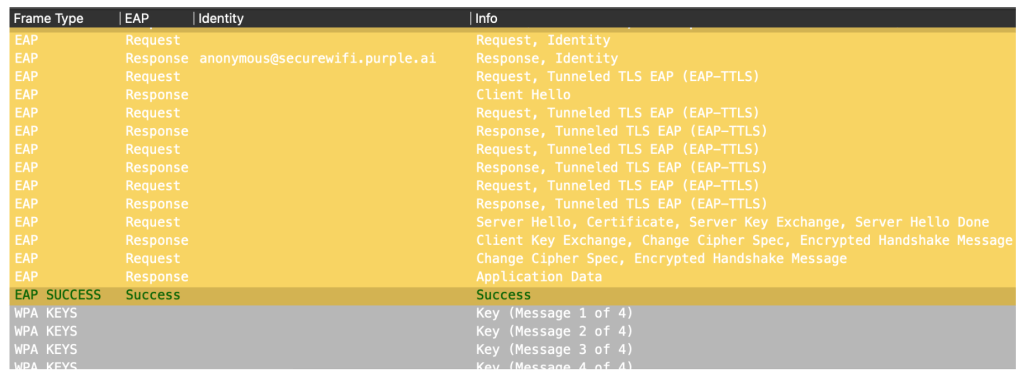
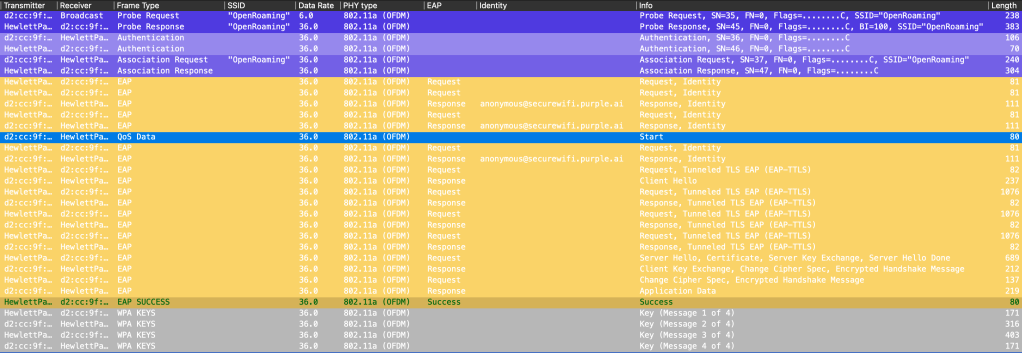
Here is a packet capture showing a PurpleConneX provisioned device connecting to an SSID using the WBA OpenRoaming RADIUS test server.
Challenge to networking vendors
Purple have made the first move by offerring OpenRoaming for free.
I believe all cloud managed networking vendors should offer a drop-down option to enable OpenRoaming on an SSID with a hosted RadSec Proxy / ANP for no additional licensing cost.
Also Apple and Microsoft, please include device native OpenRoaming functionality as an option to use the account that is signed into the device. This is already possible with a Google account on Android.
Only when OpenRoaming is free for users, simple for administrators to deploy, and simple to use will we see the uptake of this awesome technology.
In case you were wondering, this is a post about HPE Juniper Networking’s Cloud NAC offering – Access Assurance. Great, now that’s cleared up, on with the post!
The way things were
For most of the ClearPass deployments I’ve been involved with in the last few years, the requirements for wireless have been pretty simple:
In order to meet this requirement, I’d typically configure:
TEAP with chained EAP-TLS to authenticate Windows devices and users, and plain EAP-TLS for other OSs.
Entra ID and Intune API integration for authorization.
Intune configuration payloads including where to enrol for a certificate from a suitable CA, whether it be ClearPass Onboard, SCEPman, SecureW2, NDES, or ADCS with a certificate connector.
Anyone for a SNAC?
With the trend towards SaaS for everything else, what about NAC? (SaaS NAC = SNAC?) you heard it here first folks, Gartner eat your heart out 😛
HPE Networking have Aruba and Juniper Mist flavoured ‘SNAC’s which are rapidly growing in functionality, and are respectively:
Central NAC
Access Assurance
There were two features in particular which compelled me to spin up a demo of Access Assurance:
PKI with SCEP integration
TEAP
To the lab!
Any good lab work should start with a hypothesis (or so primary school science taught me).
Mine was this: A SaaS NAC should be able to replace an on-prem NAC for most customer’s wireless needs.
(By the way, this blog post isn’t intended to be a deployment guide, but rather to highlight key functionality that might help you decide whether or not to deploy Access Assurance, based on my experience).
Here are the key features of Access Assurance:
OAuth IdP integration for group based authorization
MDM integration for compliance checking
PKI which can be integrated with Intune or Jamf Pro for issuing certificates to managed devices
Support for TEAP (basic for now)
Support for non-Mist devices with use of a Mist Edge (RADIUS Proxy – licensed separately)
IdP SSO integrated portal to provision unmanaged devices with a certificate
Supports ‘BYO’ Client Root CA and Server Certificates if you want to use it with an existing PKI
Competitive license pricing, counted on concurrently connected users (not seats)
Keep it Simple
The first thing I noticed is how simple everything is. A lot of the nuts and bolts have been hidden under a layer of goldilocks-level abstraction.
Everything that you need to configure for the NAC itself is done from this humble menu.
In no particular order, here is a quick tour:
Identity Providers
Setup your IDP using OAuth after first creating an Entra ID App Registration with the appropriate permissions and Client Secret. This will allow you to perform group lookups for authorization.
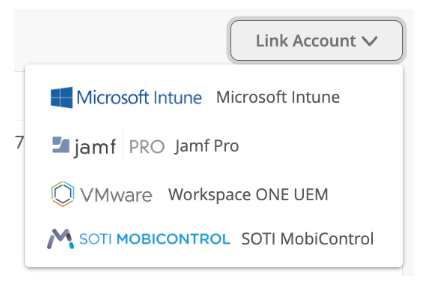
Next, link your MDM of choice for compliance checking.
If you’re signed into your Azure Portal account with the correct permissions, linking your Intune account is as simple as approving access to a pre-canned service.
Other MDM options are available too:
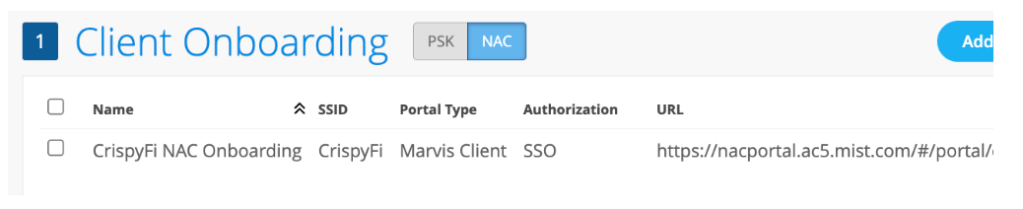
Client Onboarding
If you have unmanaged devices that you want to deploy a certificate and Wi-Fi configuration profile to, you can create a NAC Onboarding Portal, complete with SSO using SAML against your IdP of choice.
There is even a pre-built Entra ID Enterprise App for the SSO bit:)
You need to install the Marvis App on your OS of choice for this to work.
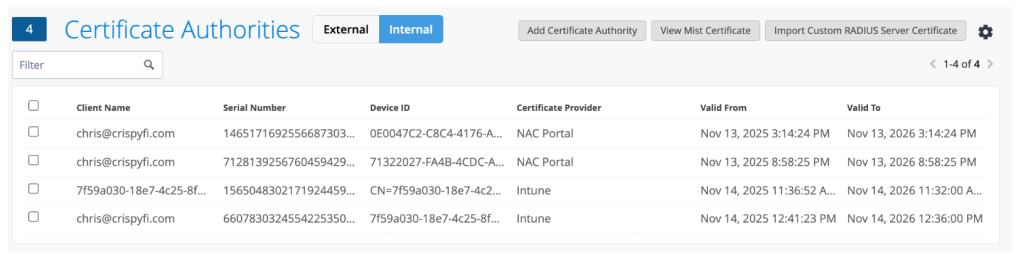
Certificates
On the Internal tab you can view all of your issued certificates.
You can upload your own CA certificate, in case you issue client certificates to your devices from another CA. You can also upload your own RADIUS Server certificate as well if you’d prefer to use your own PKI entirely.
If you’re sticking with the Mist CA, you can download the CA certificate that sits above the RADIUS Server Certificate in the chain of trust, for deploying to your devices via Intune.
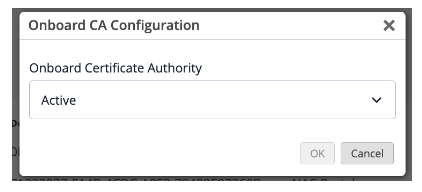
Enabling the CA couldn’t be simpler, you just choose ‘Active’ from the drop-down menu accessible from the gear icon.
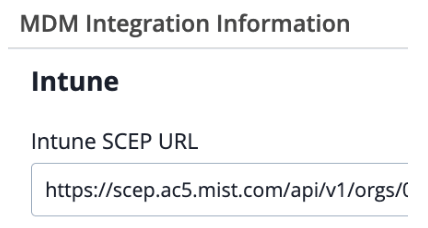
You can also view the SCEP URL for integration with Intune or Jamf Pro, and download the Onboard CA Certificate, for deploying to your devices.
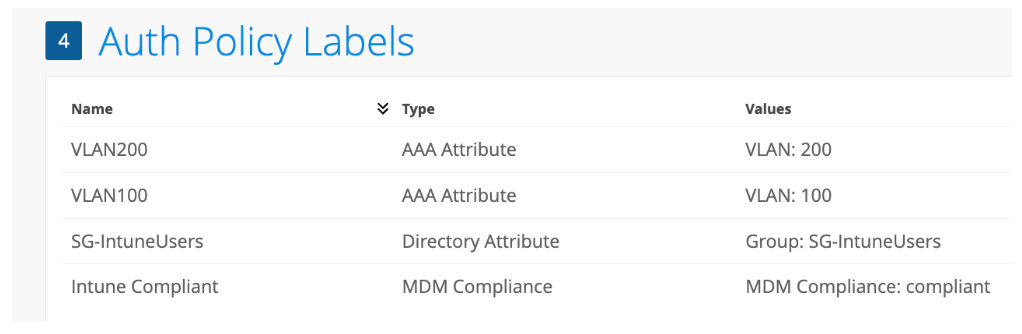
Auth Policy Labels
Auth Policy Labels are the building blocks for your policies.
They can be used either as match criteria (e.g. Entra ID Group) for a particular rule, or as an action to take after authentication (e.g. Assign a particular VLAN ID).
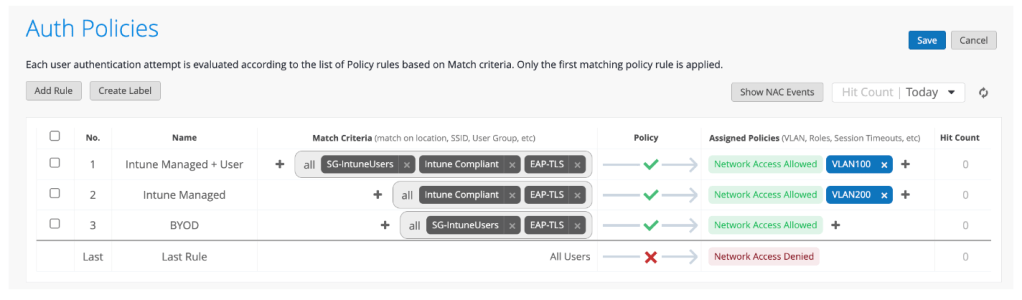
Auth Policies
This is about as simple as it gets.
My list of policies is as follows: 1) EAP-TLSUser authentication with Entra ID Group and Intune Compliance authorization 2) EAP-TLSDevice authentication with Intune Compliance authorization (i.e. Windows logon screen) 3) EAP-TLSUser authentication with Entra ID Group authorization (for a Marvis Client enrolled device)
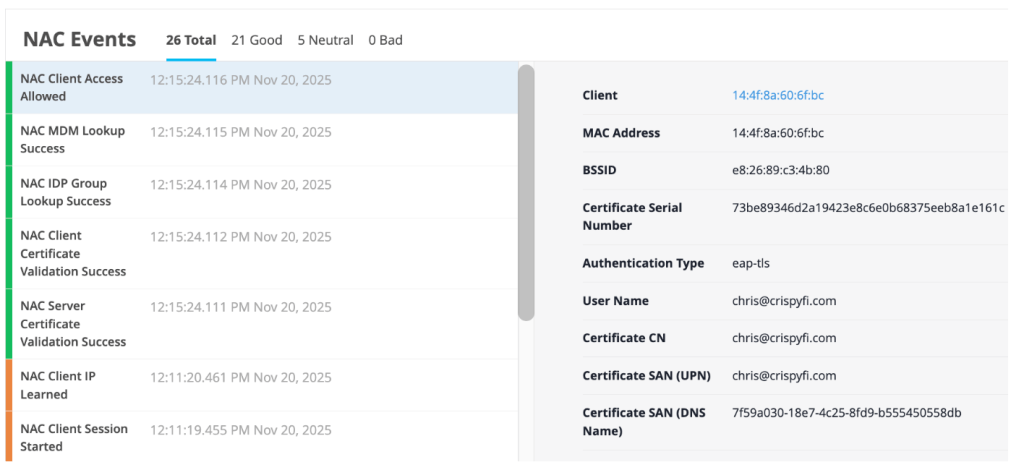
NAC Events
Logging is pretty simple but perfect for troubleshooting policy or client configuration issues.
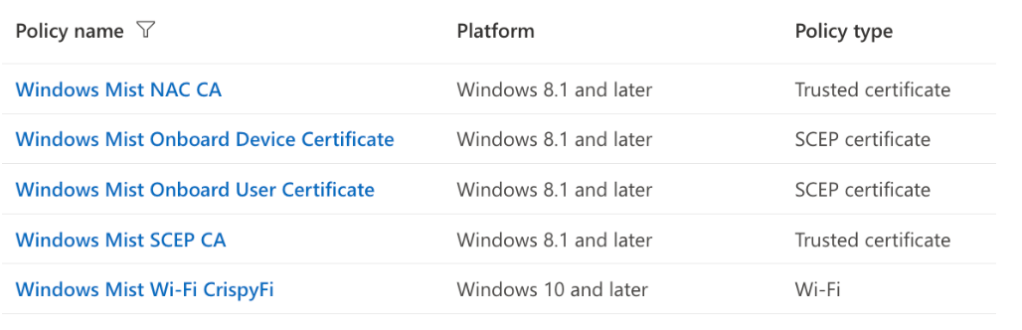
Intune Configuration Profiles
Worth mentioning of course are the various configuration profiles that need to be created in Intune for a complete solution.
Mist opportunity?
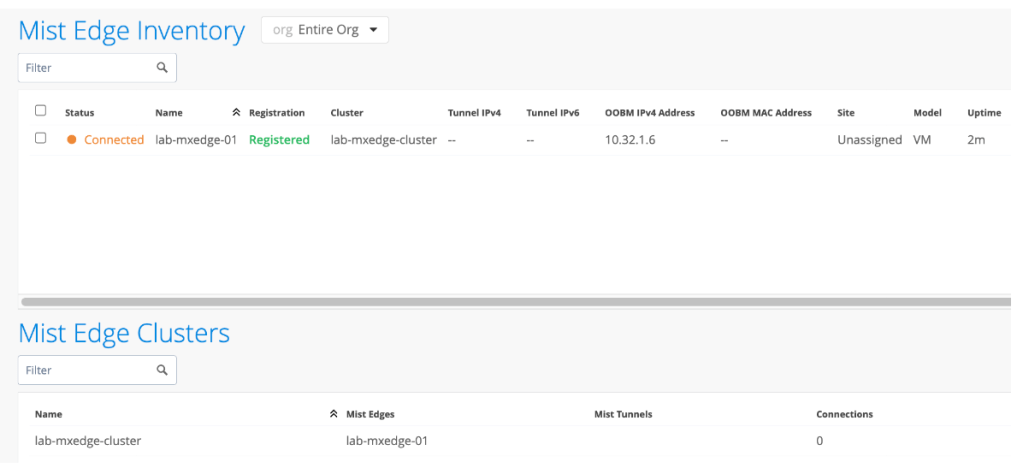
Since I only (currently) have Aruba APs in my lab, I thought there would be no way to test Access Assurance with getting hold of a Mist AP first.
I was wrong. Under the hood, Access Assurance only accepts RadSec (RADIUS over TLS) connections from Mist devices, but this also includes Mist Edge virtual appliances.
Although licensed separately, you can quite easily spin up a Mist Edge VM to accept regular RADIUS traffic and proxy it to Access Assurance using RadSec.
A little bit of Azure lab credit later, I was well on my way.
All I had to do in HPE Aruba Networking Central was add the IP address of the Mist Edge appliance as a RADIUS Server in my SSID config.
TEAP
As I mentioned, my go-to for Intune managed Windows device authentication is TEAP with EAP-TLS.
I tried to setup a basic set of policies which treated a user + computer authentication differently to a computer only authentication (e.g. Windows device at logon screen).
For now, computer only authentication only is not supported. So we’ll have to use regular EAP-TLS.
Closing Thoughts
So what about my hypothesis? Can a SaaS NAC replace an on-prem NAC for most customer’s wireless needs? The answer is almost.
For what I personally configure, once TEAP support is feature complete and if TEAP & SCEP cross-pollenate over to Central NAC 😉 that will cover most wireless deployments.
Wired is a different story – I’m yet to put Central NAC or Access Assurance through its paces for a ‘Colourless Port’ deployment with profiling, although with the recent enhancements to the AI based client profiling (had to get the buzzword in at least once) I can’t imagine a robust solution will be far off, if not already here.
In the meantime, if you’d like to try Access Assurance yourself, reach out to your local SE and check out the Access Assurance Guide.
I was working on a project where I wanted to prototype a VXLAN deployment, and was about to revive a GCP VM mentioned in my previous blog post.
This time, I also wanted to see if I could use the VS Code Extension on my local machine to interact with the lab.
Familiarising myself with the documentation again, I noticed a comment from the Containerlab team mentioning Codespaces:
Intrigued, I explored Containerlab’s documentation on Codespaces and looked at the official GitHub Codespaces page.
Codespaces are cloud-hosted development environments that can be quickly deployed using Docker Development containers.
On GitHub’s free tier, you have access 120 CPU core-hours on one of their 4 vCPU machines, which is 30 hours of free lab time – perfect for occasional use.
The Containerlab team have published a Development container image that includes almost everything you need to spin up a lab in Codespaces…
I can hardly contain myself!
If you want to run the HPE Aruba Networking CX Switch Simulator in Containerlab, you need to bring your own Docker image. This requires downloading the OVA file from HPE Networking Support, and using vrnetlab to package it inside a Docker container.
Accessing the image from Codespaces also requires the image to be hosted in a Container Registry.
Since I run an ARM-based mac, I can’t make x86 Docker images on my machine, so I would have to do this from a VM hosted somewhere else.
This is where ljarasius suggested I use a GitHub Action to download the OVA, make the Docker container image, and publish to a private GitHub Container Registry.
Now everything could be done from in CodeSpaces (once obtaining the download link of course).
All systems go
GitHub account – check
New repo – check
Dev container image – check
AOS-CX container image – check
VS Code extension – check
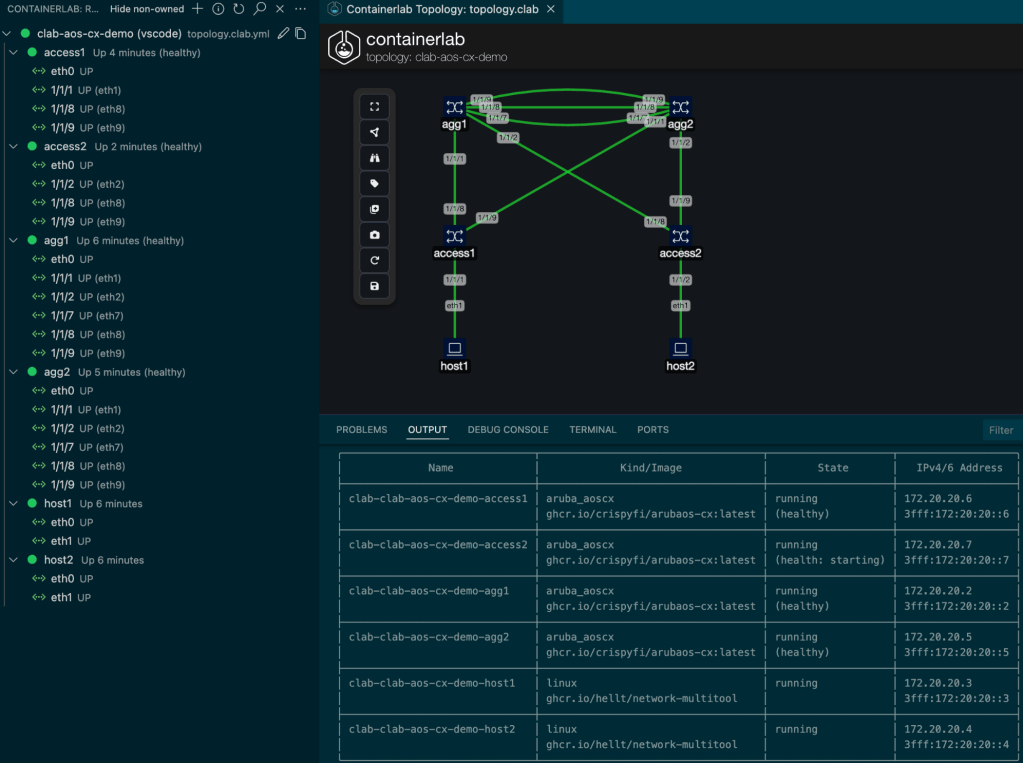
After creating a simple topology.yml file in the GitHub, I was able to get a fully functional lab working from VS Code running on my MacBook – and this is what it looked like.
I created a GitHub repository with a full set of instructions that you can fork and use to get your own lab up and running quickly. https://github.com/crispyfi/clab-aos-cx-demo
[stderr] 03:31:42 INFO Containerlab started version=0.68.0
[stderr] 03:31:42 INFO Parsing & checking topology file=topology.clab.yml
[stderr] 03:31:42 INFO Creating docker network name=clab IPv4 subnet=172.20.20.0/24 IPv6 subnet=3fff:172:20:20::/64 MTU=1500
[stderr] 03:31:42 WARN iptables check error: exit status 111. Output:
[stderr] 03:31:42 WARN iptables check error: exit status 111. Output:
[stderr] 03:31:42 WARN iptables check error: exit status 111. Output:
[stderr] 03:31:42 WARN iptables check error: exit status 111. Output:
[stderr] 03:31:42 INFO Pulling ghcr.io/crispyfi/arubaos-cx:latest Docker image
[stderr] 03:32:31 INFO Done pulling ghcr.io/crispyfi/arubaos-cx:latest
[stderr] 03:32:31 INFO Pulling ghcr.io/hellt/network-multitool:latest Docker image
[stderr] 03:32:42 INFO Done pulling ghcr.io/hellt/network-multitool:latest
[stderr] 03:32:42 INFO Creating lab directory path=/workspaces/clab-aos-cx/clab-clab-aos-cx-demo
[stderr] 03:32:42 INFO Creating container name=agg1
[stderr] 03:32:42 INFO Creating container name=host1
[stderr] 03:32:42 INFO Creating container name=host2
[stderr] 03:34:13 INFO node "agg1" turned healthy, continuing
[stderr] 03:34:13 INFO Creating container name=agg2
[stderr] 03:34:13 INFO Created link: agg1:eth9 (1/1/9) ▪┄┄▪ agg2:eth9 (1/1/9)
[stderr] 03:34:13 INFO Created link: agg1:eth8 (1/1/8) ▪┄┄▪ agg2:eth8 (1/1/8)
[stderr] 03:34:13 INFO Created link: agg1:eth7 (1/1/7) ▪┄┄▪ agg2:eth7 (1/1/7)
[stderr] 03:36:45 INFO node "agg2" turned healthy, continuing
[stderr] 03:36:45 INFO Creating container name=access1
[stderr] 03:36:45 INFO Created link: agg1:eth1 (1/1/1) ▪┄┄▪ access1:eth8 (1/1/8)
[stderr] 03:36:45 INFO Created link: agg2:eth1 (1/1/1) ▪┄┄▪ access1:eth9 (1/1/9)
[stderr] 03:36:45 INFO Created link: access1:eth1 (1/1/1) ▪┄┄▪ host1:eth1
[stderr] 03:41:17 INFO node "access1" turned healthy, continuing
[stderr] 03:41:17 INFO Creating container name=access2
[stderr] 03:41:18 INFO Created link: agg1:eth2 (1/1/2) ▪┄┄▪ access2:eth8 (1/1/8)
[stderr] 03:41:18 INFO Created link: agg2:eth2 (1/1/2) ▪┄┄▪ access2:eth9 (1/1/9)
[stderr] 03:41:18 INFO Created link: access2:eth2 (1/1/2) ▪┄┄▪ host2:eth1
[stderr] 03:41:18 ERRO Failed to execute command command="bash /host2.sh" node=host2 rc=127 stdout=""
[stderr] stderr=
[stderr] │ bash: /host2.sh: No such file or directory
[stderr] 03:41:18 ERRO Failed to execute command command="bash /host1.sh" node=host1 rc=2 stdout=""
[stderr] stderr=
[stderr] │ RTNETLINK answers: File exists
[stderr] 03:41:18 INFO Adding host entries path=/etc/hosts
[stderr] 03:41:18 INFO Adding SSH config for nodes path=/etc/ssh/ssh_config.d/clab-clab-aos-cx-demo.conf
╭───────────────────────────────┬────────────────────────────────────┬────────────────────┬───────────────────╮
│              Name             │             Kind/Image             │        State       │   IPv4/6 Address  │
├───────────────────────────────┼────────────────────────────────────┼────────────────────┼───────────────────┤
│ clab-clab-aos-cx-demo-access1 │ aruba_aoscx                        │ running            │ 172.20.20.6       │
│                               │ ghcr.io/crispyfi/arubaos-cx:latest │ (healthy)          │ 3fff:172:20:20::6 │
├───────────────────────────────┼────────────────────────────────────┼────────────────────┼───────────────────┤
│ clab-clab-aos-cx-demo-access2 │ aruba_aoscx                        │ running            │ 172.20.20.7       │
│                               │ ghcr.io/crispyfi/arubaos-cx:latest │ (health: starting) │ 3fff:172:20:20::7 │
├───────────────────────────────┼────────────────────────────────────┼────────────────────┼───────────────────┤
│ clab-clab-aos-cx-demo-agg1    │ aruba_aoscx                        │ running            │ 172.20.20.3       │
│                               │ ghcr.io/crispyfi/arubaos-cx:latest │ (healthy)          │ 3fff:172:20:20::3 │
├───────────────────────────────┼────────────────────────────────────┼────────────────────┼───────────────────┤
│ clab-clab-aos-cx-demo-agg2    │ aruba_aoscx                        │ running            │ 172.20.20.5       │
│                               │ ghcr.io/crispyfi/arubaos-cx:latest │ (healthy)          │ 3fff:172:20:20::5 │
├───────────────────────────────┼────────────────────────────────────┼────────────────────┼───────────────────┤
│ clab-clab-aos-cx-demo-host1   │ linux                              │ running            │ 172.20.20.4       │
│                               │ ghcr.io/hellt/network-multitool    │                    │ 3fff:172:20:20::4 │
├───────────────────────────────┼────────────────────────────────────┼────────────────────┼───────────────────┤
│ clab-clab-aos-cx-demo-host2   │ linux                              │ running            │ 172.20.20.2       │
│                               │ ghcr.io/hellt/network-multitool    │                    │ 3fff:172:20:20::2 │
╰───────────────────────────────┴────────────────────────────────────┴────────────────────┴───────────────────╯
Four AOS-CX containers can get a little sluggish, so you can always run them on a bigger machine, or upgrade to a GitHub Pro account for more Codespaces core-hours.
Git with the program
Not only is this a simple, quick and cost-effective way to spin up a lab, it forces you to learn version control with Git and how to use Git with VS Code.
Once you’re comfortable with how everything hangs together, you can do everything straight from VS Code – no browser required.
What’s next
Shortly after getting my lab up and running in Codespaces, I came across Antimony which I can’t wait to try!
I was recently working on a project where I needed to configure and check the output of a few commands on some Aruba CX switches.
In the past I ran EVE-NG on an Intel NUC on with ESXi free (RIP), which I no longer have.
My EVE-NG Pro license had an also expired.
Running the Aruba CX Switch Simulator on EVE-NG helped me a lot when studying for my ACSP certification and was invaluable for developing complex multi-VRF BGP configurations for a data centre migration project.
All the cool kids use Infrastructure-as-code
A good friend of mine told me I should check out Containerlab, which allows you to define a lab topology in a YAML file and run network device images as Docker containers for a true infrastructure as code experience.
The performance with Docker is much better, since you’re not running a full-blown hypervisor (i.e. KVM with EVE-NG).
Another tool called Vrnetlab takes the VMDK file from the Aruba CX switch simulator and builds a Docker image from it.
Home Data Centre?
Without having any decent compute at home (and intentionally trying to keep it that way 😉 my first idea was to try and run Containerlab on my M3 MacBook Pro with Rosetta 2 handling the x86 translation.
Docker for desktop allows running x86 containers and Parallels Pro allows you to do a one click install of an Ubuntu x86 VM.
Unfortunately neither of these supported the nested virtualisation (vmx CPU flag).
Azure?
Having little success with Containerlab at this point I tried to install EVE-NG Pro on an Azure VM, however the install failed. Although there are blog articles from 2023 reporting it works, it is not officially supported, and I came across some information online that lead me to believe Azure would also not support non-Microsoft nested virtualisation.
Google it
Google Cloud Platform is the only cloud provider that EVE-NG is officially supported on, so perhaps it would support Containerlab since they both rely on nested virtualisation?
Conviniently, GCP gives new users $300 USD to use in 90 days – what did I have to lose?
Would it work? Only one way to find out!
A couple of cups of coffee and a few typos later, I had two virtual CX switches pinging each other in the cloud 🙂
Do it yourself mate
To save you some pain, here are the key steps to get you up and running.
This assumes you have an existing Google Cloud Platform Account and some credit (credits will do fine).
All of the steps below are using default parameters, including the default VPC so be sure to customise to suit your environment.
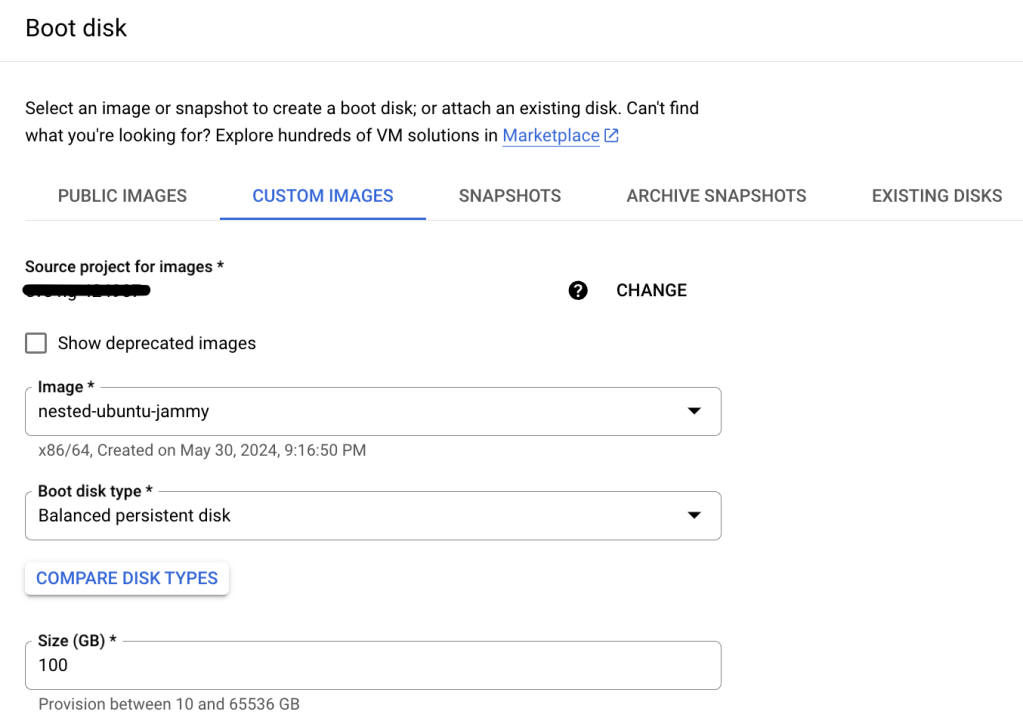
Prepare a custom Ubuntu boot disk template
From Google Cloud Console, open Google Cloud Shell and paste the following command to create a custom Ubuntu 22.04 image that supports nested virtualisation.
Any of the N2 images should work, pick your size based on how many devices you are going to be running.
For reference, each CX switch simulator image requires 4GB of memory according to the documentation.
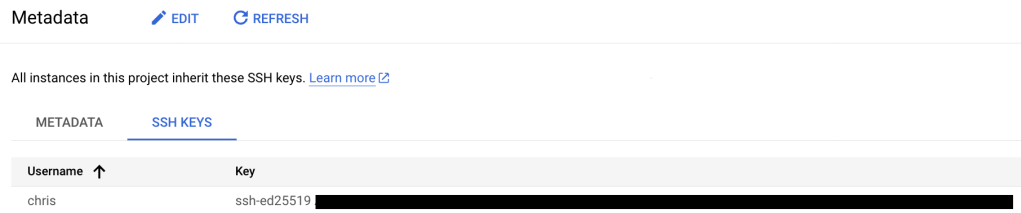
Generate and Upload SSH Key
Commands below are for macOS, create a new SSH key pair and upload the public key to GCP.
ssh-keygen -o -a 100 -t ed25519
cat /Users/chris/.ssh/id_ed25519.pub
Under Settings > Metadata > SSH Keys, upload SSH Key.
Update firewall rules
Navigate to the VPC containing VM (the default VPC if you don’t specify a different one). Update inbound firewall rules to allow SSH from your public IP address only.
Connect to VM via SSH
You can then connect to your VM by simply typing:
ssh <public IP of your VM>
Update OS, install dependencies
Install the latest OS updates.
Make is required by Vrnetlab to build the Docker image, vim is because I don’t like nano 😉
sudo apt update
sudo apt upgrade

sudo apt install make vim
Install Docker
Install docker – the steps are from the official Docker documentation referenced below.
Copy only the OVA file to your GCP VM using SCP from your local machine. (Again, I’m using macOS for this example).
scp Aruba_AOS-CX_Switch_Simulator_10_13_1000_ova/ArubaOS-CX_10_13_1000.ova <public IP of your VM>:/home/chris/containerlab/vrnet/aoscx
Make Docker Image
From the aoscx directory, extract the VMDK file from the OVA and run make to create the Docker image.
There is a readme file in this directory with more information if needed.
You can then make sure the docker is in the image list, and find which tag was used (created based on the timestamp from the VMDK file).
cd containerlab/vrnet/aoscx
tar xvf
ArubaOS-CX_10_13_1000.ova

sudo make docker-image

docker image ls

REPOSITORY          TAG              IMAGE ID       CREATED       SIZE
vrnetlab/vr-aoscx   20240129204649   9043b910e18a   9 hours ago   1.24GB
Deploy from YAML file
Create a YAML file in the Containerlab working directory.
cd /home/chris/containerlab

vi lab.yml
Paste your lab topology from one you have created in a local text editor, or from the example below.
This simple topology deploys two switches and connects interfaces 1/1/1 and 1/1/2 between each.
The image is the docker image created in the previous step, including the tag.
You can specify a config file to be loaded from the same directory as the topology YAML file.
You can now SSH from the VM to each switch using the IP address in the table above, with credentials ‘admin’, ‘admin’.
Note that eth0 on each deployed container maps to the mgmt interface on each switch.
Destroy lab
Once you’ve finished with the lab, you can kill the containers with the command below.
containerlab destroy --topo lab.yml
Remember, this is infrastructure as code, so the idea is to spin up the containers and topology with a predefined config each time you want to run the lab.
Closing thoughts
This is an incredibly simple example which should hopefully get you started running CX switches using Containerlab.
The sky is the limit in terms of the topologies you can create the other powerful features of Containerlab.
Personal Wireless Networks are a new addition to the HPE Aruba Networking Central Cloud Auth feature set.
In a nutshell, they provide a way to segment a network on a per-user or device basis, without requiring certificates.
User experience
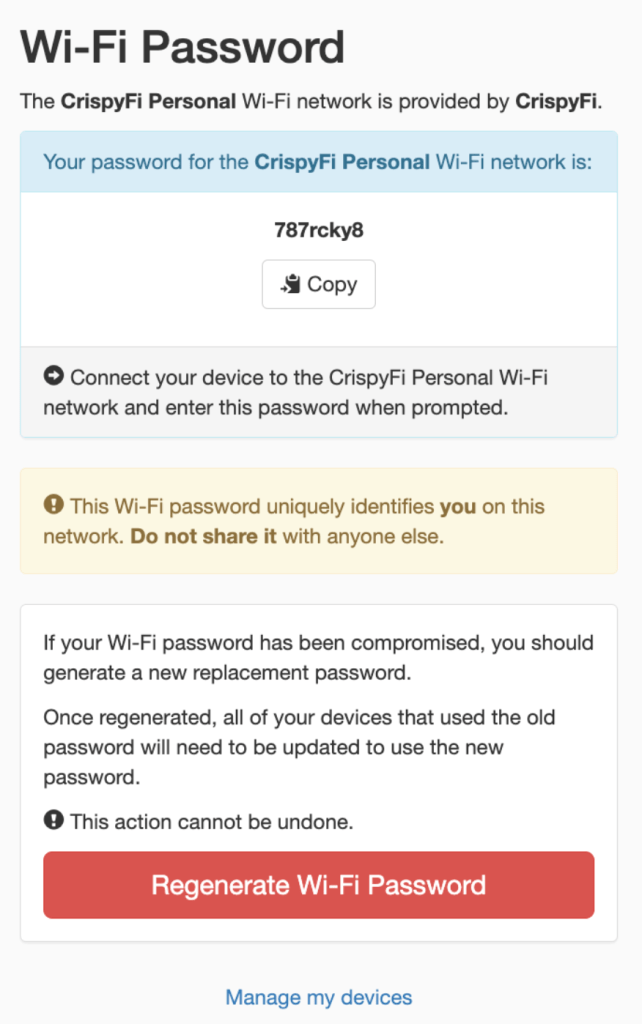
Users can access a self-service portal where they can login using SSO and obtain a pre-shared key to connect all of their devices to a Wi-Fi network.
For devices that don’t belong to an SSO enabled user, administrators can manually add a PSK and assign a Client Role, which supports a combination of Access Rules and VLAN assignment.
Traffic between devices using the same pre-shared key is permitted, with traffic between devices using different pre-shared keys is denied. Think private VLANs for Wi-Fi.
In my lab, I was able to verify this behaviour with a simple ping test between devices associated to different users.
Who can use it
There is a long list of use cases for this type of setup, but the most relevant are:
BYOD, especially when devices don’t support certificate authentication
Tenanted buildings (e.g. Retirement villages, university dorms)
Headless or IoT devices
Why this is so cool
This is an awesome solution for a number of reasons:
Devices are associated with a user for added visibility and control (i.e. logging and user off-boarding)
Roles can be assigned based on Group membership from the chosen Identity Provider
Cloud native solution with no additional licensing required
Uses RadSec (RADIUS over TLS) for secure operation over the public Internet
Not tied to device MAC address (no issues with MAC randomisation or iCloud Keychain)
Setup can be done in a matter of minutes
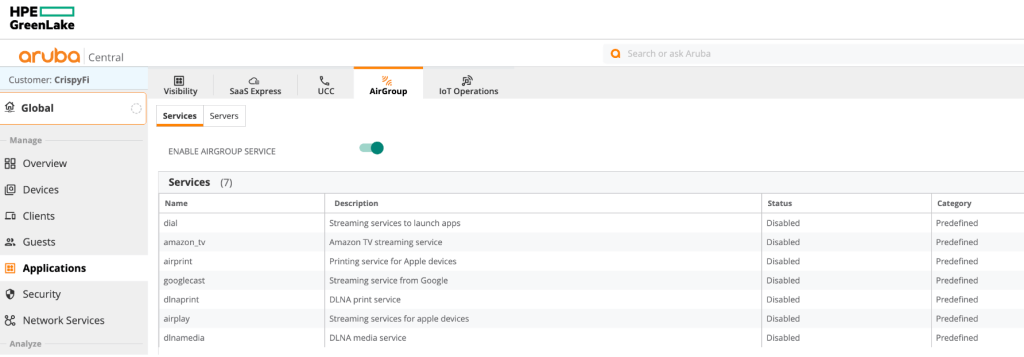
AirGroup can be used to share mDNS and DLNA servers between users, or by designating a server as publicly accessible (e.g. a printer that supports AirPrint)
Look Mum, no certificates!
Things to keep in mind
Based on WPA2, there is not yet a way to achieve this sort of functionality with WPA3-SAE key management.
While there is Authentication and Authorisation for the self-registration portal, there is effectively only ‘identification’ and no ‘authentication’ of the user when devices connect to the network, since the PSK could used on any device.
It’s worth mentioning that Cloud Auth supports an SSO-fronted self-registration portal for certificate enrolment against a per-tenant CA hosted in Central. This provides actual authentication and better security, with the tradeoff of a slightly more involved onboarding process.
What you need to make it work
An HPE Aruba Networking Central account
An Access Point running at least ArubaOS version 10.6.0.0
An Identity Provider (e.g. Microsoft Entra ID)
Setting it up
If you want to try this out in your environment, feel free to follow along with my simple step by step instructions. I make labbing FUN!!
(I’m using Microsoft Entra ID as my Identity Provider)
Create a new App Registration
To begin, draw an S create a new App Registration, grant the following Microsoft Graph API permissions and create a new Client Secret. Don’t forget to record the value and put it in your password manager of choice.
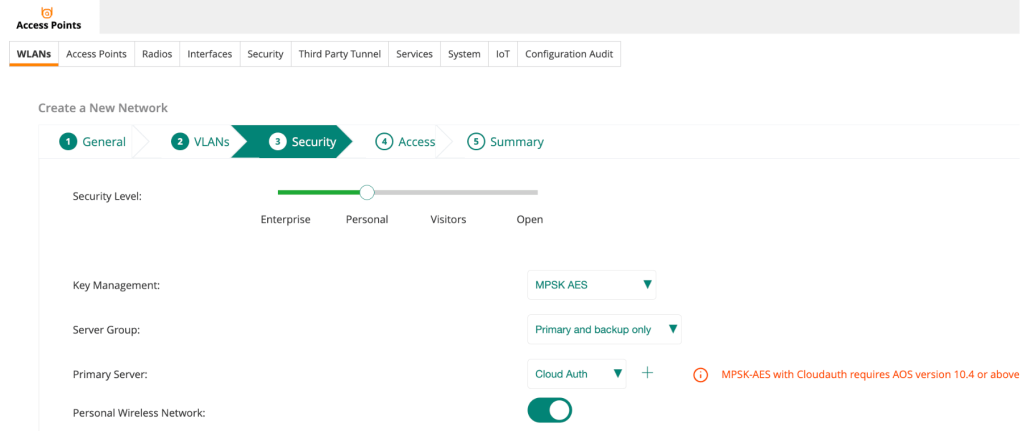
Create a new WLAN under your desired Group with the following Security config:
Security Level: Personal
Key Management: MPSK AES
Primary Server: Cloud Auth
Personal Wireless Network: Enable
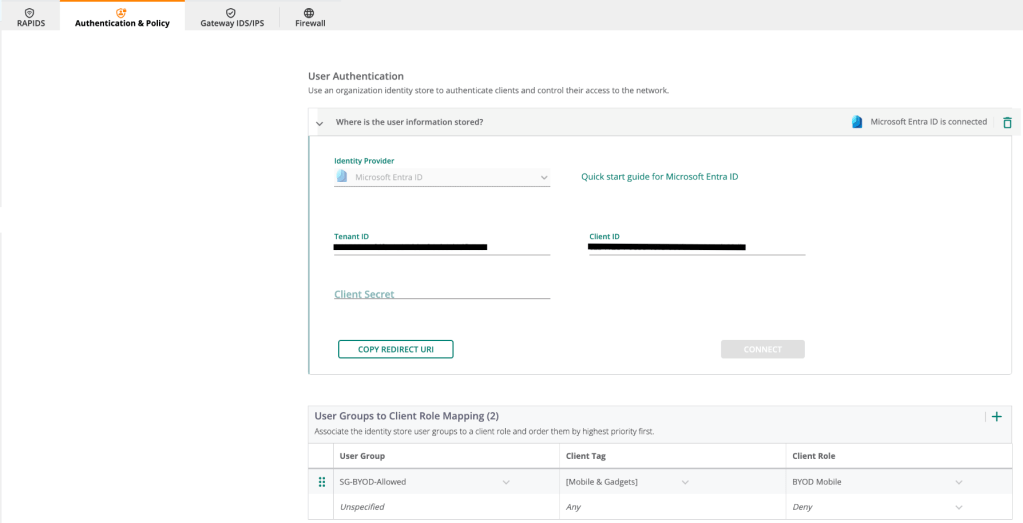
3. Configure Central User Authentication
Login to Central, navigate to Global > Security > Authentication & Policy > Config and Edit the User Access Policy.
Select Microsoft Entra ID as the Identity provider and populate the info from your new App Registration.
Copy the Redirect URI and enter it under Authentication in the App Registration.
Click Connect and you should be able to find and select a user group from Entra ID, filter on a specific Client Tag, and assign a corresponding role.
Click Save when you’re done.
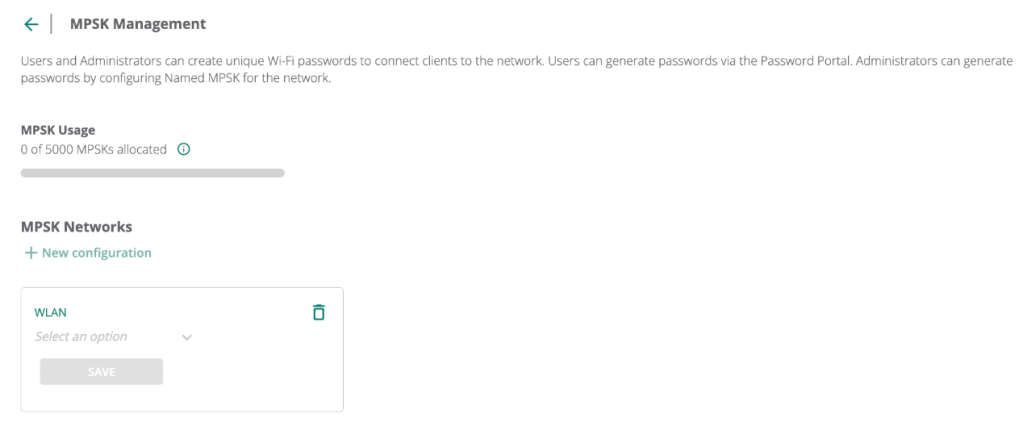
4. Configure Central User Authentication
Click Manage MPSK, select the WLAN you recently configured and click Save.
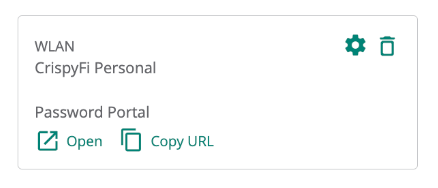
5. Register a device
Open the Password Portal link and sign-in using SSO.
Copy the generated PSK and use it to connect your devices.
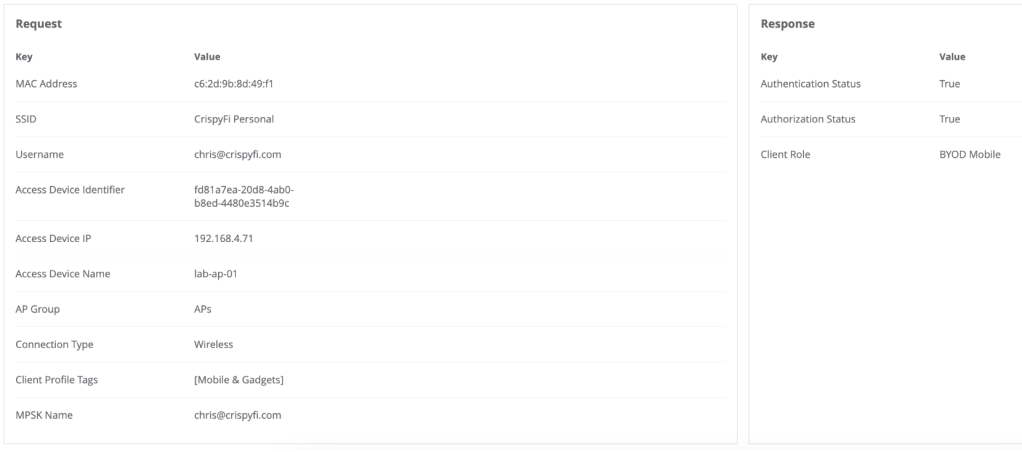
Authentication & Policy Logs
You can view logs and sessions under the Authentication & Policy view.
Notice how the associated username for the device is shown in the logs.
If a user was no longer a member of the configured group, their devices would no longer be allowed to connect.
Clients view
AirGroup
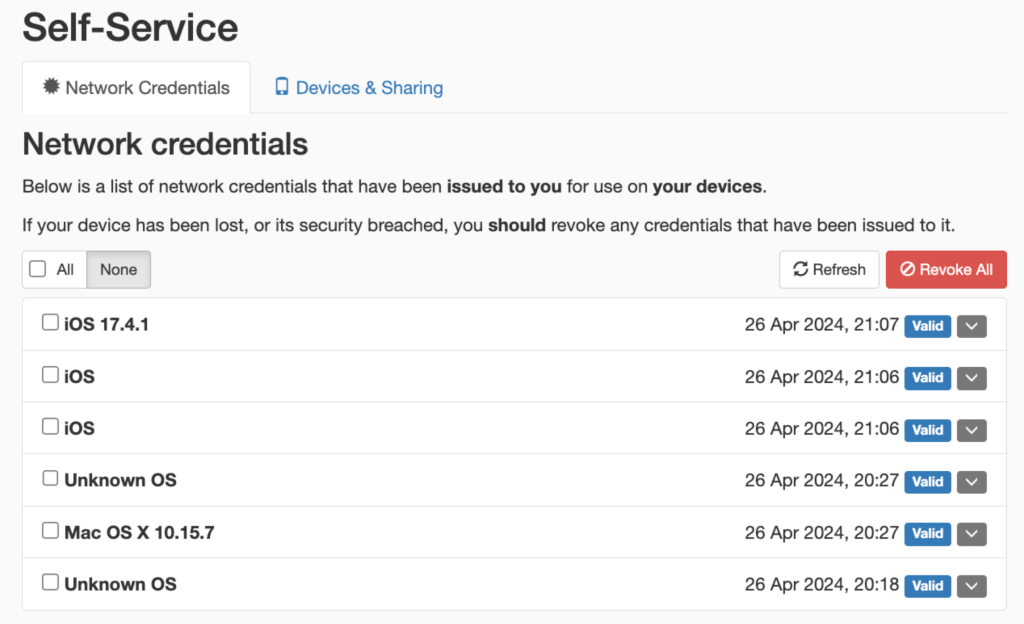
While I didn’t fully configure and test AirGroup for the purposes of the blog, I did enable it along with Personal device visibility and sharing to allow users to view their list of devices and setup sharing.
Here is what the Self-Service portal looks like:
Closing thoughts
Personal Wireless Networks are another great addition to the list of available options for getting users and devices connected to Wi-Fi.
As always, there is no ‘one-size-fits-all’ approach and your organisation or customers’ security policy & requirements should be considered to determine whether it is an appropriate solution to use for a particular use case.
For more information on Personal Wireless Networks, check out the webinar below:
“We’ve always done things this way”, is the most dangerous phrase in language, or so the quote goes.
I shelled out close to $10,000 (AUD) on Ekahau hardware and software a few years ago, and my current employer did the same, both before the release of the 6GHz capable Sidekick 2.
Needless to say, these were significant investments in a particular toolset, and so was the time spent building experience and workflows using that toolset.
Our customers have also grown accustomed to seeing designs presented in a certain way.
New kid on the block
Enter Hamina. Having recently released their Onsite survey software and matching hardware, they now have a complete solution that could be a viable alternative for us.
From a pure cost perspective, it is a no-brainer. We can easily pay for multiple years of licensing and the 6 GHz capable Oscium Nomad for less than the cost of a new Sidekick 2.
The bigger question is: can it do what we need it to?
Taking it for a spin
After kicking the tyres with the beta version almost 2 years ago, I had an opportunity to use Hamina Planner to create a predictive design for one of our customers. This was an ideal opportunity to do an internal evaluation and try out all of the new features that have been added.
When you have used any vendor’s technology for a decent length of time, it is easy to see everything through the lens of their way of doing things. I’ll be the first to admit you can get comfortable with what is familiar, but it’s important to stay as objective as possible during any evaluation.
Rather than looking for feature-by-feature parity, there may be a better way to achieve the same outcome or a completely different philosophy for that aspect of a design.
R is for Requirements
After remembering what was drilled into me in my early consulting days, I started with our requirements.
Here is a list of what would end up as deliverables in one of our typical predictive design reports (funnily enough, these are also all based on requirements!):
List the requirements our design was aiming to meet:
In-scope vs out-of-scope areas
Thresholds for each chart shown
Prove that our design met the requirements:
Primary and secondary signal strength
SNR
Data rates
Co-channel interference
Show how our design would meet those requirements:
AP name & placement
AP model
AP radio configuration (status, transmit power, channel width)
Mounting information & antenna direction
Go with the workflow
With that in mind, I set to work on a predictive design as I usually would: Importing and scaling a floor plan, defining in-scope vs out-of-scope areas, setting up coverage and capacity requirements, drawing walls and attenuation areas and finally, placing access points.
The user experience in Planner is lightning fast and I found myself getting less frustrated drawing zones and walls (it often used to take me a couple of attempts to define an irregularly shaped entire building area in AI Pro).
I also love the continuous approach to channel planning, as opposed to re-running it periodically.
It took me a little while to find a few settings, but overall the interface is very intuitive.
Coming to the Party
Before publishing this blog, I shared it with Grant Shelley from Hamina, who heads up Technical Operations for APAC. We exchanged a few emails and to cut a long story short I ended up on a Zoom call with the team in Finland where we had a great conversation about some of my feedback, the philosophy behind the technology and some exciting features that are in development.
It is exactly this sort of community engagement that makes working with the Hamina tools so awesome. I was blown away to even have a conversation about my feedback but never dreamed I’d be talking to the Founder / CEO and Technical director about it over Zoom.
Jussi was even kind enough to offer this screenshot as proof that it didn’t make all of this up!
Home comforts
I take my hat off to the Hamina product development team and the developers themselves for the pace and quality of new features released.
There are a few minor improvements that I would love to see in future updates, and I’m pleased to say that nearly all of them are already in development or under consideration in their feature request portal.
A couple of these were:
Being able to crop floor plan images (I’ve been told this feature is nearly ready!)
Being able to change the colour for scope zones
Reporting-as-code
On the call with Hamina, we talked about report customisation, and how it might work with something like markdown and variables to customise the presentation of data that is already in the tool.
That way, we could include all of our usual company fluff, customer or project-specific info, and dynamically reference design and configuration parameters without having to re-export a report, and scroll through and edit an external document after making a minor change.
On the subject of reporting, I was given permission to share a sneak preview of what could be the new AP Install Sheet! This will go a long way towards getting APs deployed correctly the first time.
Airtime is of the essence
Another thing we talked about on the call was airtime-based capacity planning.
While there is already client-count-based capacity modelling, it isn’t yet possible to define a list of their bandwidth requirements, and some key client types are missing (e.g. laptop running Windows).
The team assured me that having a Windows client in Planner was high on their to-do list and would be in there very soon.
In most office designs I’ve done recently, Microsoft Teams has been the most critical business application that relies on the wireless network (or at least the easiest for a customer to define). Understanding the required number of AP radios to achieve the total aggregate throughput for a mix of clients using Teams video according to the bandwidth requirements from Microsoft would be very useful indeed.
While this feature is useful in office-type designs, many engineers are happy with a more rudimentary client count per AP capacity metric. I’m sure this has something to do with the difficulty in nailing down specific device and throughput requirements.
Perhaps total-system throughput or per-AP uplink capacity would be more useful, especially in large public venue designs?
Will it blend?
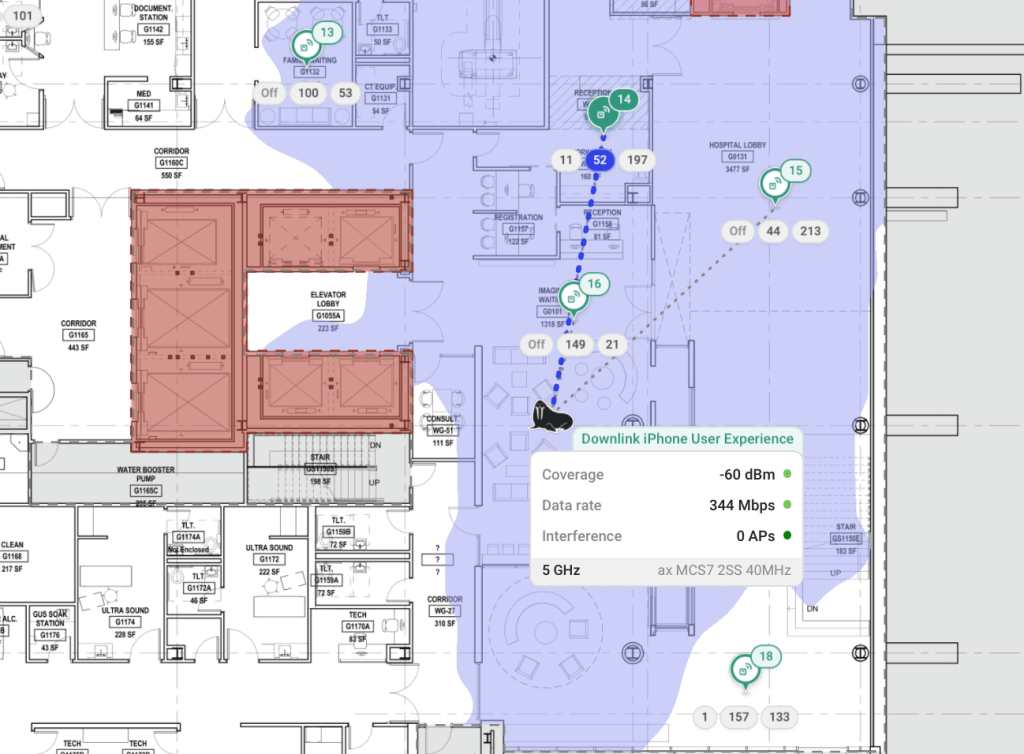
So, can Hamina Planner replace Ekahau AI Pro as my daily driver? My vote is a resounding yes, with a few downstream changes required.
One of the biggest differences is the way data is presented. Our current workflow involves exporting a .docx file and merging it into one of our standard document templates which includes antenna patterns, key specifications, project background etc.
In my opinion, one of Planner’s killer features (there are many!) is the ability to publish an interactive version of the report that customers can explore. So perhaps for us, we would include a smaller number of screenshots in our standard report template as a teaser for the full interactive design, accessible via a password-protected link.
Once customers realise they can move a walrus stick figure man around their office to see how clients might roam (another killer feature) I’m sure they won’t miss their old report full of almost identical-looking images.
Let’s be honest, that is way more fun than reading a PDF full of green floor plans. Who even makes it past the first 10 pages anyway?
Up next
In an upcoming post, I’ll take a similar look at Hamina Onsite.
In the meantime, check out Hamina planner for yourself – you can even do a predictive design for your house with the free version!